# eazyBackup Knowledge Base

<table data-card-size="large" data-view="cards"><thead><tr><th align="center"></th><th align="center"></th><th data-hidden data-card-target data-type="content-ref"></th></tr></thead><tbody><tr><td align="center">eazyBackup Guides</td><td align="center">Learn about eazyBackup and use our step-by-step instructions to help you get started.</td><td><a href="/pages/Pr7dVSaFDguTdrD3Ah27">/pages/Pr7dVSaFDguTdrD3Ah27</a></td></tr><tr><td align="center">e3 Object Storage</td><td align="center">Learn about our S3 Compatible Object Storage, and follow our step-by-step backup guides to help you get started.</td><td><a href="/pages/Y3LesVHPeuTwjCGIEzwe">/pages/Y3LesVHPeuTwjCGIEzwe</a></td></tr><tr><td align="center">eazyBackup Documentation</td><td align="center">The Documentation section houses detailed walkthroughs, configuration details, and in-depth technical resources.</td><td><a href="/pages/0MydpnJMsbJTLtduc6Vz">/pages/0MydpnJMsbJTLtduc6Vz</a></td></tr><tr><td align="center">eazyBackup Troubleshooting</td><td align="center">The Troubleshooting section provides solutions to common issues and errors you may encounter while using our cloud backup service.</td><td><a href="/pages/yyPaRFtGcArq6PbL9aEQ">/pages/yyPaRFtGcArq6PbL9aEQ</a></td></tr><tr><td align="center">FAQs</td><td align="center">Our FAQs section addresses common inquiries about features, pricing, and setup for our cloud backup service.</td><td><a href="/pages/Dxdkqa4MMB6NJY1py1mF">/pages/Dxdkqa4MMB6NJY1py1mF</a></td></tr><tr><td align="center">eazyBackup Re-branding Guide</td><td align="center">This guide is aimed at system administrators and/or MSP (Managed Service Provider) partners to help configure their custom backup client and control panel branding options</td><td><a href="/pages/uz8B6hURq7df7oyuJ6Et">/pages/uz8B6hURq7df7oyuJ6Et</a></td></tr></tbody></table>


# Guides


# Getting Started Guide

{% embed url="<https://eazybackup.com/wp-content/uploads/2019/09/eazyBackup-Getting-Started-Guide.mp4?_=1>" %}

This article outlines the steps to create a scheduled file backup job with eazyBackup.

**Log into the eazyBackup client**

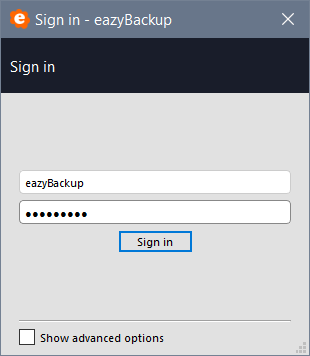
Open eazyBackup and login to the client user interface with your chosen account username and password.\
\
You can find your backup account username and reset the account password within the [client area](https://eazybackup.ca/accounts) from **Backup Accounts -> Manage Accounts**.

<div align="center"><img src="https://eazybackup.com/wp-content/uploads/2019/09/Backup-interface-login.png" alt="" width="375"></div>

\
**Backing up (Files and Folders)**\
The first step in backing up your files is to create a "Protected Item".

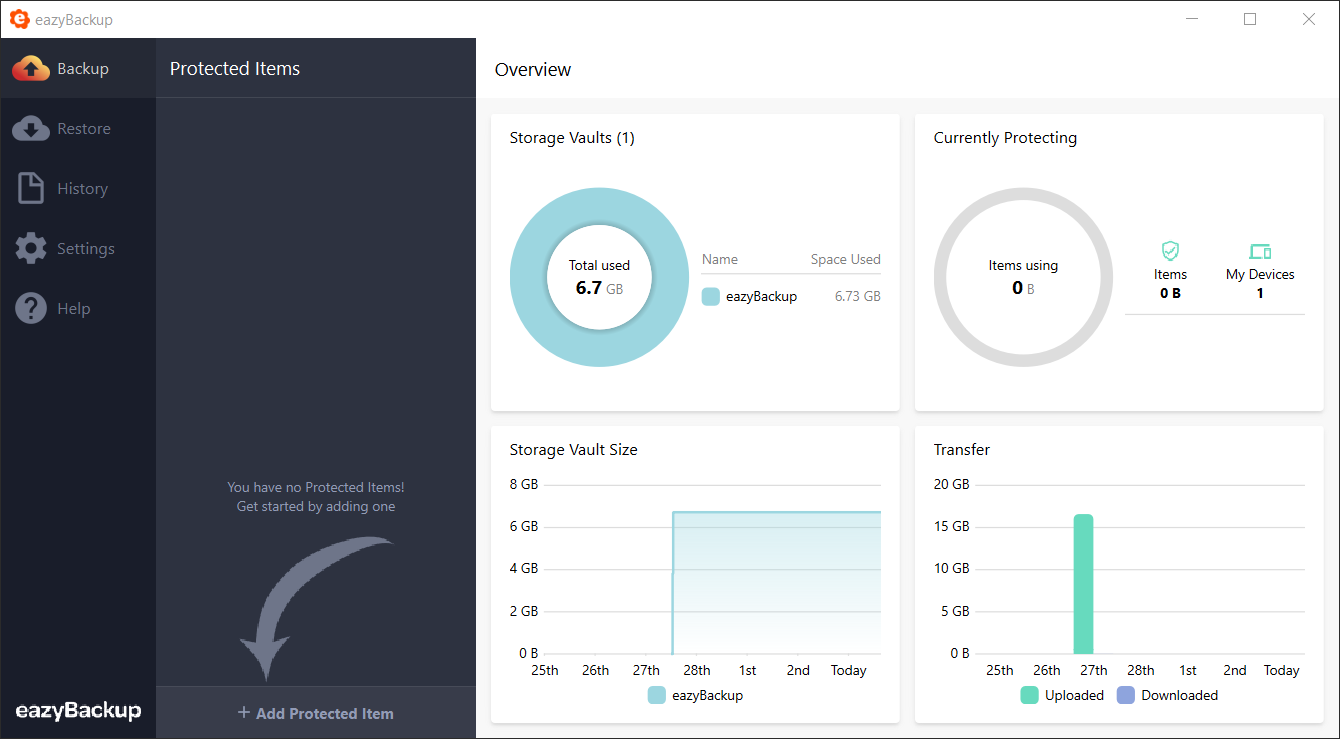
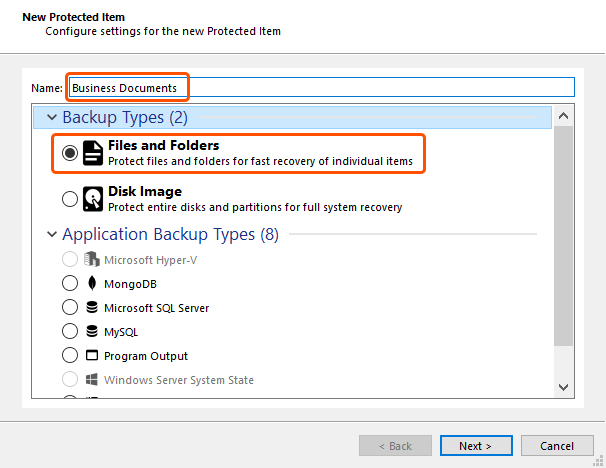
Go to the "Backup" tab and click "+ Add Protected Item". Name this Protected Item and choose the "Files and Folders" for backup "Type".

<div data-full-width="true"><img src="https://eazybackup.com/wp-content/uploads/2019/09/eazyBackup-Interface.png" alt="" width="563"></div>

\
**Select the type of backup**\
Name the new Protected Item and choose "Files and Folders" for the Backup Type.&#x20;

<figure><img src="https://eazybackup.com/wp-content/uploads/2019/09/Backup-Interface-Select-Protected-Item.png" alt="" width="563"><figcaption></figcaption></figure>

\
**Select items to backup**\
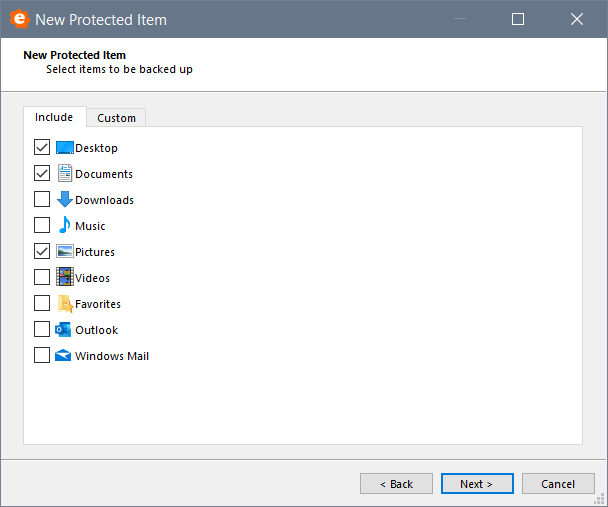
Add the items you would like to include in your backup.

<img src="https://eazybackup.com/wp-content/uploads/2019/09/Backup-Interface-Select-Backup-Items.png" alt="" width="563">

**Schedules**\
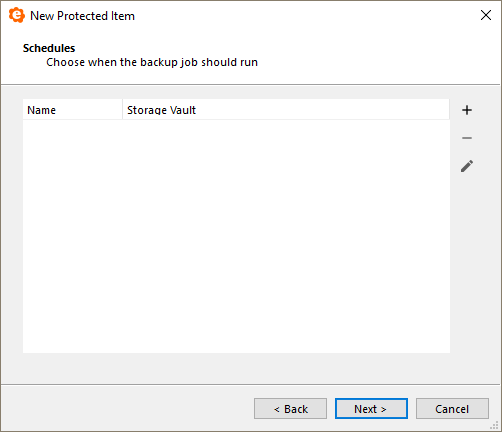
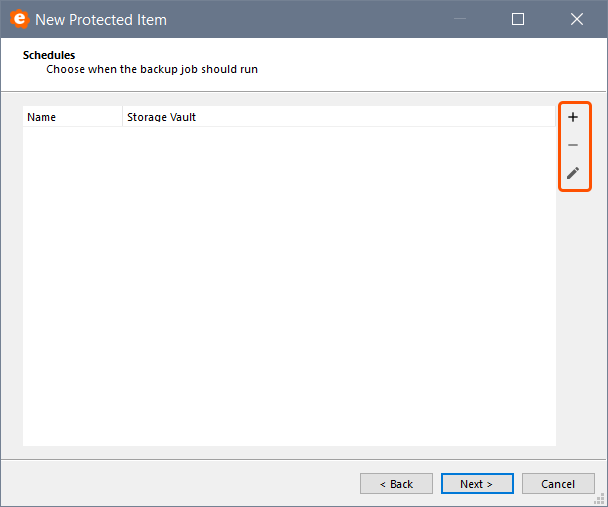
eazyBackup can run backup jobs automatically on a schedule. It is recommended to automate your backups on a regular schedule.

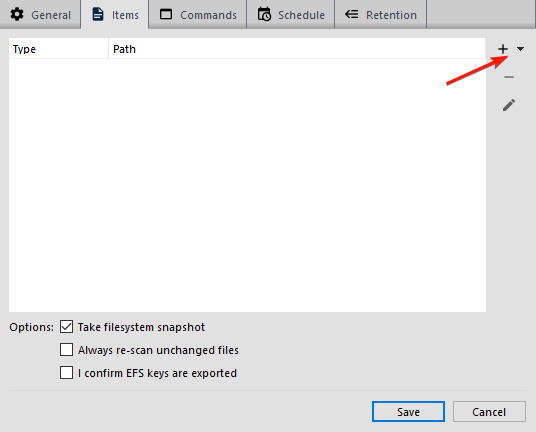
Click the "+"  button to add a new schedule.
<img src="https://eazybackup.com/wp-content/uploads/2019/09/Backup-Interface-Schedule-Step-1.png" alt="" width="563">

**General Schedule Options**

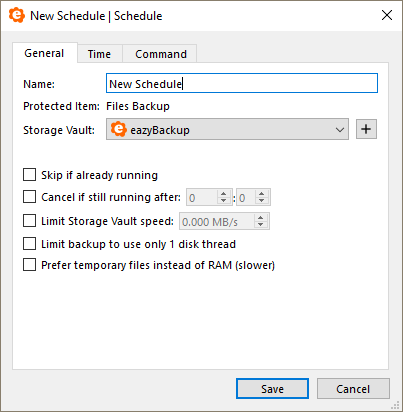
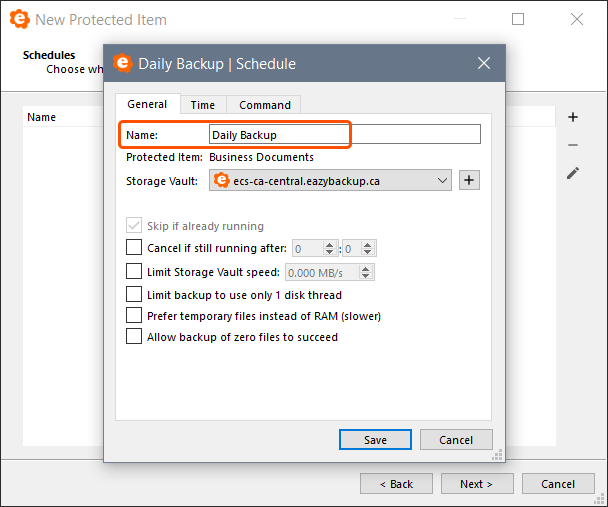
From the 'General' tab enter a name for the new schedule. You can have multiple schedules for a single protected item, for this reason it helps to give it a name.

When a schedule is due to run, the backup job will run automatically to the selected Storage Vault.

You can also configure advanced backup runtime options, such as the following:

* **Skip if already running**. If this option is enabled, and another backup job is known by the Server to exist for the same Protected Item and Storage Vault in "Running" status, then this backup job will be skipped. Skipping a backup job creates a log entry for the job in "Skipped" status.
* **Cancel if still running after**. If the backup job exceeds this time limit, the backup job would be cancelled.
* **Limit Storage Vault Speed**. This option allows you to limit the total speed to the Storage Vault. The speed limit applies to the total combined read/write bandwidth.
* **Limit backup to use only 1 disk thread**. eazyBackup uses multithreading to improve performance. On some machines, this can impact PC performance. If you are experiencing low system performance while the backup job is running, you can try to enable this option.
  <figure><img src="https://eazybackup.com/wp-content/uploads/2019/09/Backup-Interface-Schedule-Step-2.png" alt="" width="563"><figcaption></figcaption></figure>

\
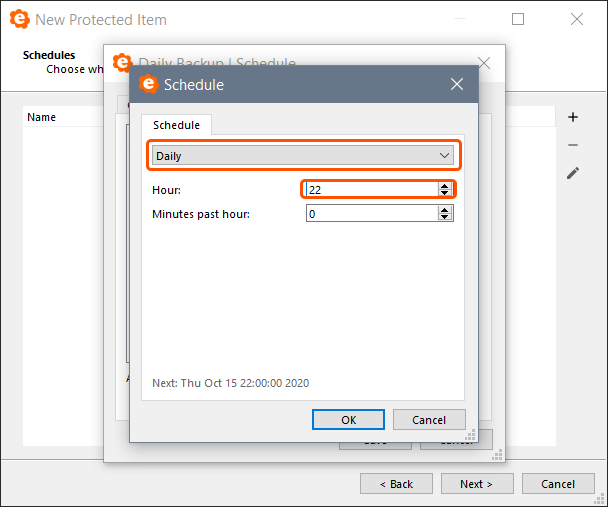
**Schedule times**

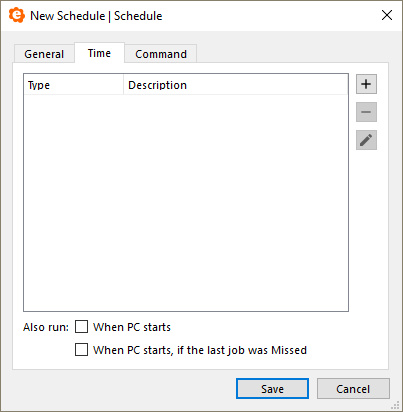
You can configure the times when this schedule will be executed. You can add multiple times to the same schedule.

The available time-based schedule frequencies are:

* **Hourly**. The schedule would run every hour. You can choose the minutes past the hour.
* **Daily**. The schedule would run every day. You can choose the time of day (hours/minutes). The hours are specified in 24-hour time, from 0 to 23.
* **Weekly**. The schedule would run every week. You can choose the day of the week, and the time of day (hours/minutes).
* **Monthly**. The schedule would run every month.
* **Once only**. The schedule would run only when the specified date and time is reached.

The available event-based schedule frequencies are:

* **Also run when PC starts**. The schedule would be initiated immediately after the PC boots.
* **Also run when PC starts, if the last job was Missed**. The schedule would be initiated immediately after the PC boots if the last backup job for this Protected Item and Storage Vault pair was in Missed status. This allows you to "catch up" missed backups for PCs that are only online at irregular intervals (e.g., laptops).

<img src="https://eazybackup.com/wp-content/uploads/2019/09/Backup-Interface-Schedule-Step-4.png" alt="" width="563">

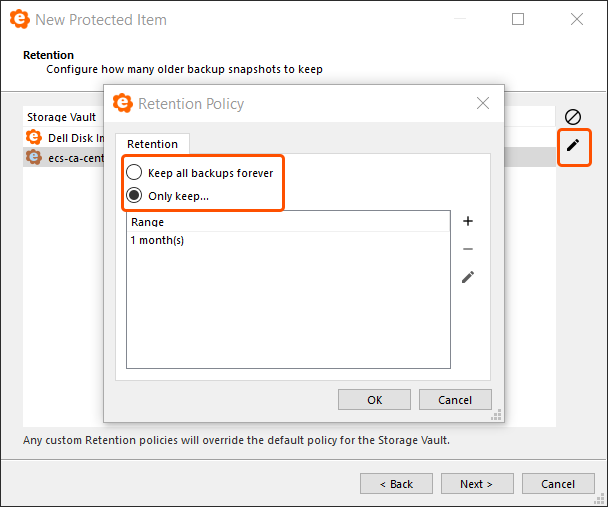
**Retention**

"Retention" is the concept of classifying backed-up data, to determine what data should be kept, and what data can be safely removed.

You may choose to keep the last 30 days of backed-up data, or all data from the last 100 backup jobs; but any data older than this is unlikely to be useful and can be safely removed.
<img src="https://eazybackup.com/wp-content/uploads/2019/09/Backup-Interface-Retention.png" alt="" width="563">

**Start your first backup**

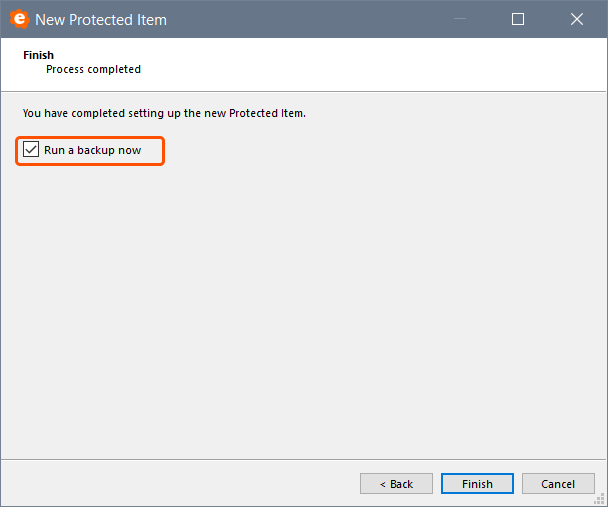
Click "Finish" to complete the setup wizard. You can also choose to check the box to run your first backup immediately.
<img src="https://eazybackup.com/wp-content/uploads/2019/09/Backup-Interface-Run-Backup.png" alt="" width="563">

***

[eazyBackup](https://eazybackup.com)


# Creating Protected Items

**Add New Protected Item**

***

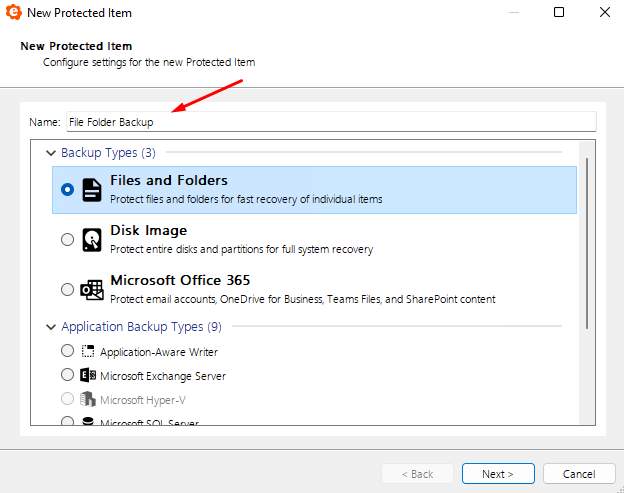
* Start by adding a new Protected Item, you can enter a brief name describing what data is being backed up in the "Description" field.
* Select which type of data is to be protected.
<img src="https://eazybackup.com/wp-content/uploads/2019/09/protected_item_step_1.png" alt="" width="563">

\
**Select Items to Backup**

***

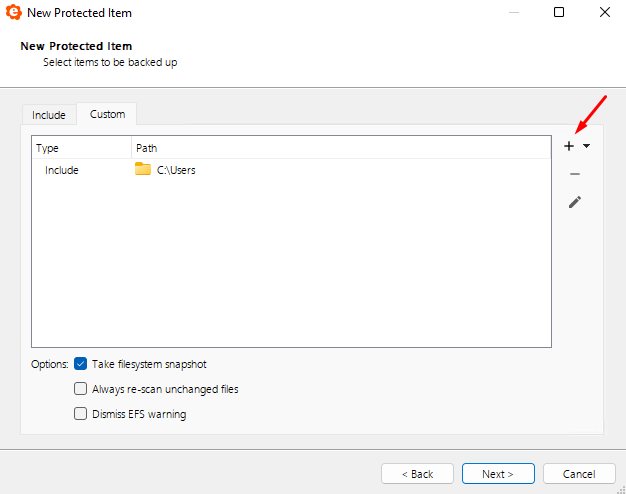
Choose items you would like to include in the Protected Item. For file and folder backups, you can use either the quick selection menu or the custom file selection depending on your needs.
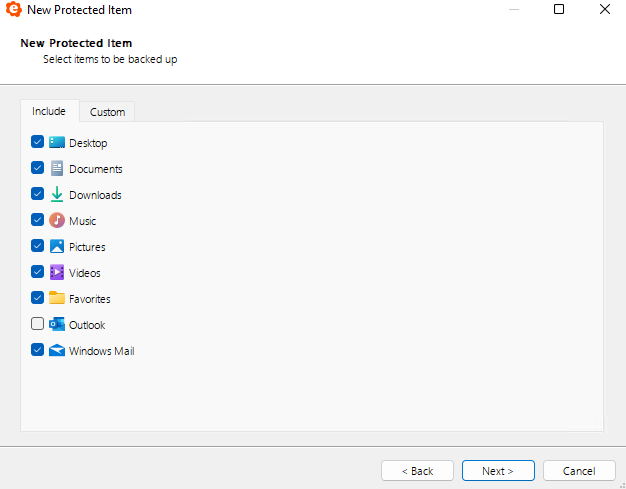
<img src="https://eazybackup.com/wp-content/uploads/2019/09/protected_item_include_quick.png" alt="" width="563">

<img src="https://eazybackup.com/wp-content/uploads/2019/09/protected_item_include_custom.png" alt="" width="563">

**Commands (Protected Item)**&#x20;

***

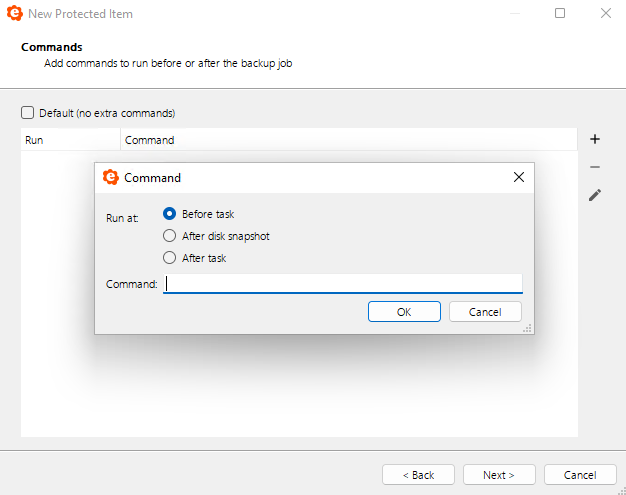
You can optionally configure Commands that run before or after the Protected Item is backed up.

The Commands feature on a Protected Item works the same way as for Commands on a Storage Vault or on a Schedule. For more information about the Commands feature, please see the [Commands Article](/documentation/commands) .

{% content-ref url="/pages/L7Q3LJw9lYmaVpKnkEgO" %}
[Commands](/documentation/commands)
{% endcontent-ref %}

The default is no extra commands, only enable this option if you have a specific use case. Please contact support if you would like assistance creating before / after commands.
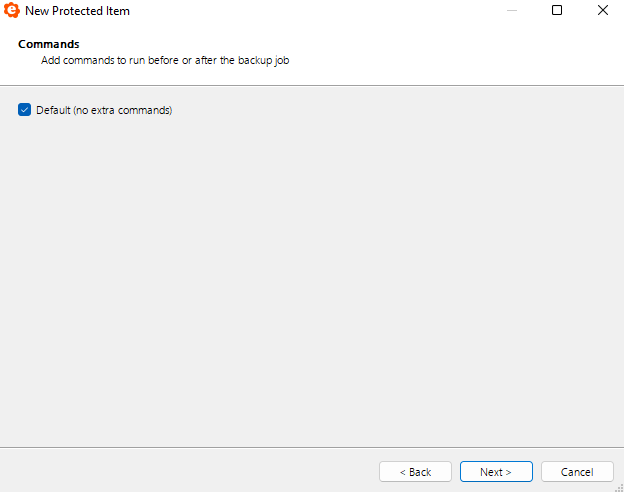
<img src="https://eazybackup.com/wp-content/uploads/2019/09/protected_item_no_commands.png" alt="" width="563">

<img src="https://eazybackup.com/wp-content/uploads/2019/09/protected_item_commands.png" alt="" width="563">

\
**Schedules**&#x20;

***

<img src="https://eazybackup.com/wp-content/uploads/backup-interface_TflXdix4OD.png" alt="" width="563">

eazyBackup can run backup jobs automatically on a schedule. It is strongly recommended to automate your backups on a regular schedule.

Click the "+" button to add a new schedule and create a friendly name for the schedule.

**General Schedule options**&#x20;

<img src="https://eazybackup.com/wp-content/uploads/backup-interface_7VvC9R5aHn.png" alt="" width="563">

When a schedule is due to run, the backup job will run automatically to the selected Storage Vault.

You can also configure advanced backup runtime options:

* **Skip if already running**. If this option is enabled, and another backup job is known by the eazyBackup Server to exist for the same Protected Item and Storage Vault in "Running" status, then this backup job will be skipped. Skipping a backup job creates a log entry for the job in "Skipped" status.
* **Cancel if still running after**. You can set a time limit for the backup job. If the backup job exceeds this time limit, the backup job would be cancelled.
* **Limit Storage Vault Speed**. This option allows you to limit the total speed that eazyBackup reads and writes to the Storage Vault. The speed limit applies to the total combined read/write bandwidth.
* **Limit backup to use only 1 disk thread**. When reading multiple files from the local disk for backup, eazyBackup uses multithreading to improve performance. On some machines, this can impact PC performance. If you are experiencing low system performance while the backup job is running, you can try enabling this option to see if it resolves the issue.

**Schedule times**&#x20;

<img src="https://eazybackup.com/wp-content/uploads/backup-interface_GwYCpEpkqw.png" alt="" width="563">

You can configure the times when this schedule will be executed. You can add multiple times to the same schedule.
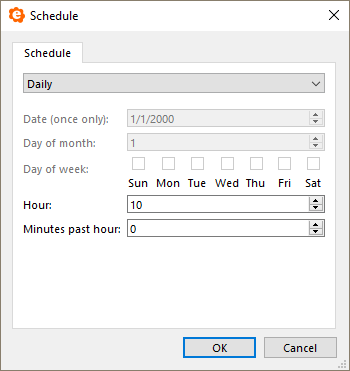
<img src="https://eazybackup.com/wp-content/uploads/backup-interface_NhmpKHVUsq.png" alt="" width="563">

The available time-based schedule frequencies are:

* **Hourly**. The schedule would run every hour. You can choose the minutes past the hour.
* **Daily**. The schedule would run every day. You can choose the time of day (hours/minutes). The hours are specified in 24-hour time, from 0 to 23.
* **Weekly**. The schedule would run every week. You can choose the day of the week, and the time of day (hours/minutes). You can choose multiple days of the week.
* **Monthly**. The schedule would run every month.
* **Once only**. The schedule would run only when the specified date and time is reached.

If the device is online, eazyBackup will try to run the backup job. If the device is not online, or the backup job could not be started, a "Missed" job will show in the backup job log.

The available event-based schedule frequencies are:

* **Also run when PC starts**. The schedule would be initiated immediately after the PC boots.
* **Also run when PC starts, if the last job was Missed**. The schedule would be initiated immediately after the PC boots if the last backup job for this Protected Item and Storage Vault pair was in "Missed" status. This allows you to "catch up" missed backups for PCs that are only online at irregular intervals (e.g. laptops).

The time that the "PC starts" is defined as follows: the time that the eazyBackup background service started, if the system uptime is less than 10 minutes. *(This definition is subject to change.)*

**Commands (Schedule)**&#x20;

You can configure Commands that run before/after this Schedule runs.

The Commands feature on a Schedule works the same way as for Commands on a Protected Item or on a Storage Vault. For more information about the Commands feature, please see the [Commands Article](/documentation/commands).

{% content-ref url="/pages/L7Q3LJw9lYmaVpKnkEgO" %}
[Commands](/documentation/commands)
{% endcontent-ref %}

**Retention (Protected Item)**&#x20;

***

On the Retention tab, you can configure a retention policy to apply when backing up this Protected Item to a specific Storage Vault. If no policy is configured for a specific Storage Vault, the default retention policy for the Storage Vault will apply.

***

[eazyBackup](https://eazybackup.com)


# How to Backup Windows Network Shares and UNC Paths

eazyBackup can back up Windows network shares (SMB), however, because eazyBackup runs as a background service user, there are some issues with authentication to be aware of.

{% hint style="info" %}
When possible, the best option would be to to install eazyBackup directly on the device rather than backing up over the network.
{% endhint %}

**Network Authentication**<br>

On Windows, your logged-on user session may have its own mapped network drives. These mapped drives belong to your logged in user session and are not available to background service accounts.

Most UNC shares will require network authentication. If your backup logs show messages like WARNING Lstat: CreateFile \\\\?\UNC\\...: Access is denied., this is likely because the eazyBackup service account is not logged into your network shares.

We will show you how to configure the backup with network authentication to avoid these issues.

#### Here are the steps:

Add a new Protected Item or modify an existing file and folder protected item.
<figure><img src="/files/p5zEZE2mmNsGuJhz4nyG" alt=""><figcaption></figcaption></figure>

Name the Protected Item and select the "Files and Folders" backup type and then proceed to the next step

<figure><img src="/files/hg6eSwacGrdjhWZtXXi9" alt=""><figcaption></figcaption></figure>

#### Configure the network share authentication:

Select the 'Custom' tab, Click the "ellipsis" button to reveal the extra options and select "Log in to network share"

<figure><img src="/files/Natuoka0wputcHu405Sy" alt=""><figcaption></figcaption></figure>

1. Enter the UNC path to your network share
2. Enter the username of an account that has permission to access the network share
3. Enter the password for your network account
4. Test Connection before you proceed.&#x20;

<figure><img src="/files/mNq6oEkxDkSXOa6iHLlH" alt=""><figcaption></figcaption></figure>

```
UNC path
\\server-name\shared-resource-pathname 
```

{% hint style="info" %}
When adding the Username, in some cases you may need to specify the network name of the server before the username in this format

`myservername\Username`
{% endhint %}

#### Select files from your network share to include in your backup:

Click the "+" button to open the Select panel.

<figure><img src="/files/dZyZIm70GwHYVL0c0ztM" alt=""><figcaption></figcaption></figure>

Click the "Options" button, select "Browse UNC path".

<figure><img src="/files/Cvs1dvvQ3mkMR93Ae0NU" alt=""><figcaption></figcaption></figure>

Type the UNC path to your network share, be sure to use the format shown below and don't forget the trailing slash.

click "OK".&#x20;

<figure><img src="/files/iTHhHzGdgBTxZMlc2Ps4" alt=""><figcaption></figcaption></figure>

* Your network share should now appear in the list of items
* Browse the directory tree and select the files and folders you want included in the backup.&#x20;

<figure><img src="/files/deLy7KRSYoiPhZ0hNisa" alt=""><figcaption></figcaption></figure>

{% hint style="info" %}
At this point, if your network share is not visible in the list of items, you may have incorrectly entered the share username, password or UNC path.&#x20;
{% endhint %}

Before you proceed check the following:&#x20;

* You should see your network credentials listed here.
* Any files or folders you selected for backup should be listed.&#x20;

<figure><img src="/files/lXdtxJxpO9PrTomedEpL" alt=""><figcaption></figcaption></figure>

Optionally, run the backup job immediately or allow the backup run according to the schedule you configured.&#x20;

<figure><img src="/files/1CEhgZG4Rxm4K2oaoBXa" alt=""><figcaption></figcaption></figure>

***

[eazyBackup](https://eazybackup.com)


# How to Restore Files and Folders

Restoring any type of Protected Item can be done from either the desktop application or the online Control Panel.

{% hint style="info" %}
The online Control Panel can only be used to restore data to the computer where the desktop application is installed, and the device must be online.
{% endhint %}

**Restoring Files and Folders using the Desktop Application and the Control Panel**

{% embed url="<https://eazybackup.com/wp-content/uploads/2019/09/How-to-restore-files-and-folders.mp4?_=1>" %}

Follow these steps to restore files/folders:

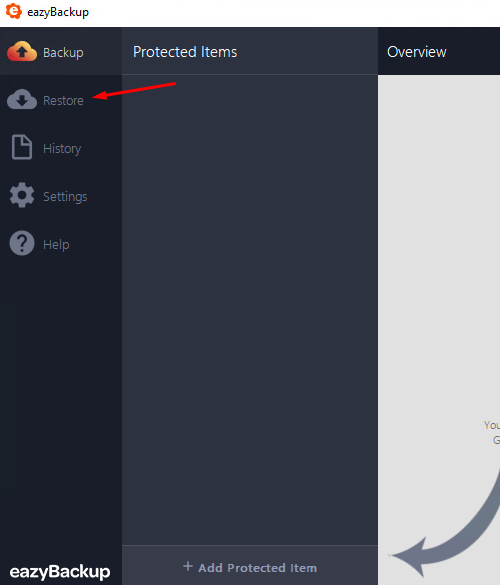
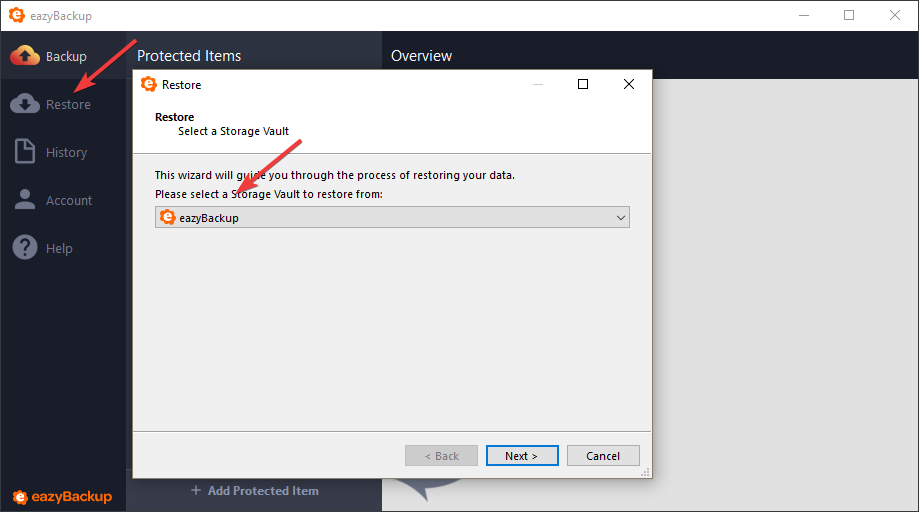
1. Click the "Restore" button in the left-hand menu bar
2. Select the Storage Vault containing the backed-up data and click "Next"

   <figure><img src="https://eazybackup.com/wp-content/uploads/backup-interface_EtLt3uDJkL.png" alt=""><figcaption></figcaption></figure>
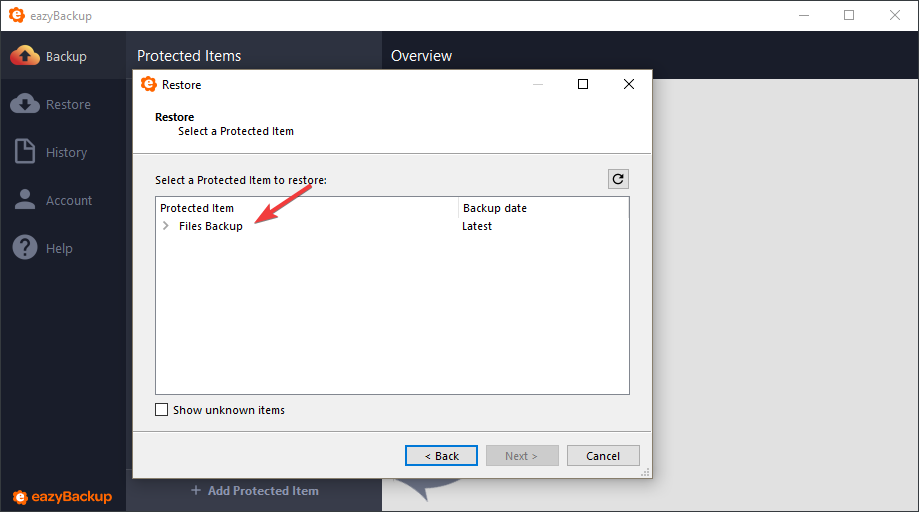
3. Select the Protected Item that you want to restore and click "Next"

   * (Optional) Click the Caret to Unfold the Protected Item, this will allow you to pick from a history of available backups.

   <figure><img src="https://eazybackup.com/wp-content/uploads/backup-interface_kRODHeqku7.png" alt=""><figcaption></figcaption></figure>
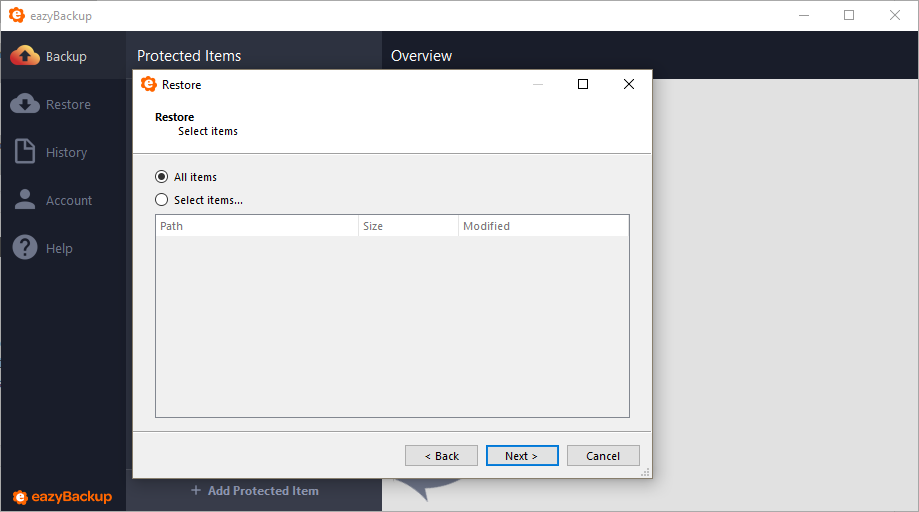
4. Select which files to restore and click "Next"<br>

   * (Optional) By default, all files are restored. You can use the "Choose files" radio option to select individual files or folders to restore.
   <figure><img src="https://eazybackup.com/wp-content/uploads/backup-interface_rZn7Gmlxjq.png" alt=""><figcaption></figcaption></figure>
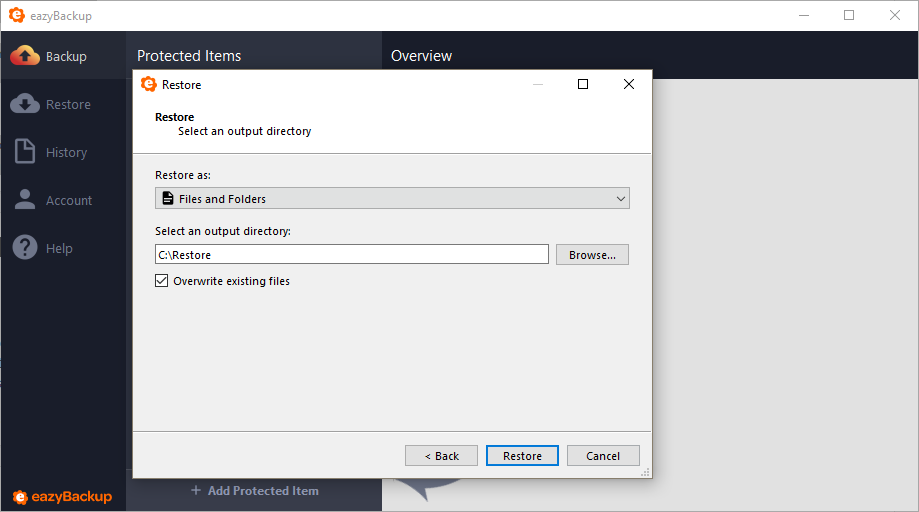
5. Select the destination path to restore to and click "Next"

   <figure><img src="https://eazybackup.com/wp-content/uploads/backup-interface_apJ5ruW6Ys.png" alt=""><figcaption></figcaption></figure>

The restore job will start within the main window interface.

***

[eazyBackup](https://eazybackup.com)


# Disk Image Backup Guide

This is a walkthrough to help you create Disk Image backup.

* Disk Image backups will deduplicate with other data existing inside your Storage Vault. For example, backing up Files and Folders and performing a Disk Image backup from the same hard drive will deduplicate, and provide you with a valuable storage savings.
* If you are looking for technical information on the Disk Image backup type, please see this article: [Disk Image Backup](/documentation/disk-image-backup).

{% content-ref url="/pages/j5BHxb3gavrTqgnT8MVm" %}
[Disk Image Backup](/documentation/disk-image-backup)
{% endcontent-ref %}

{% embed url="<https://eazybackup.com/wp-content/uploads/2023/03/Disk-Image-Backup.mp4?_=1>" %}

### **Use the following steps to create a Disk Image backup:**

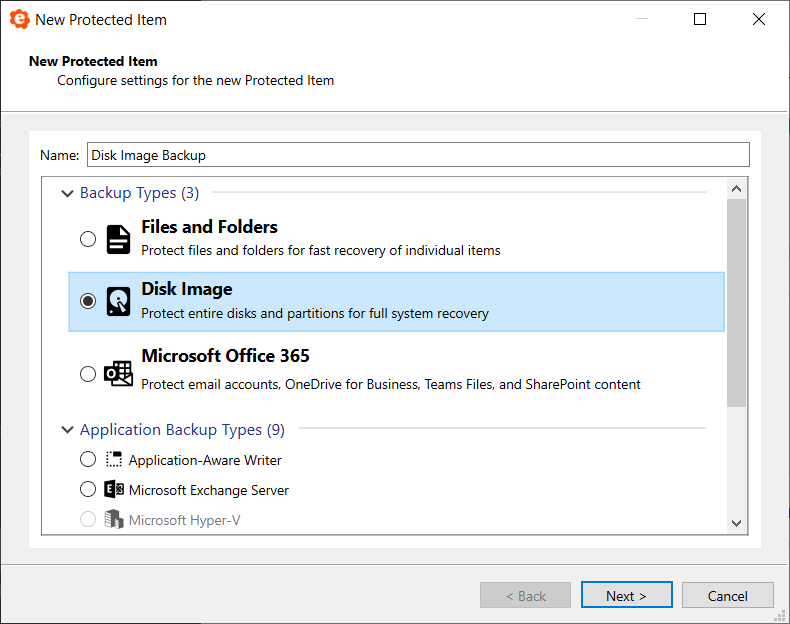
**Add a new Protected Item, select the Disk Image backup type**

<img src="https://eazybackup.com/wp-content/uploads/2023/03/Disk-Image-Protected-Item.png" alt="" width="563">

{% hint style="info" %}
Note: You need to have purchased a backup plan that includes the Disk Image feature in order to create a Disk Image Protected Item.
{% endhint %}

**Select the disk that will be included in the backup**
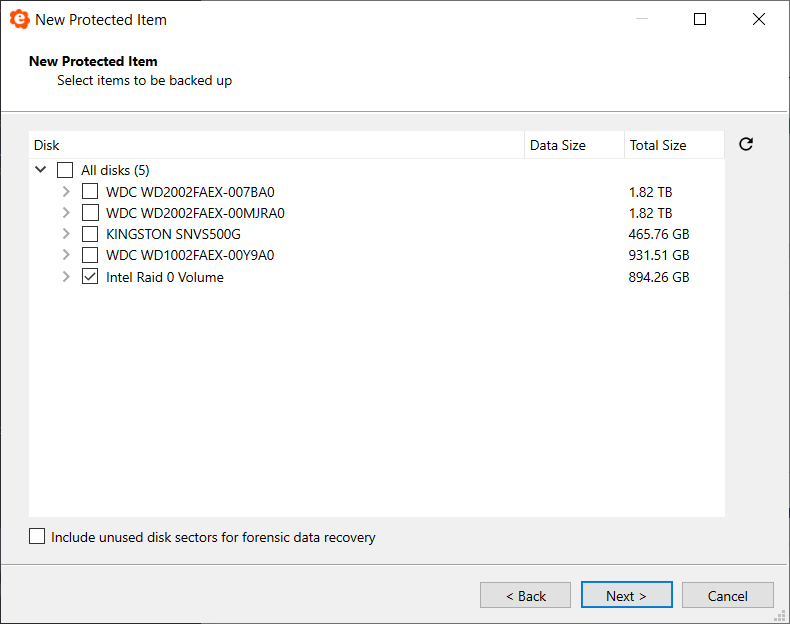
<img src="https://eazybackup.com/wp-content/uploads/2023/03/Disk-Image-Protected-Item-Partition-Selection.png" alt="" width="563">

{% hint style="info" %}
After creating a Disk Image backup, if any changes are made to the partition table of the selected disk, the disk ID may change and eazyBackup will not recognize the disk. \
\
You will receive a warning that the drive can no longer be found and you will need to reselect the drive and/or partitions.
{% endhint %}

<mark style="color:orange;">**Advanced Option: Include unused disk sectors for forensic data recovery**</mark><mark style="background-color:blue;">**​**</mark>

By default unused space from the disk will be excluded from the backup, enabling this option will include any non-indexed and marked-as-deleted files in the free space. This could be used for forensic data recovery, but keep in mind that it will lengthen the backup time.

***

[eazyBackup](https://eazybackup.com)


# Disk Image Backup Restore Guide

Disk Image backup protects a complete disk or individual partitions and allows you to restore the backup to bare metal in the event of a disk failure.

Boot your Workstation / Server with the eazyBackup [USB recovery media](#create-usb-recovery-media) and restore disks or partitions without requiring temporary spool space.&#x20;

The Disk Image can be restored to dissimilar hardware if needed.

Disk Image Backups can be performed to multiple destinations, such as a local storage device in addition to cloud storage. Having a local, onsite backup will reduce the time needed restore large backups and offers additional redundancy.

#### Disk Image Backup

The demo video shows how a typical Windows PC can be backed up using the Disk Image Protected Item type

{% embed url="<https://eazybackup.com/wp-content/uploads/2021/09/Disk-Image-Backup.mp4?_=1>" %}
#### Disk Image Restore

The demo video below shows the restore process using the USB bootable recovery media. The system is booted from the USB media and the system disk is restored directly from cloud storage.

{% embed url="<https://eazybackup.com/wp-content/uploads/2021/09/Disk-Image-Restore.mp4?_=2>" %}

#### Restore options

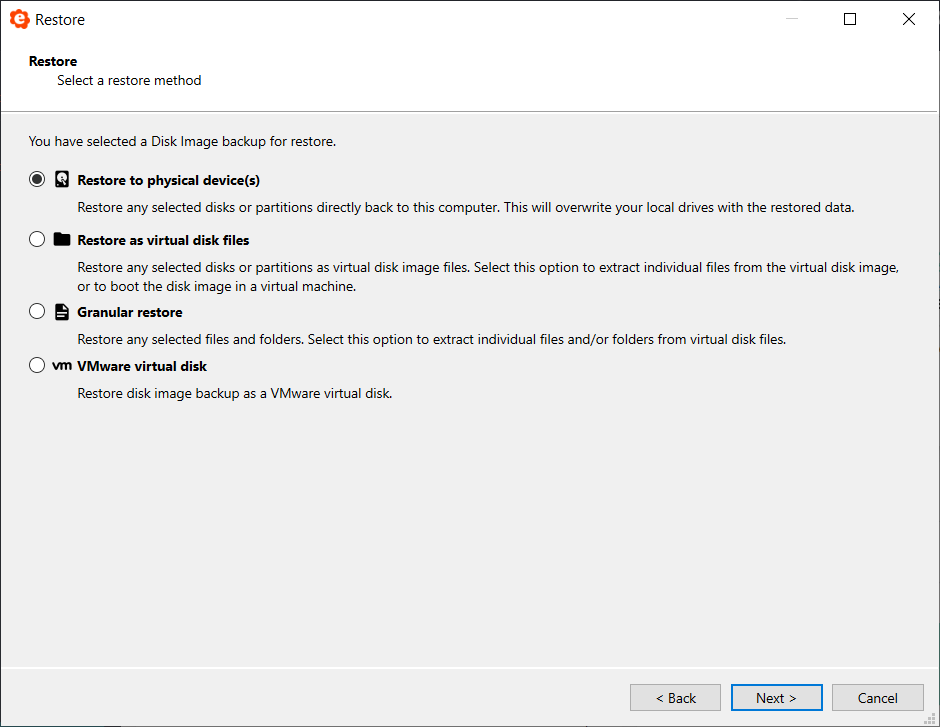
The Restore wizard inside eazyBackup allows restoring of backed-up disks and partitions directly to physical disks and partitions, without requiring temporary spool space. Alternatively, it can be restored as virtual disk files.

<img src="https://eazybackup.com/wp-content/uploads/2021/09/disk_image_restore_options.png" alt="" width="563">

eazyBackup stores the Disk Image files in VMDK format, from which single files can be extracted.

#### Restore to physical device(s)

In order to restore to physical hardware, the target disk or partition should be unmounted (not in use). eazyBackup may be able to do this automatically from within the currently booted OS if no programs are using the target drive (e.g. for a non-boot drive).

* If the goal is to restore to the boot drive, first, reboot the PC into a recovery environment.
* When restoring a smaller partition into a larger one, eazyBackup will automatically extend the restored filesystem to the fill the target partition. eazyBackup does not support restoring a large backed-up partition into a smaller physical partition. The partition must be shrunk using the OS’s partition manager prior to performing the backup.

**Restore from Windows boot environment**

1. Select a backed-up disk or partition to restore, from the left-hand column
2. Select a target disk or partition to write to, from the right-hand column
3. Click the *Add to restore queue* button
4. Repeat steps 1-3 as necessary for other disks and partitions
5. Click the *Restore* button to begin the restore job
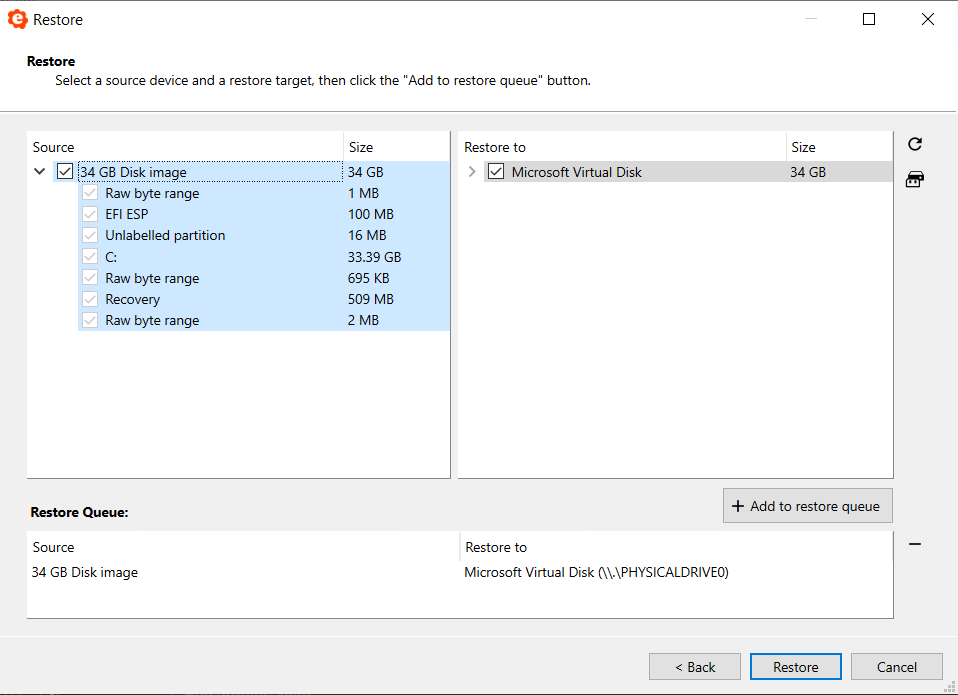
<img src="https://eazybackup.com/wp-content/uploads/2021/09/disk-image-restore-to-physical-disk.png" alt="" width="563">

{% hint style="info" %}
The *Edit* function can be used to re-partition the local drives using Windows Disk Management. After doing so, the *Refresh* function may be used to refresh the view of the local disks and partitions able to be selected for restore.
{% endhint %}

**Restore from Linux boot environment**

Steps to restore an entire disk, without spooling:

1. Restore just the `disk.vmdk` file (without the data extents), and open it in a text editor in order to read the partition sizes.
2. Recreate partitions to the exact target size
3. Single partitions can be restored without any local spool disk, using the "Program Output" restore option, and selecting only a single partition file for restore: `dd of=/dev/sdx1 bs=8M`

#### Restore Disk Image as virtual disk files

There is one plain text VMDK descriptor file containing metadata about the whole drive, plus separate raw image files for each partition’s extent on the disk. The plain text file is labelled `disk.vmdk` by default.

Partitions of the disk that were not selected for backup are represented as zero extents in the VMDK descriptor file. The effect of this is that the restored disk image will appear to have the full disk size, even if only a small amount of partitions inside it were selected. However, the zero extents will be compressed inside the Storage Vault.
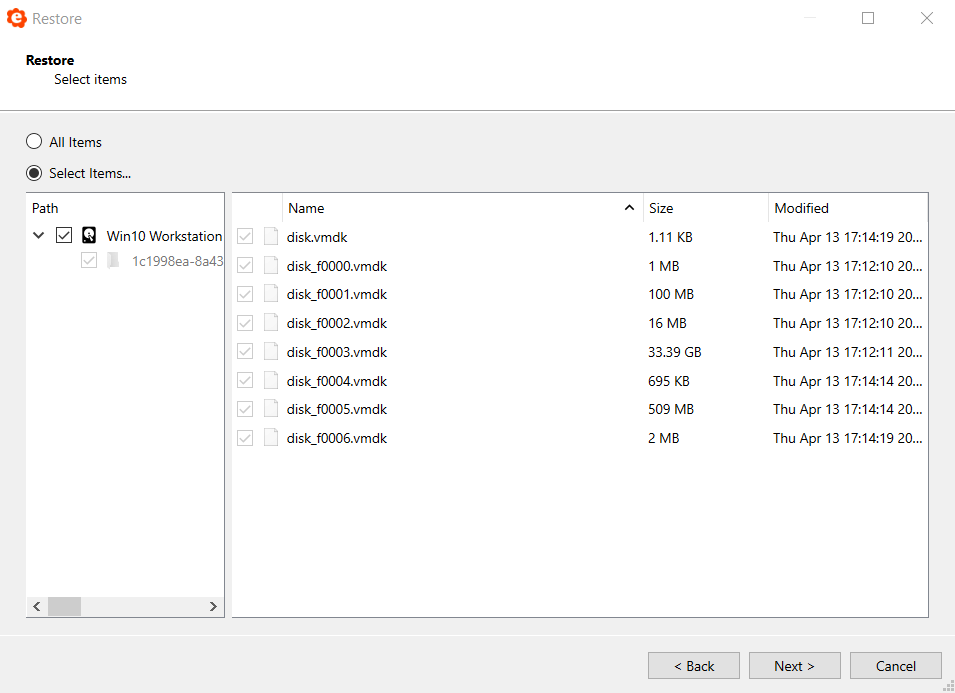
<img src="https://eazybackup.com/wp-content/uploads/2021/09/disk-image-restore-to-vmdk-files-1.png" alt="" width="563">

The VMDK disk images may be restored, then, optionally, do one of the following:

* Extract single files from them, or
* Recover to a local virtual machine, or
* Recover to a cloud server

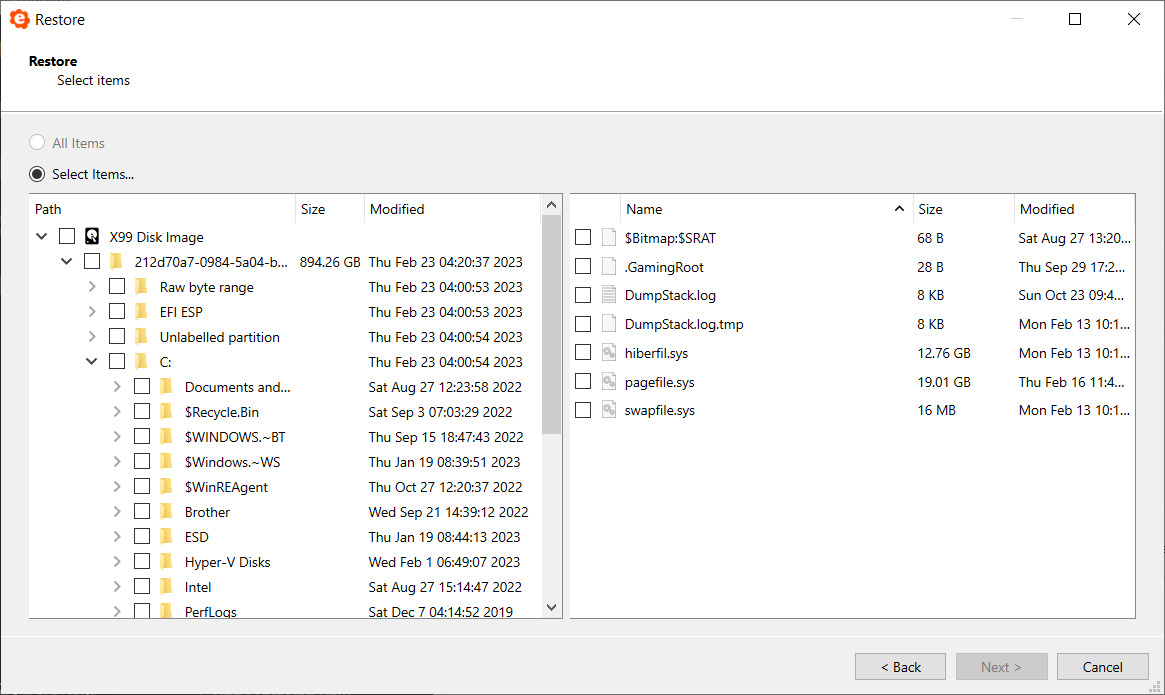
#### Restore files and folders from Disk Image

This feature allows a customer to browse the filesystem in a Disk Image backup and restore files and/or folders without downloading the whole VMDK disk image in advance. Currently this feature is supported for the NTFS.
<img src="https://eazybackup.com/wp-content/uploads/2021/09/Disk-Image-File-Folder-Restore.png" alt="" width="563">

#### VMware virtual disk​

Starting from version 23.9.5, there's a new feature for disk image backup. Now, you can restore your disk image backup as a virtual disk that works with VMware. This means you can use it in VMware without needing to change anything.

#### Create USB Recovery Media

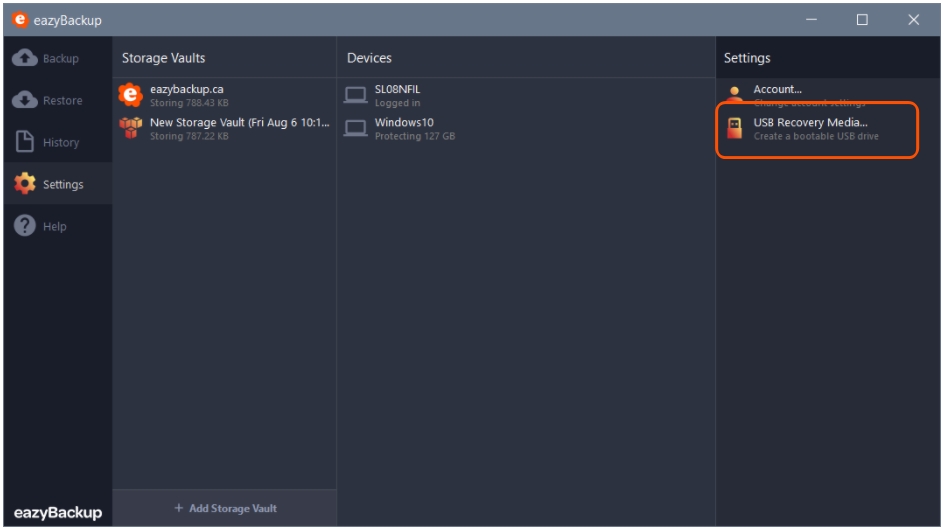
The eazyBackup app supports the creation of USB Recovery Media from the wizard on the Settings screen.

This allows a user to boot from the USB device, type-in the username and password for the backup account, and make a full restoration from backup onto the drive(s) of the connected PC. In this fashion, bare-metal restorations can be achieved.
<img src="https://eazybackup.com/wp-content/uploads/2021/09/Disk_Image_recovery_media.jpg" alt="" width="563">

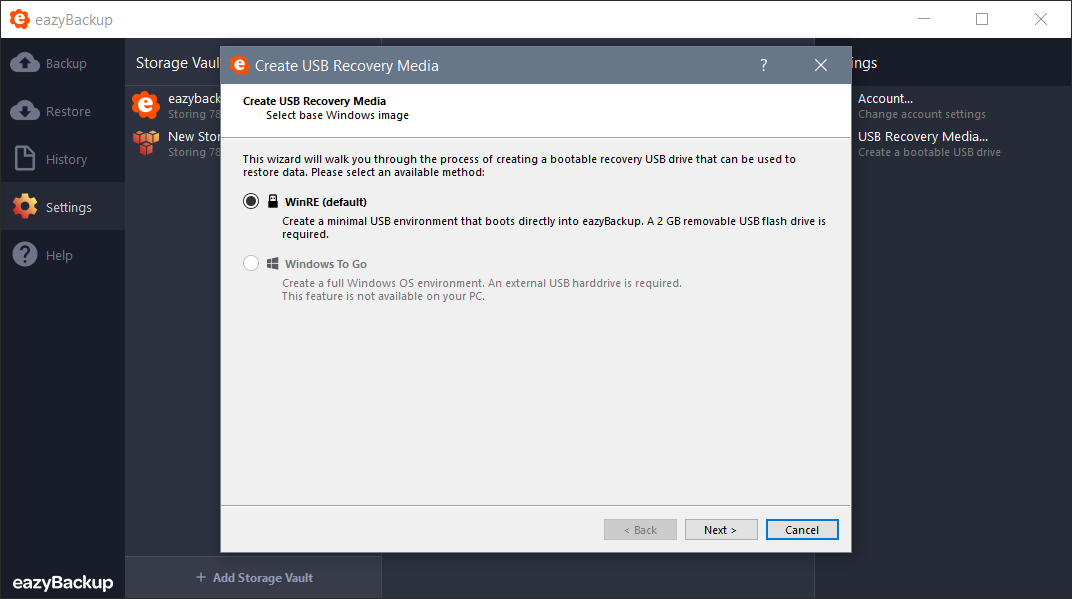
The following options are available:

* WinRE
* Windows To Go
<figure><img src="https://eazybackup.com/wp-content/uploads/2021/09/eazyBackup_disk_Image_restore.png" alt="" width="563"><figcaption></figcaption></figure>

**WinRE**

Selecting this option allows the creation of a minimal USB Recovery Media based on the Windows Recovery Environment.

**Windows To Go**

Selecting this option allows the creation of a full Windows boot environment. this method

**Other boot environment**

A recovery environment may also be created in other ways. Both Windows or Linux can be used as a suitable recovery environment. Some possible methods include:

* creating a Linux bootable USB drive, or
* using a third-party tool like [Rufus](https://rufus.ie/) to create a Windows-To-Go drive, or
* using recovery media from your PC OEM vendor (e.g. Lenovo / Dell / HP)

In these cases, the eazyBackup app will need to be launched manually, once booted into the recovery environment.

***

[eazyBackup](https://eazybackup.com)


# How to backup to a local storage vault (External or Internal Hard Drive)

This article outlines the steps to create a protected item which will backup to a local storage device. The local storage device can be an internal disk, external USB or network location.

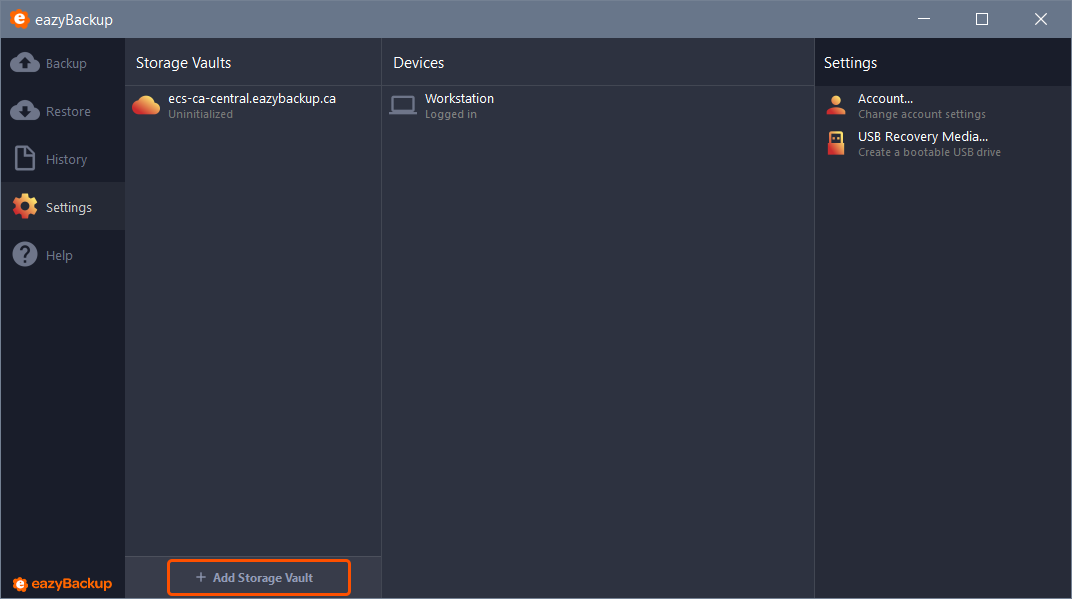
Open the eazyBackup application, select the “Accounts” menu and click “Add Storage Vault”.

<img src="https://eazybackup.com/wp-content/uploads/2019/09/Backup-Interface-Add-Storage-Vault.png" alt="" width="563">

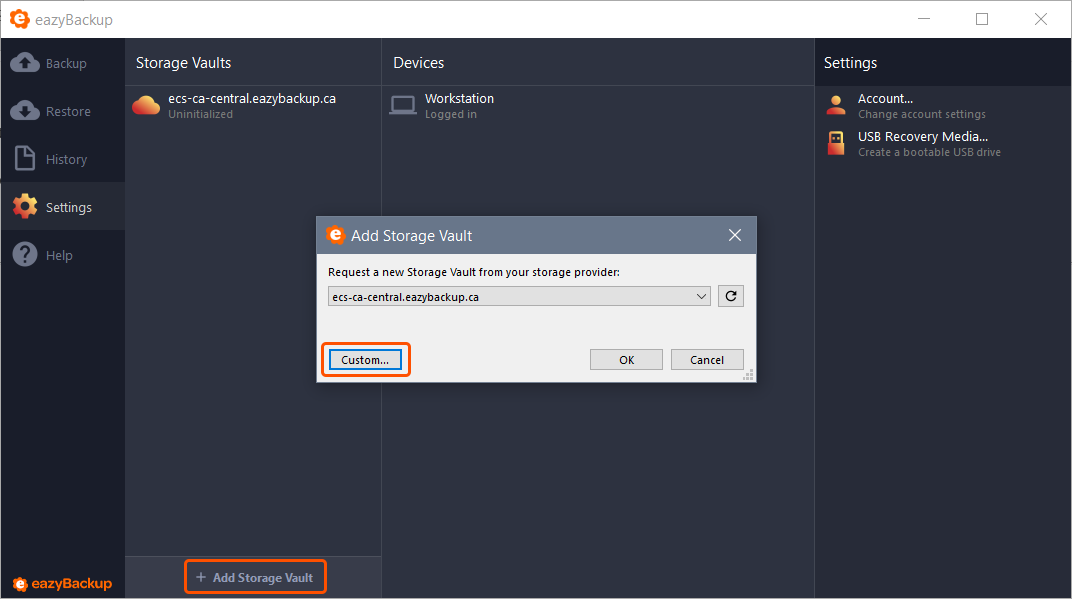
Create a new "Custom" storage vault.

<img src="https://eazybackup.com/wp-content/uploads/2019/09/Backup-Interface-Custom-Storage-Vault.png" alt="" width="563">

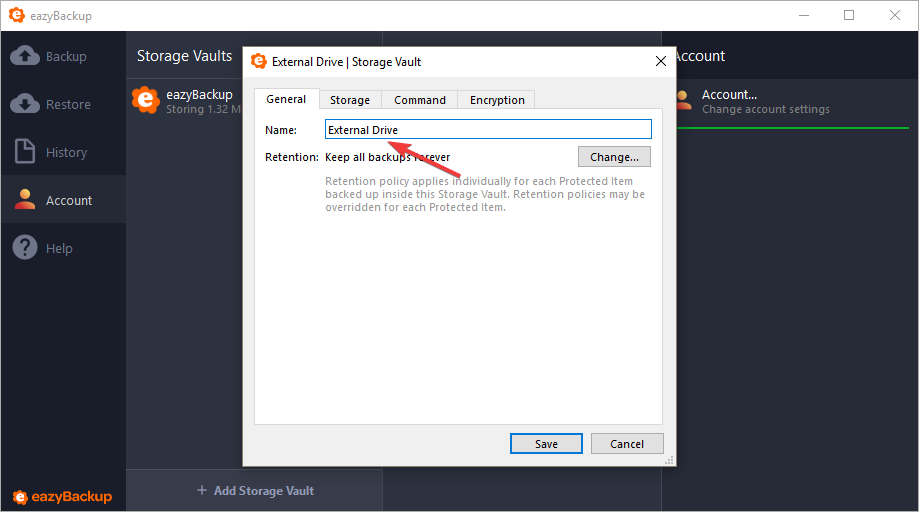
On the "General" tab, we can give our storage vault a name, enter something that makes it easy to identify later.
<img src="https://eazybackup.com/wp-content/uploads/backup-interface_pOuqkf6jjm.png" alt="" width="563">

From the "Storage" tab, click the drop down box and choose "Local Path". Next, click the browse button and locate the local storage device where you want to store backup data. When you have added the path to your local storage device click "Save".
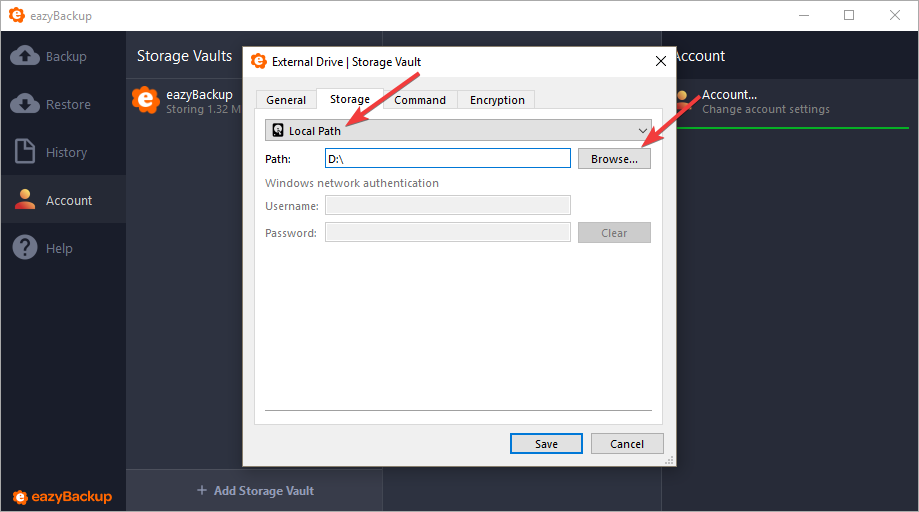
<img src="https://eazybackup.com/wp-content/uploads/backup-interface_0hdvPpWYKA.png" alt="" width="563">

Now you should have a new item listed under "Storage Vaults".
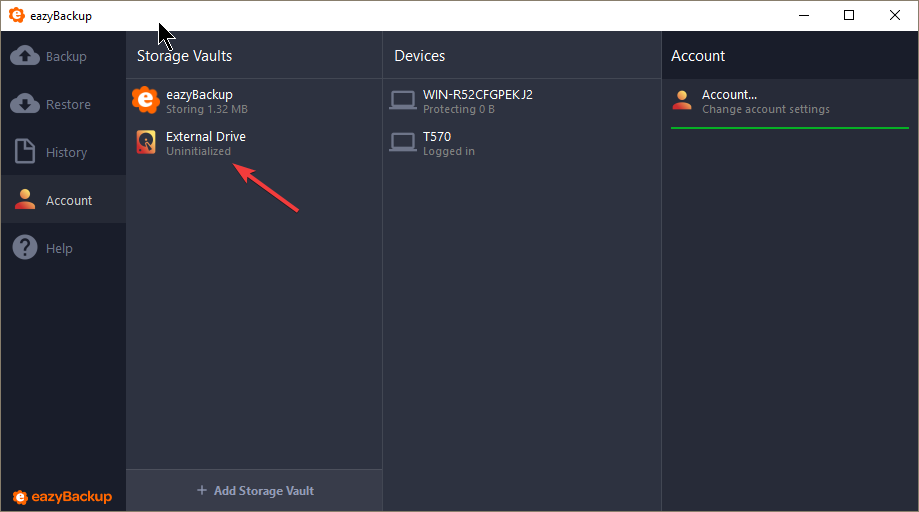
<img src="https://eazybackup.com/wp-content/uploads/backup-interface_Auik7BeyDI.png" alt="" width="563">

Now we can create a new Protected Item which will backup data to our local storage device. From the "Backup" tab, select "Add Protected Item".
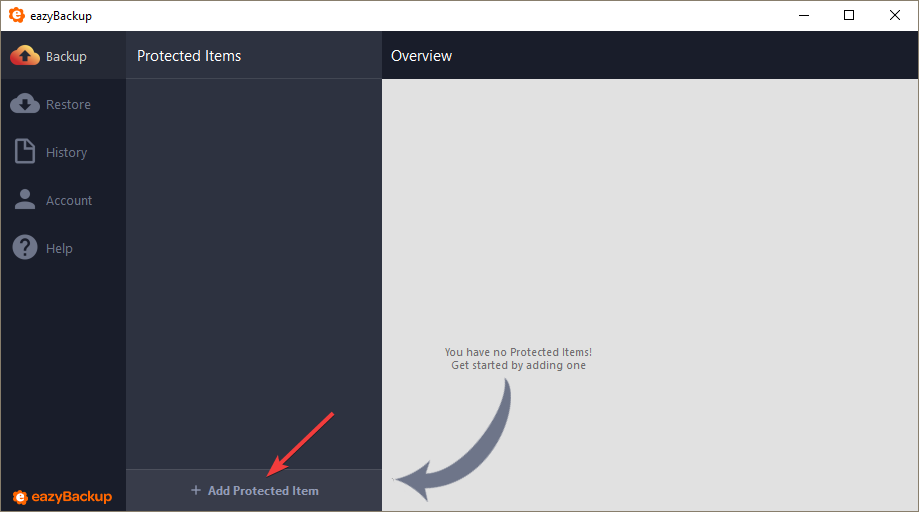
<img src="https://eazybackup.com/wp-content/uploads/backup-interface_6rkVd7VssD.png" alt="" width="563">

Here we can give our "Protected Item" a name, enter something that makes it easy to identify later. Click "Next".
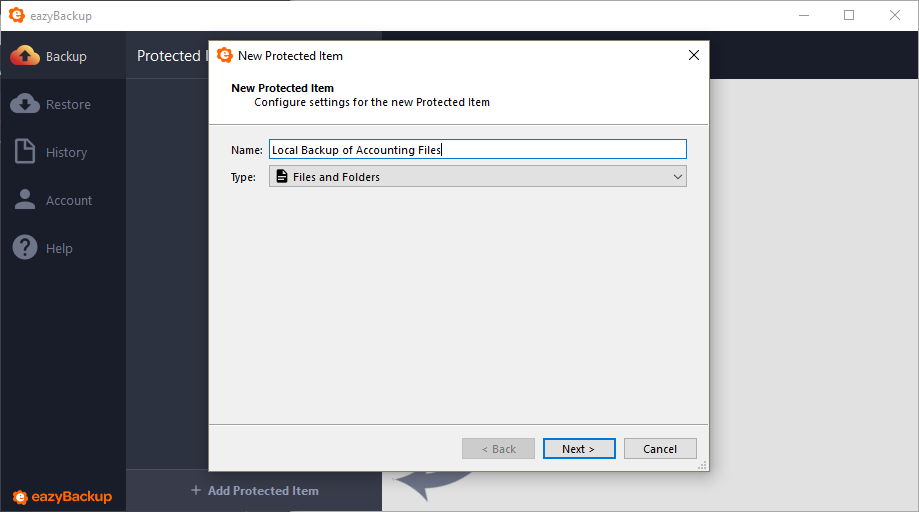
<img src="https://eazybackup.com/wp-content/uploads/backup-interface_MlnUc3V31A.png" alt="" width="563">

Now we need to add some files and folders to this backup job. Click the "+" button to browse your hard drive, place a check mark in the box next to the folders you want included. When you are done, click "Next".
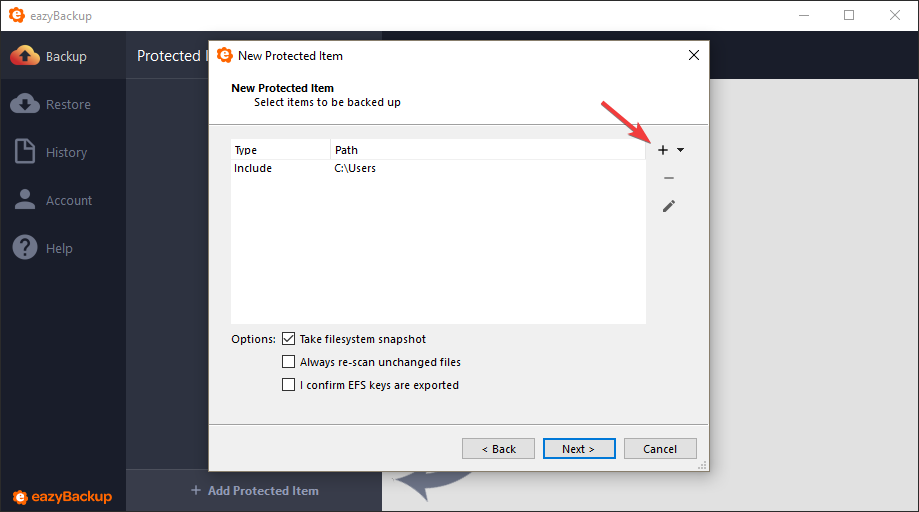
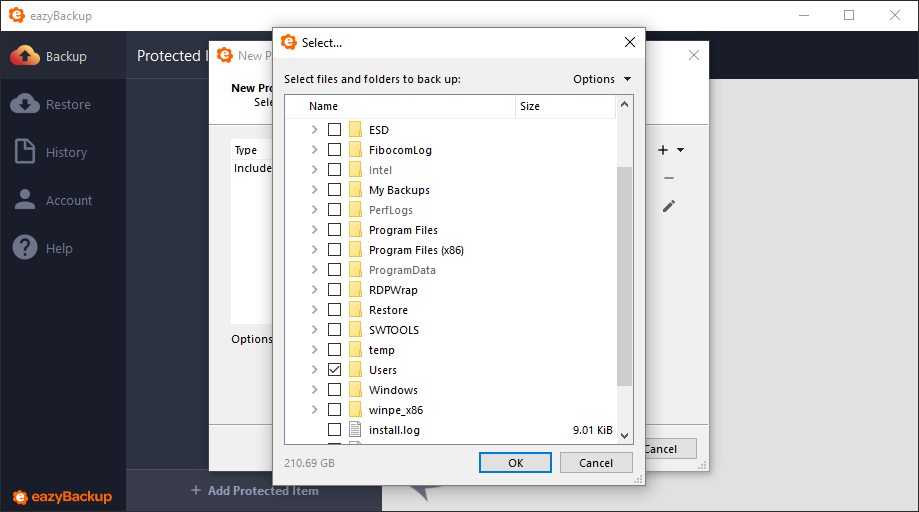
<img src="https://eazybackup.com/wp-content/uploads/backup-interface_K9f9rVgrsp.png" alt="" width="563">

<img src="https://eazybackup.com/wp-content/uploads/backup-interface_KXsUTDwlh2.png" alt="" width="563">

If you want this Protected Item to backup your files on a regular schedule, click the "+" button to create a new schedule.
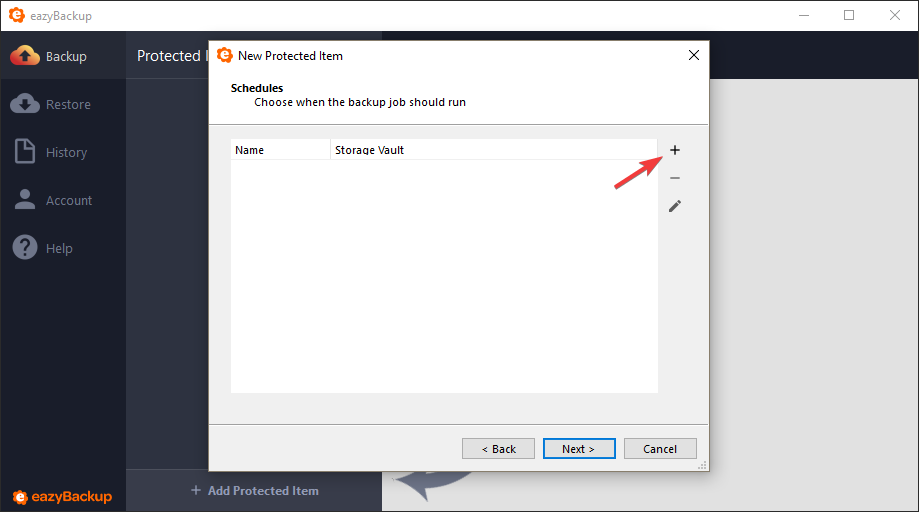
<img src="https://eazybackup.com/wp-content/uploads/backup-interface_NTM95bnAi5.png" alt="" width="563">

Here we can give the schedule a friendly name. In the "Storage Vault" selection menu, choose the new Storage Vault you just created from the list.
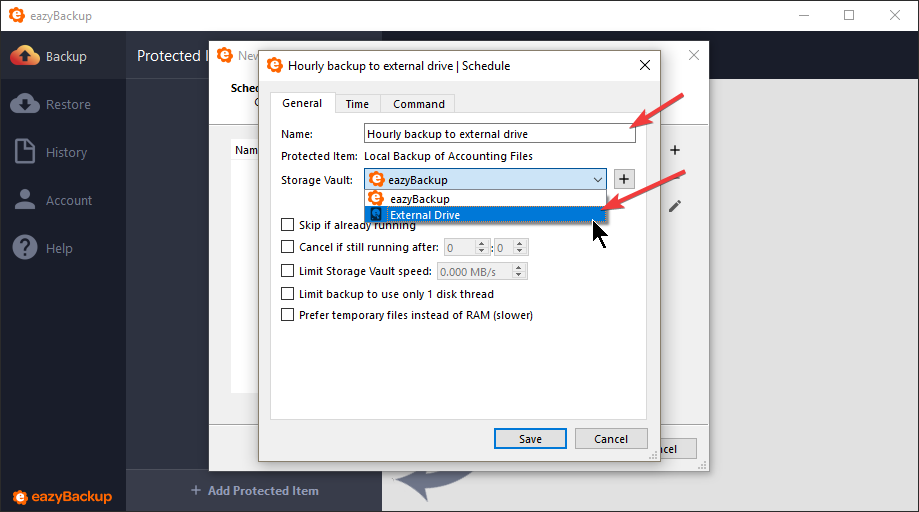
<img src="https://eazybackup.com/wp-content/uploads/backup-interface_Th2KMQs7oo.png" alt="" width="563">

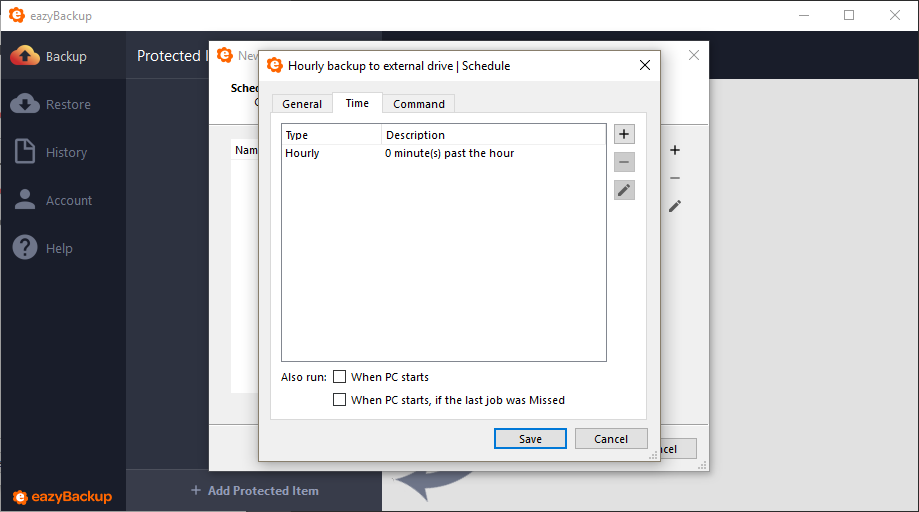
On the "Time" tab click the "+" button to add a time to run this Protected Item. Click "Save" when finished.
<img src="https://eazybackup.com/wp-content/uploads/backup-interface_UnBTuUcRVV.png" alt="" width="563">

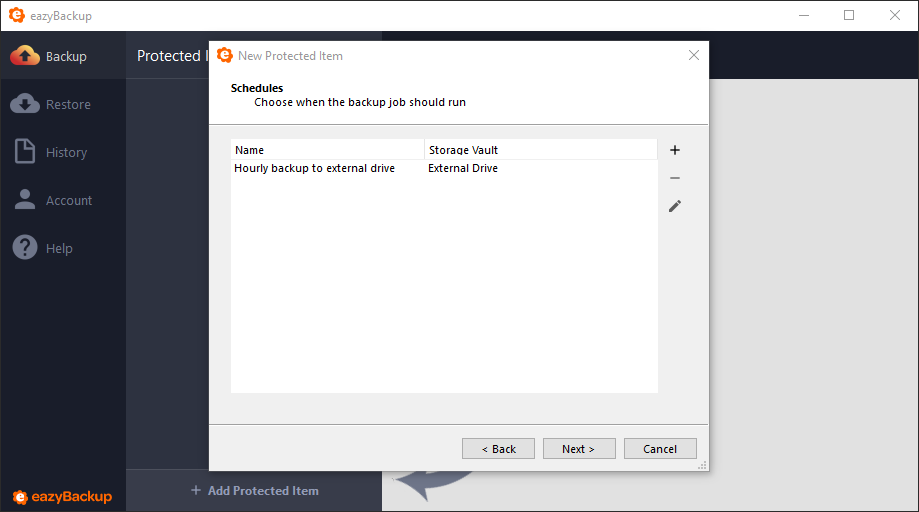
Your "Schedules" page should now look something like the example below. As you can see we have an hourly backup which will store data on our local Storage Vault, which we named "External Drive". You can also configure this Protected Item so that it will backup to multiple locations, for example, your eazyBackup Storage Vault.
<img src="https://eazybackup.com/wp-content/uploads/backup-interface_uAFTx2IIjh.png" alt="" width="563">

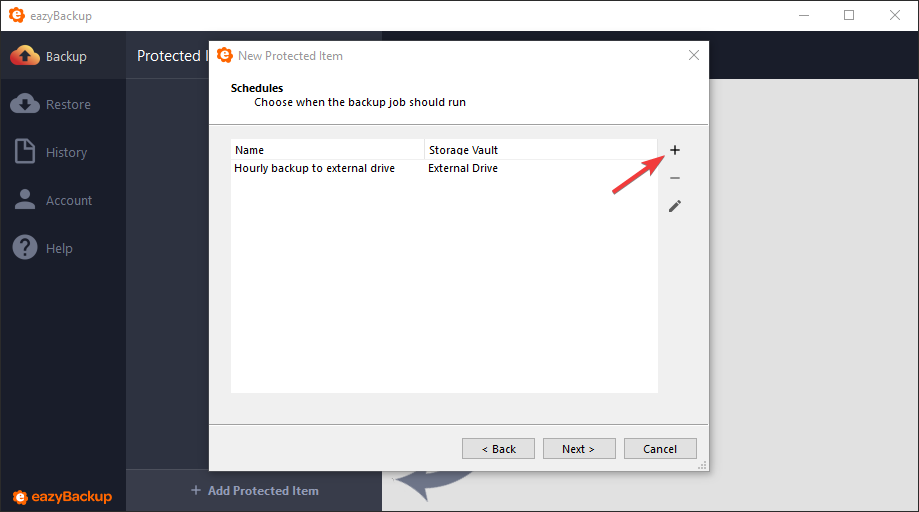
If you want to add another destination for this Protected Item click the "+" button.
<img src="https://eazybackup.com/wp-content/uploads/backup-interface_uAFTx2IIjh-1.png" alt="" width="563">

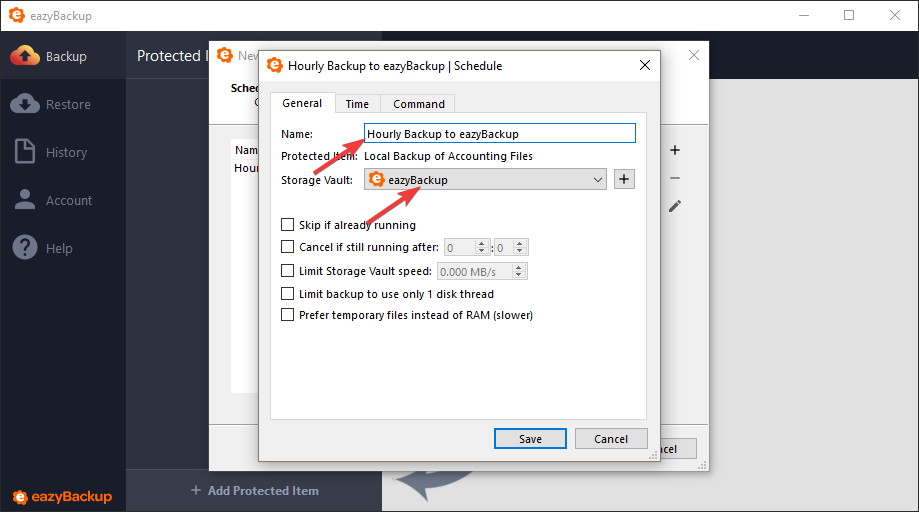
Again, we can give the schedule a relevant name. In the "Storage Vault" selection menu, choose "eazyBackup". On the "Time" tab click the "+" button to add a time to run this protected item. Click "Save" when finished.
<img src="https://eazybackup.com/wp-content/uploads/backup-interface_4wAbFw0RAR.png" alt="" width="563">

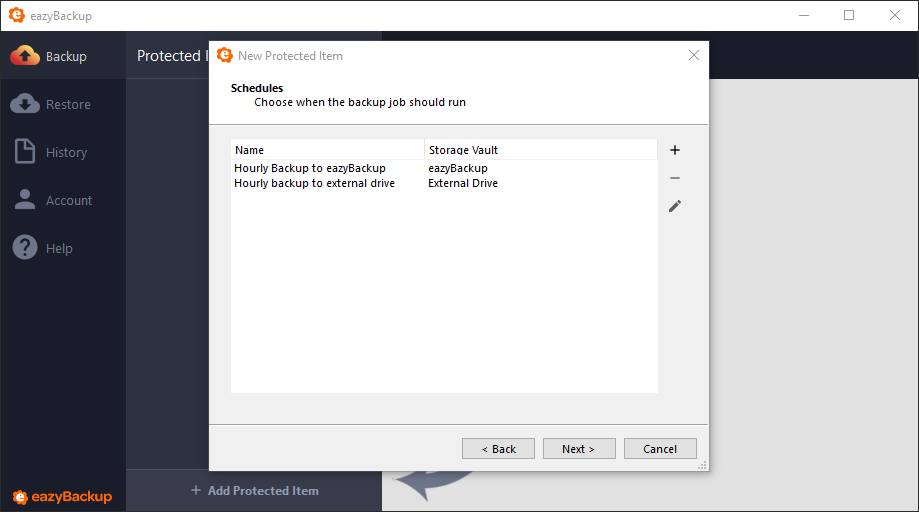
Now we have two hourly backup schedules, one which will store data on our local Storage Vault and a second schedule which will store data in your eazyBackup Storage Vault. Click "Next" when you are ready.
<img src="https://eazybackup.com/wp-content/uploads/backup-interface_R2cAtLSZR3.png" alt="" width="563">

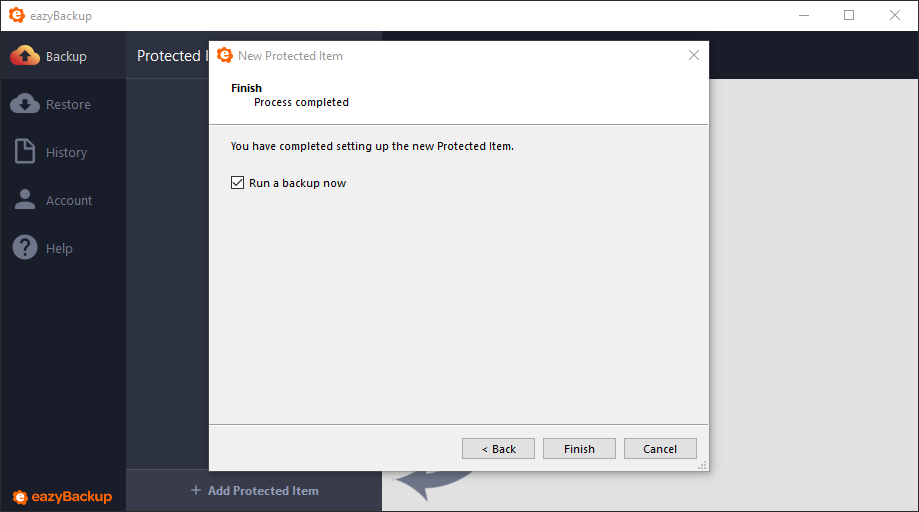
Click "Finish" to save the new Protected Item. You also have the option to run a backup job now.
<img src="https://eazybackup.com/wp-content/uploads/backup-interface_rkCfvTGKOC.png" alt="" width="563">

***

[eazyBackup](https://eazybackup.com)


# Seed Load Walk through

The seed load process allows you to perform your initial backup to a local external hard drive and then courier the external drive to the server administrator.

## What you need up front

* An external disk (USB) with enough free space for the first full backup. Use a filesystem that supports large files (NTFS, exFAT, or ext4).
* The eazyBackup client installed and signed into the correct user account.

{% hint style="info" %}
Using a slow external drive for your seed-load backup will lengthen the import. If speed matters, choose a faster device—ideally a solid-state drive.
{% endhint %}

{% embed url="<https://eazybackup.com/wp-content/uploads/2024/08/seed-load-backup-walkthrough.mp4>" %}
## Create a “Local Path” Storage Vault on the external drive

1. Plug in and mount the external disk.
2. Open **eazyBackup** → **Settings** → **Storage Vaults** → **Custom**.
3. Choose **Local Path** as the storage type.
4. Pick a folder on the external disk (for example, `E:\ezbseed` ).
5. Name the vault something like **Local Vault (Seed)** so you can spot it easily.

## Run the first backup to the seed drive

1. Go to **Create New Protected Item** and create the item set you want to back up.
2. Start a **Backup** and select the **Local Path** vault you just created.
3. Let it run to completion. Contact eazyBackup for shipping instructions when complete.&#x20;

<figure><img src="/files/mPc2wfn9GwXkXkn04moV" alt=""><figcaption></figcaption></figure>

Click the "+" icon to add a new Storage Vault and choose "Custom" for the type of Vault.&#x20;

<figure><img src="/files/lQYoUfFHhVvy4tUlhUX6" alt=""><figcaption></figcaption></figure>

Give the Vault a name that will help you identify it later, click "Next" when done.

<figure><img src="/files/2DGQXzPgDXcyFlelmsMt" alt=""><figcaption></figcaption></figure>

<figure><img src="/files/3afo8zMOF6kWxlp621lI" alt=""><figcaption></figcaption></figure>

Click the "Browse" button and locate the hard drive that will be used for the Seed load backup. Click Next when done.&#x20;

<figure><img src="/files/WWtY79bPESnnxB3daYBT" alt=""><figcaption></figcaption></figure>

Click Next again to skip past the backup pre-commands and complete the new Vault wizard.

<figure><img src="/files/cLoPjbcb15PfjZYEDztt" alt=""><figcaption></figcaption></figure>

You should now have a new, uninitialized Local Vault. This vault will be used for the seed load backup.&#x20;

<figure><img src="/files/rCEeONy2pheNHaEqO5fW" alt=""><figcaption></figcaption></figure>

Create a new Protected item for your seed load backup. You can select any type of Protected Item from the list.&#x20;

<figure><img src="/files/B44PqDvNviZ2aJ03Tb6Z" alt=""><figcaption></figcaption></figure>

Select the items you want included in the backup.

<figure><img src="/files/HQwt9AxqXklhm7KbDGG8" alt=""><figcaption></figcaption></figure>

{% hint style="info" %}
Do not configure a schedule at this time, leave the schedule options blank. Schedules can be configured at a later date after the seed load backup has been imported.&#x20;
{% endhint %}

Our team will advise you when it is safe to begin scheduled backup jobs.

<figure><img src="/files/9V0mg0W0Ip4dN7jJkmzL" alt=""><figcaption></figcaption></figure>

Start the backup and select the new Local Vault you created to back up to.&#x20;

<figure><img src="/files/v015xrvljjIfOTinCpJr" alt=""><figcaption></figcaption></figure>

<figure><img src="/files/IwawpQoGzwbYKI8kAyV3" alt=""><figcaption></figcaption></figure>

When you have completed your backup to the local device, contact eazyBackup for shipping instructions.

***

[eazyBackup](https://eazybackup.com)


# eazyBackup Control Panel

The control panel will allow you to remotely manage devices that are online and connected to the service. The control panel will allow you to do most things you can do in the desktop application.

* At the login screen enter your backup account Username and Password.
  * The control panel does not accept an account email address, you must enter a backup account Username.
* If you are an MSP with multiple backup accounts, login to each account you want to manage one at a time.

{% embed url="<https://eazybackup.com/wp-content/uploads/2023/03/eazyBackup-Control-Panel-Login.mp4?_=1>" %}

You can find your backup account username within the\
[client area](https://eazybackup.ca/accounts) from **Backup Accounts -> Manage Accounts**.

**Control Panel for eazyBackup Accounts:** [**https://panel.eazybackup.ca/**](https://panel.eazybackup.ca/)

**Control Panel for OBC Accounts:** [**https://panel.obcbackup.com/**](https://panel.obcbackup.com/)

#### Control Panel Features

* Create and manage Protected items
* Configure 2FA
* Start and Stop Backup Jobs
* Restore Items (Your can restore to the original device if connected, you cannot download the restore in the browser)
* Add / remove storage vaults and manage vault retention policies
* View and export  job logs from the 'History' page.
* Cancel running jobs from the 'History' page

#### **Control Panel Demo**

{% embed url="<https://eazybackup.com/wp-content/uploads/2023/03/Control-Panel-Walkthrough.mp4?_=2>" %}

***

[eazyBackup](https://eazybackup.com)


# Delete backup snapshots to reduce Storage Vault size

You can remove backup snapshots from a Storage Vault as follows:

1. Open the eazyBackup desktop application
2. Click the "Restore" button in the left-hand menu bar
3. Select the Storage Vault containing the backed-up data and click "Next"
4. In the restore wizard click the 'Delete' button
5. From the list of available snapshots, can select one or more to remove, and then click 'Delete'
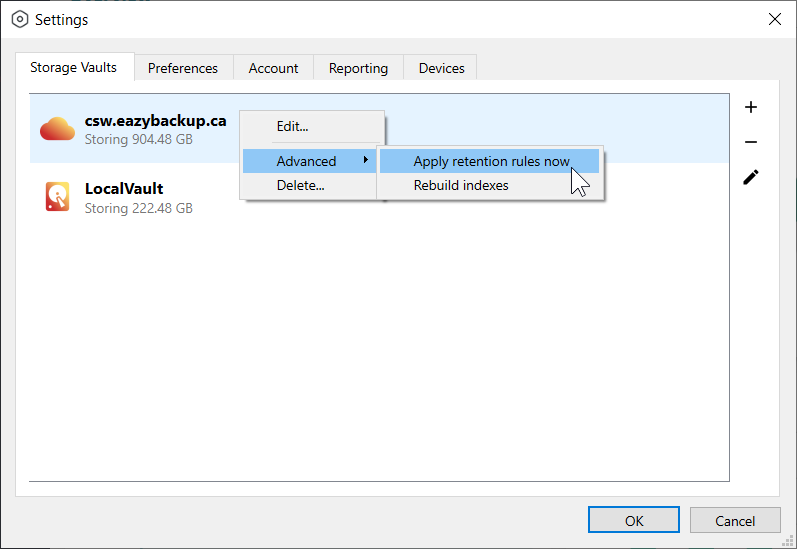
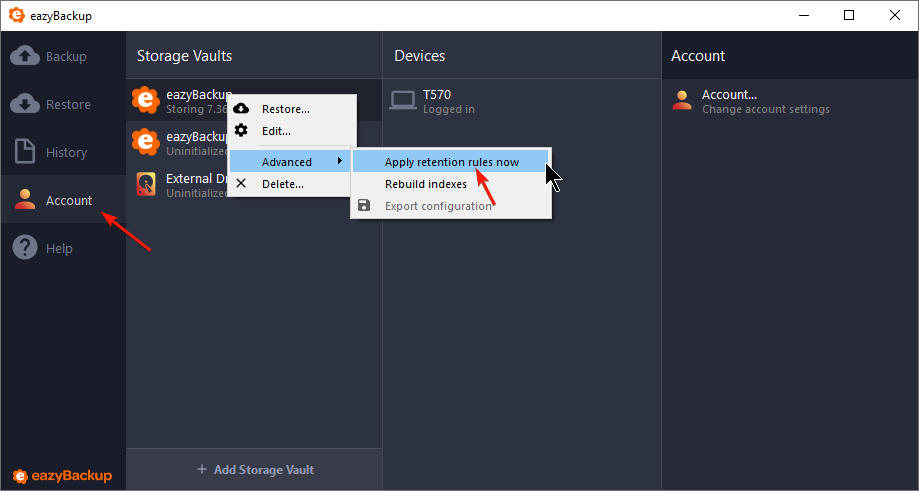
6. Once the removal of the snapshot is complete, you need to run a [retention pass](/documentation/retention-concept) on the vault if you want to immediately clean up the deleted snapshots from the storage vault.

{% hint style="info" %}
**If you need to immediately reduce the size of your storage vault, you must perform step six to manually to invoke the retention pass. Data is not removed from a storage vault until a retention pass has been completed.**
{% endhint %}

### Delete snapshots from the Backup Application

{% embed url="<https://eazybackup.com/wp-content/uploads/2019/09/eazyBackup-delete-from-storage-vault.mp4?_=1>" %}

### Delete snapshots from the Control Panel

{% embed url="<https://eazybackup.com/wp-content/uploads/2024/07/control_panel_delete_backup_snapshot.mp4>" %}

***

[eazyBackup](https://eazybackup.com)


# Kroll Pharmacy Management Database Backup

We recommend performing a daily backup of the Kroll database. Start the backup after business hours to ensure all patient data is included in the daily backup.

We suggest that in addition to the Kroll data, you backup all of the files on your server with our File/ Folder Protected Item. You can also perform a Disk Image backup in the event that you require a bare metal disaster recovery solution.

At a minimum it is critical that you back up your Kroll database files from the default location `C:/KrollWin/Backup` folder.

To perform a cloud backup of the Kroll database:

#### Step 1. You will first need to perform a local backup of the Kroll database using the Kroll windows 10 application. The local database backup can then be backed up by eazyBackup to the cloud.

* Open Kroll pharmacy software and log in as an administrative user.
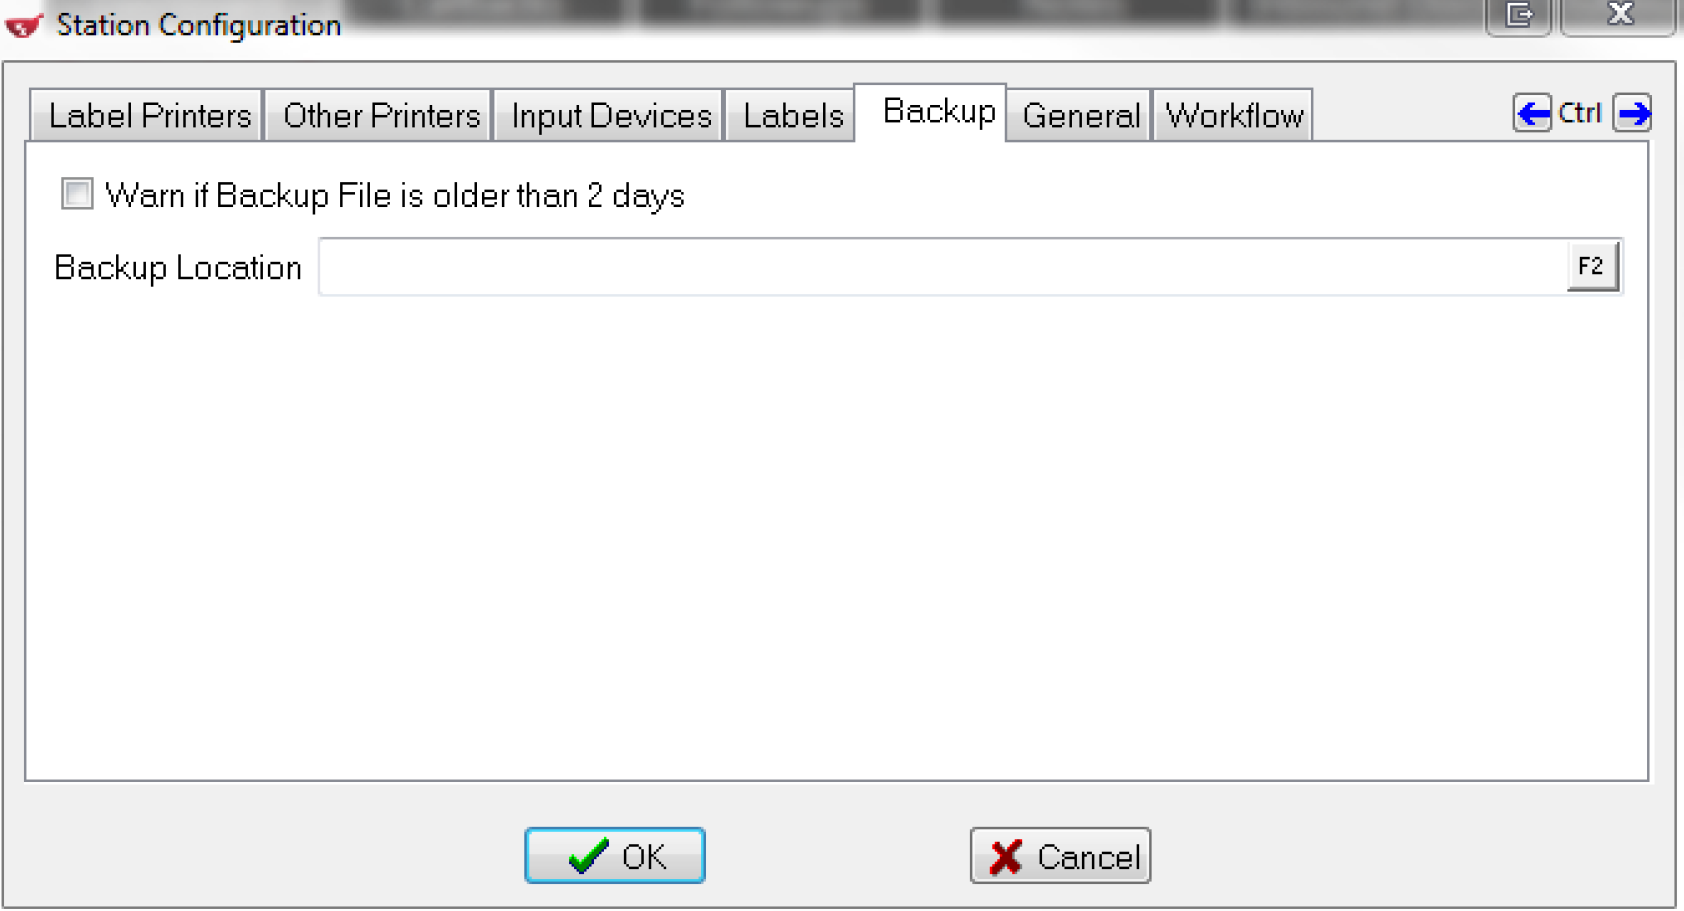
* Click on the File Menu > Configuration > Work Station > This Workstation.
* In the Station Configuration window, click on the "Backup" tab
* In the Backup Location, specify a local folder where a copy of the backup can be stored. Make sure you have sufficient free space on the destination drive. The database backups are typically 40-60GB each and you should have free space to hold at least one weeks worth of local backups.
* The default backup location is `C:/KrollWin/Backup`
* The Kroll application will perform a daily backup to the Backup Location you specified.

<img src="https://eazybackup.com/wp-content/uploads/2023/03/Kroll-Phamacy-Software-Backup.png" alt="" width="563">

Once you have Kroll configured to make a daily backup to the local device, you can configure eazybackup to perform a daily backup of your local files.

#### Step 2. Schedule eazyBackup to backup the Kroll database export

* Open the eazyBackup desktop application
* Click "Add Protected Item"
* Choose Protected Item type "Files and Folder"
* Click the 'Custom' tab
* From the 'Custom file selection' tab, choose the location where you scheduled the daily export of the Kroll database.
* Click "Next" in the Protected Item wizard until you reach the Schedule option. Create a new daily backup schedule for this Protected Item.
* Remember that your Kroll database export must have completed before eazyBackup can start, allow enough time between when the Kroll application exports a copy of your database and when eazyBackup is scheduled to run.
<img src="https://eazybackup.com/wp-content/uploads/2023/03/Kroll-Database-Cloud-Backup.png" alt="" width="563">

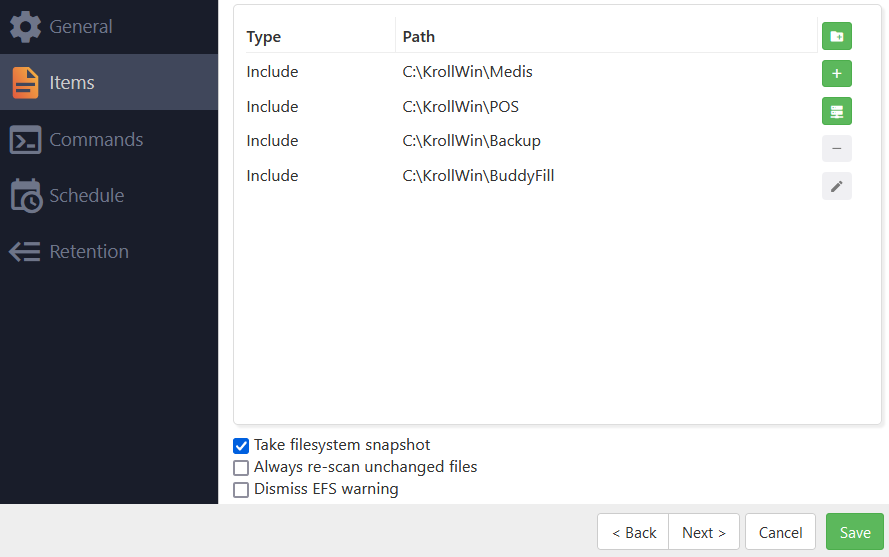
At a minimum you should backup the following locations with the eazyBackup desktop application. After the backup has completed, we recommend you preform a full restore so that you fully understand the process of backup and restoring in the event of an emergency.

`C:/KrollWin/Backup`

`C:/KrollWin/Medis`

`C:/KrollWin/POS`

`C:/KrollWin/BuddyFill`

***

[eazyBackup](https://eazybackup.com)


# How to Backup Dentrix Database to the Cloud

We recommend performing a daily backup of the Dentrix database. Start the backup after business hours to ensure all patient data is included in the daily backup.

We suggest that in addition to the Dentrix common folder, you backup all of the files on your server with our File/ Folder Protected Item. You can also perform a Disk Image backup in the event that you require a bare metal disaster recovery solution. At a minimum it is critical that you back up your Dentrix database files from the Common folder.

#### Step 1. Schedule a daily database export from Dentrix:

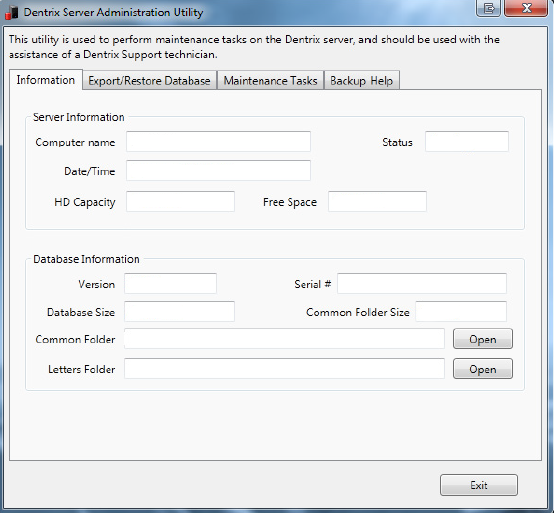
Export a copy of your live database either manually or automatically. For this step you will need to use the Dentrix Server Administration Utility. **In order to back up the active Dentrix database files, the database must be exported to a location where the eazyBackup desktop application can back up a copy of your database.**

* Open this Dentrix Server Administration Utility. This is usually located at `C:\Program Files\Dentrix\_ServerAdmin.exe`.
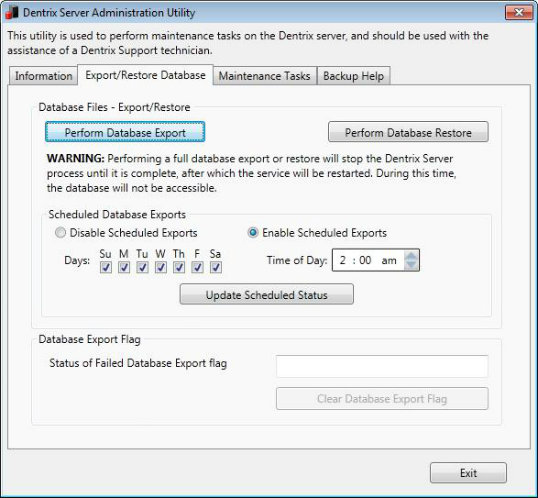
* Click the 'Export/Restore Database' tab
* Under Scheduled Database Exports, select "Enable Scheduled Exports".
* Configure your scheduled export time
* Click "Update Scheduled Status" to save the export schedule.
<img src="https://eazybackup.com/wp-content/uploads/2023/03/Dentrix-Database-Adminsitration-Utility.png" alt="" width="563">

<img src="https://eazybackup.com/wp-content/uploads/2023/03/Dentrix-database-backup-schedule.jpg" alt="" width="563">

#### Step 2. Schedule eazyBackup to backup the Dentrix database export

* Open the eazyBackup desktop application
* Click "Add Protected Item"
* Choose "Protected Item type File / Folder Backup"
* Click the 'Custom' tab
* From the 'Custom file selection' tab, choose the location where you scheduled the daily export of the Dentrix database.
* Click "Next" in the Protected Item wizard until you reach the Schedule option. Create a new daily backup schedule for this Protected Item.
* Remember that your Dentrix database export must have completed before eazyBackup can start, allow enough time between when the Dentrix Server Administration Utility exports a copy of your database and when eazyBackup is scheduled to run.

***

[eazyBackup](https://eazybackup.com)


# How to Backup Patterson Eaglesoft Dental Software

We recommend performing a daily backup of the Eaglesoft database. Start the backup after business hours to ensure all patient data is included in the daily backup.

We suggest that in addition to the Eaglesoft data folder, you backup all of the files on your server with our File / Folder Protected Item. You can also perform a Disk Image backup in the event that you require a bare metal disaster recovery solution. At a minimum it is critical that you back up your Eaglesoft database files from the default location of `C:\Eaglesoft\Data\`.

The default Data folder paths are:

* `C:\Eaglesoft\Data\Audio`
* `C:\Eaglesoft\Data\Images`
* `C:\Eaglesoft\Data\Metafile`
* `C:\Eaglesoft\Data\Customdraw types`
* `C:\Eaglesoft\Data\Documents`
* `C:\Eaglesoft\Data\Indicators`
* `C:\Eaglesoft\Data\Data2*`

#### Step 1. Make sure that everyone in the office is logged out of the application to ensure the backup process has exclusive access.

#### Step 2. Schedule the Patterson server engine to stop before the backup is scheduled to start.

* Use windows Task Scheduler to Start and Stop the Server Engine - See this article for detailed instructions: <https://pattersonsupport.custhelp.com/euf/assets/Answers/4868/DB_Automated_Stop_Start_07.26.17.pdf?nointercept/1>
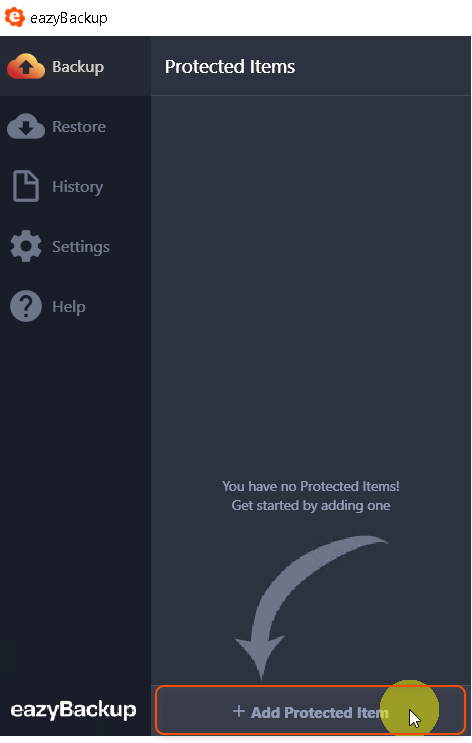
* Open the eazybackup desktop application
* Click Add Protected Item
* Choose Protected Item type File / Folder Backup
* Click the Custom tab
* From the Custom file selection tab, choose the data location (default is **C:\Eaglesoft\Data\\**)
* Click Next in the Protected Item wizard until you reach the Schedule option. Create a new daily backup schedule for this Protected Item.
* Use windows Task Scheduler to start the Patterson Server Engine after the daily backup is complete.

{% hint style="info" %}
**IMPORTANT - You must schedule the shutdown of the Patterson Server Engine before eazyBackup can start, or important files may be missed in your backup.**&#x20;
{% endhint %}

After you have completed a successful backup, perform a restore of the server database. It's important to go through the process of restoring data to familiarize yourself with the process.

***

[eazyBackup](https://eazybackup.com)


# Hyper-V Virtual Machine Backup Walkthrough

The Hyper-V Protected Item will help you perform backups of Hyper-V guest virtual machines on Windows Server.

The underlying technology is Microsoft VSS and is compatible with all versions of Hyper-V running on Windows Server, including Windows Server 2022 (the latest version at the time of writing).

This backup type is only applicable when running on Windows Server. Hyper-V on Windows Desktop is not supported by this Protected Item type.

eazyBackup integrates with the Hyper-V VSS writer to perform a Hyper-V backup snapshot, including support for in-VM quiescence on supported guest operating systems.

Backing up a Hyper-V virtual machine with eazyBackup includes, but is not limited to:

* its configuration file
* all attached virtual drives
* the contents of memory (if the machine was running)
* the full tree of saved checkpoints

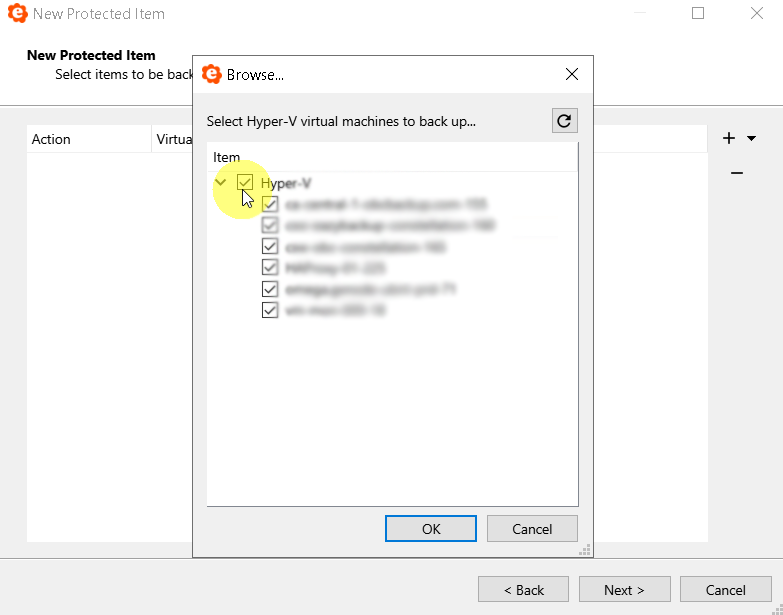
You can select individual virtual machines for backup, or choose “All virtual machines”.

#### Step 1. Add New Protected Item:

<img src="https://eazybackup.com/wp-content/uploads/2023/03/Hyper-V-Backup-Add-New-Protected-Item.png" alt="" width="563">

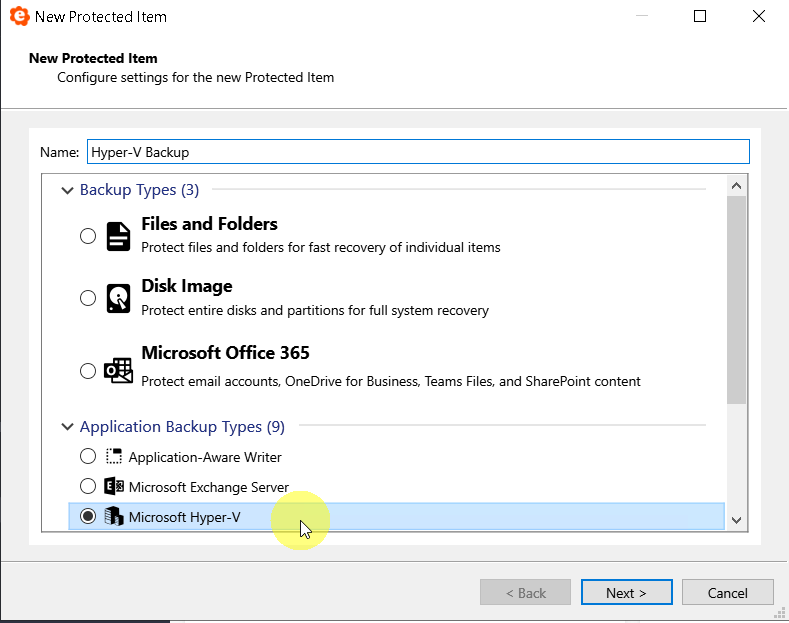
#### Step 2. Select Microsoft Hyper-V backup type and give the Protected Item a name:
<img src="https://eazybackup.com/wp-content/uploads/2023/03/Hyper-V-Backup-Protected-Item.png" alt="" width="563">

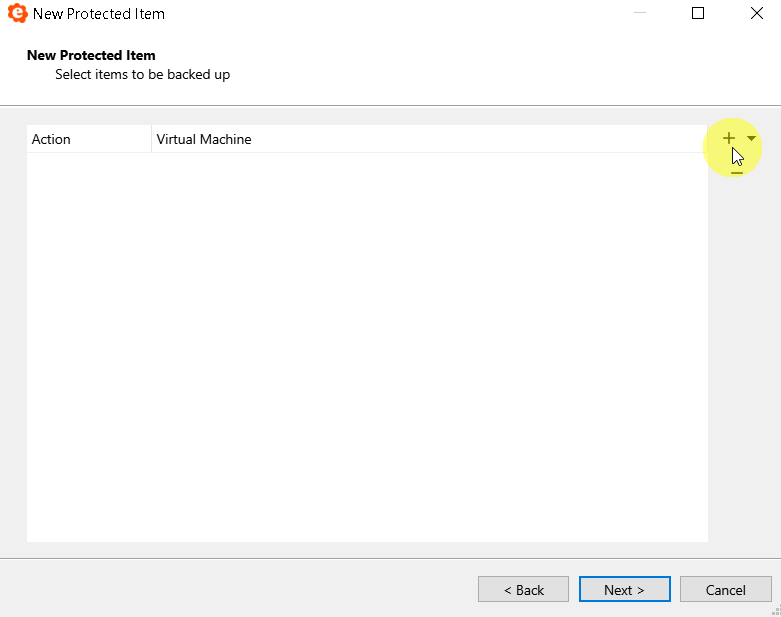
#### Step 3. Select VMs for backup by clicking the + button:
<img src="https://eazybackup.com/wp-content/uploads/2023/03/Hyper-V-Backup-Select-Items.png" alt="" width="563">

#### Step 4. Select all Virtual Machines or individual VMs for backup:
<img src="https://eazybackup.com/wp-content/uploads/2023/03/Hyper-V-Backup-Server-Selection.png" alt="" width="563">

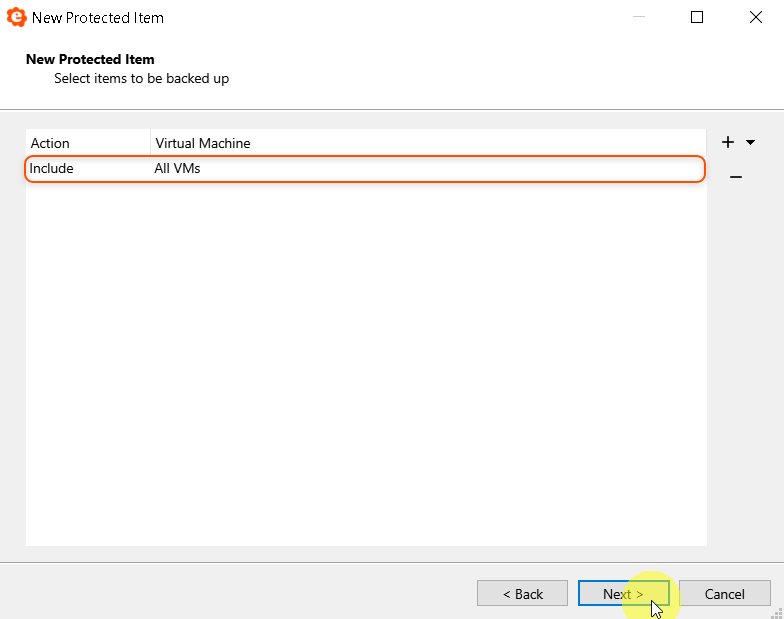
#### Step 5. The Item selection window shows you which VMs you have selected for backup - Click Next:
<img src="https://eazybackup.com/wp-content/uploads/2023/03/Hyper-V-Backup-VM-Items-Selected.png" alt="" width="563">

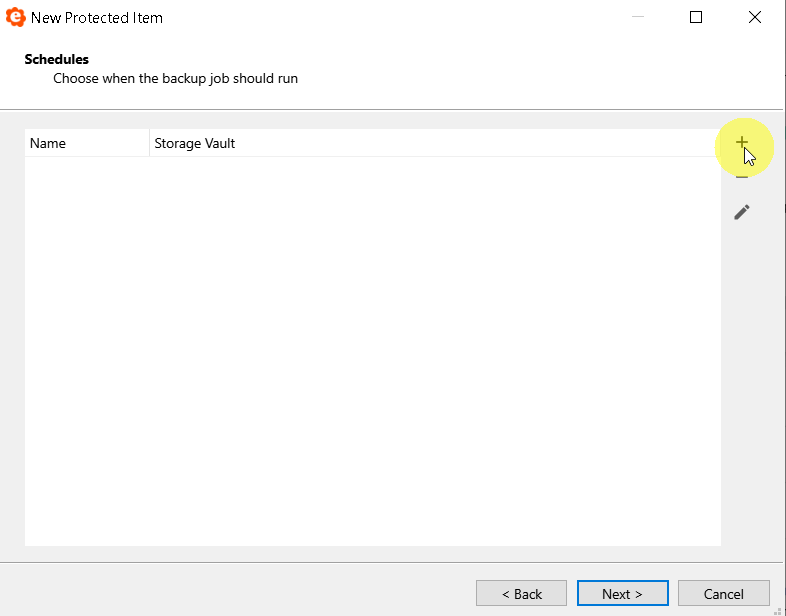
#### Step 6. Create a new schedule, click the + button to create the schedule:
<img src="https://eazybackup.com/wp-content/uploads/2023/03/Hyper-V-Backup-New-Schedule.png" alt="" width="563">

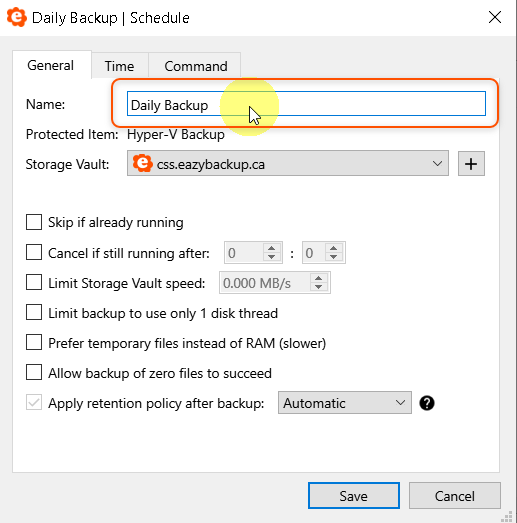
#### Step 7. You can now name the schedule:
<img src="https://eazybackup.com/wp-content/uploads/2023/03/Hyper-V-Backup-Schedule-Name.png" alt="" width="563">

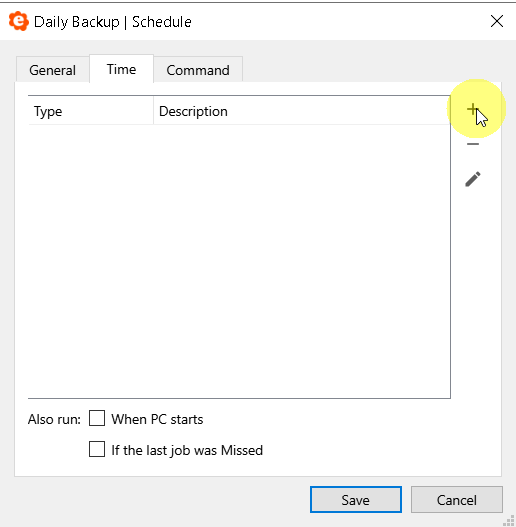
#### Step 8. Select the Time tab, click the + button to add scheduled run times:
<img src="https://eazybackup.com/wp-content/uploads/2023/03/Hyper-V-Backup-Schedule-Add-Time.png" alt="" width="563">

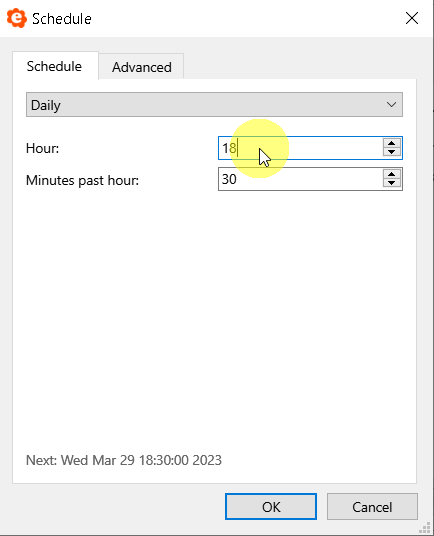
#### Step 9. Set your start time, then click OK and Next:
<img src="https://eazybackup.com/wp-content/uploads/2023/03/Hyper-V-Backup-Schedule-Time.png" alt="" width="563">

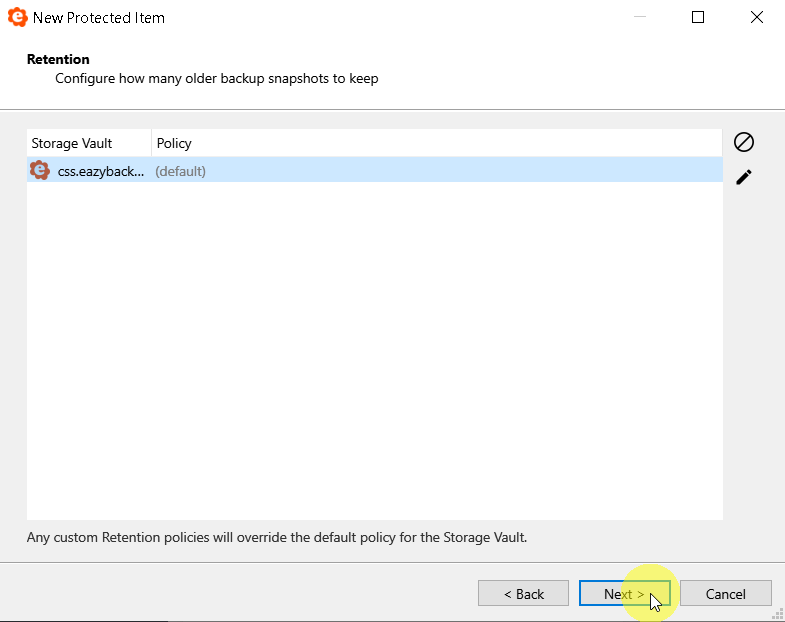
#### Step 10. Default retention is 30 Backup Jobs, you can modify the retention settings here to suit your requirements:
<img src="https://eazybackup.com/wp-content/uploads/2023/03/Hyper-V-Backup-Retention.png" alt="" width="563">

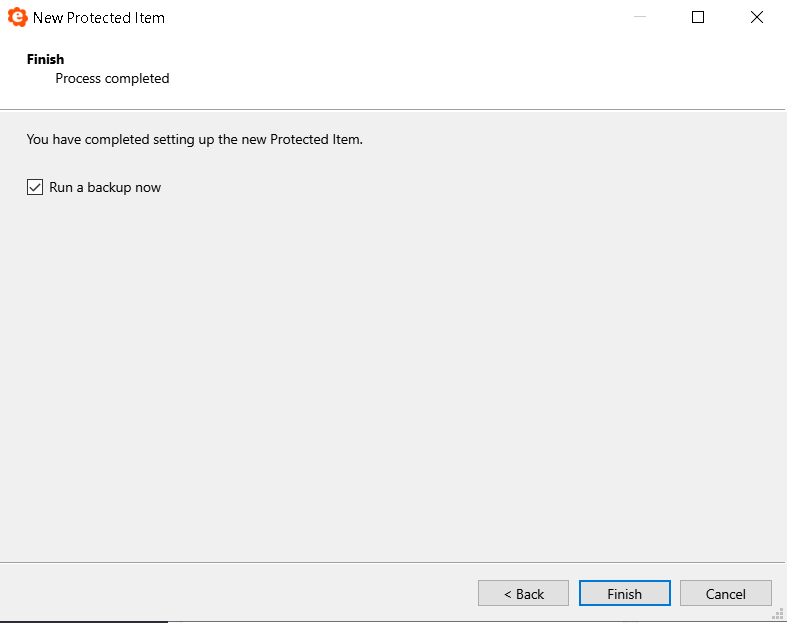
#### Step 11. Click Finish to Save the Protected Item:
<img src="https://eazybackup.com/wp-content/uploads/2023/03/Hyper-V-Backup-Finish.png" alt="" width="563">

***

[eazyBackup](https://eazybackup.com)


# Storage Vault Usage Report

{% embed url="<https://eazybackup.com/wp-content/uploads/2023/04/Vault-Usage-Report.mp4?_=1>" %}
#### Using the online Control Panel, it is possible to get a detailed report of data usage in your storage vault(s).

1. Login to the eazyBackup Control Panel: <https://panel.eazybackup.ca/>
2. Click on 'Storage Vaults' from the left side menu.
3. You will see a list of your storage vaults on this page. Click the link in the 'Stored' size column to open the report.
4. The report will display data that belongs to current backups, data held in retention by retention policies, and data from 'unknown' items. 'Unknown' items are Protected Items that have been deleted, but the data has not yet expired based on the retention policy set on your storage vault.
5. Reports can be exported to the Clipboard as a CSV or Excel file.

***

[eazyBackup](https://eazybackup.com)


# Linux Installation Guide (Debian, Ubuntu)

You can install eazyBackup using the Debian client package. The Debian package installs the eazyBackup binaries and a systemd unit script to start and stop the service. The installed service is named backup-tool.

Download the backup client\
<https://csw.eazybackup.ca/>

Install the package using apt install in the directory where the .deb file was downloaded.

```
sudo apt install ./eazyBackup-xx.x.x.deb
```

The installer will perform the following tasks:

* Install the backup client into /opt/eazyBackup/&#x20;
* Prompt you for your account username and password
* Prompt you for the URL of the eazyBackup  server&#x20;
* Register your Linux device into that eazyBackup account
* Starts running the backup-tool service in the background.

The eazyBackup service is installed with the name backup-tool. It can be managed using the standard systemctl commands.

### Managing Backups

The linux client does not provide a graphical interface. Creating Protected Items, schedules and manually running backups or restores is done from the eazyBackup [Control Panel](/guides/eazybackup-control-panel) web interface.&#x20;

You can find additional information on how to use the Control Panel web interface for the backup client in our Control Panel guide:

{% content-ref url="/pages/MjB8IIJhhOfB7U5TUXN0" %}
[eazyBackup Control Panel](/guides/eazybackup-control-panel)
{% endcontent-ref %}

### Uninstall​

You can uninstall the package by running&#x20;

`apt remove backup-tool`

{% hint style="info" %}
By default, removing the package will preserve your saved credentials for future reinstall. To forget any saved configuration, run `apt purge backup-tool`. This command will also uninstall the package if it is still installed.
{% endhint %}


# Two-Factor Authentication for Backup Accounts

With eazyBackup it is possible to enable two-factor authentication using a time based one time passcode for use with the both the backup software and the web control panel.

To configure this option, you will need to login to the backup account from the control panel: <https://panel.eazybackup.ca/>

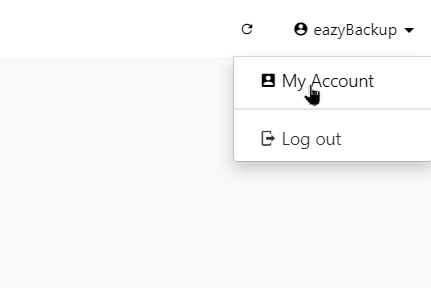
From the backup control panel, open account settings, click on "My Account".

<img src="https://eazybackup.com/wp-content/uploads/2021/07/eazybackup-panel-my-account-settings.png" alt="" width="563">

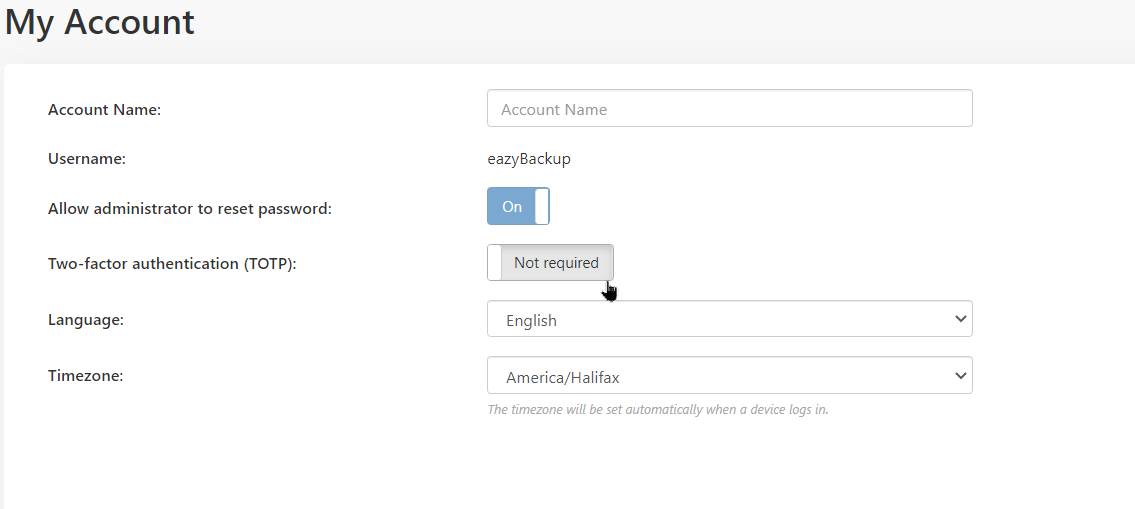
Enable the option for two-factor Authentication (TOTP).
<img src="https://eazybackup.com/wp-content/uploads/2021/07/enable-two-factor-authentication.png" alt="" width="563">

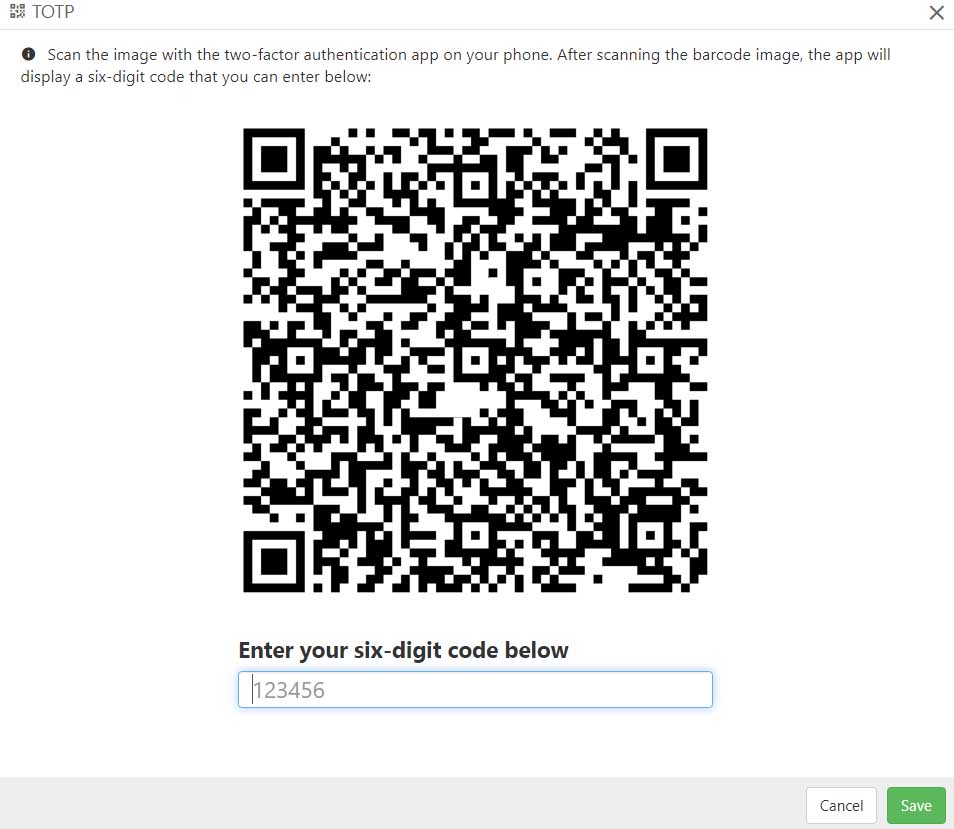
Scan the image with your two-factor authentication app, then enter the six-digit code from the app. Save the settings to enable the feature.
<img src="https://eazybackup.com/wp-content/uploads/2021/07/TOTP-barcode.jpg" alt="" width="563">

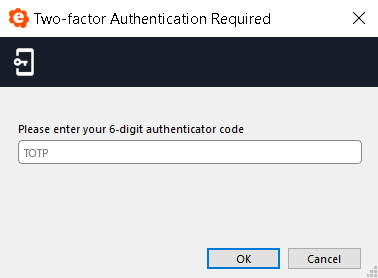
With 2FA enabled, when you log into the web control panel or the backup software,  your two-factor code will be required.
<img src="https://eazybackup.com/wp-content/uploads/2021/07/eazybackup-application-2fa.png" alt="" width="375">

### Additional Account Security

{% hint style="info" %}
As of September 1st 2023, the backup application will lock automatically when it is closed. Each time the application is opened, you will be required to enter the backup account username and password.
{% endhint %}

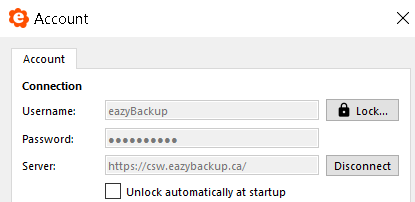
As an additional security measure we recommend automatically locking the backup application when it is closed. If the lock has not been enabled, the software can be opened without the requirement to enter the account password or your TOTP 2FA.

* Open the eazyBackup application, select “**Account**” at the bottom left side menu,
* Select “**change account settings**” button,
* On the Account tab, click the “**Lock…**” button to the right of the Username field.
* If you confirm the confirmation to lock the application, the program immediately locks and closes. Your password (and TOTP if configured) is required to open the application again.
* Each time you login to the application you must lock it again following the steps above.
<img src="https://eazybackup.com/wp-content/uploads/2021/07/eazybackup-application-lock.png" alt="" width="563">

***

[eazyBackup](https://eazybackup.com)


# Securing your Backup against Ransomware

To better protect your backups against unauthorized access and types of Malware such as Ransomware, we recommend locking the application when not in use.

{% hint style="info" %}
As of September 1st 2023, the backup application will lock automatically when it is closed. Each time the application is opened, you will be required to enter the backup account username and password.
{% endhint %}

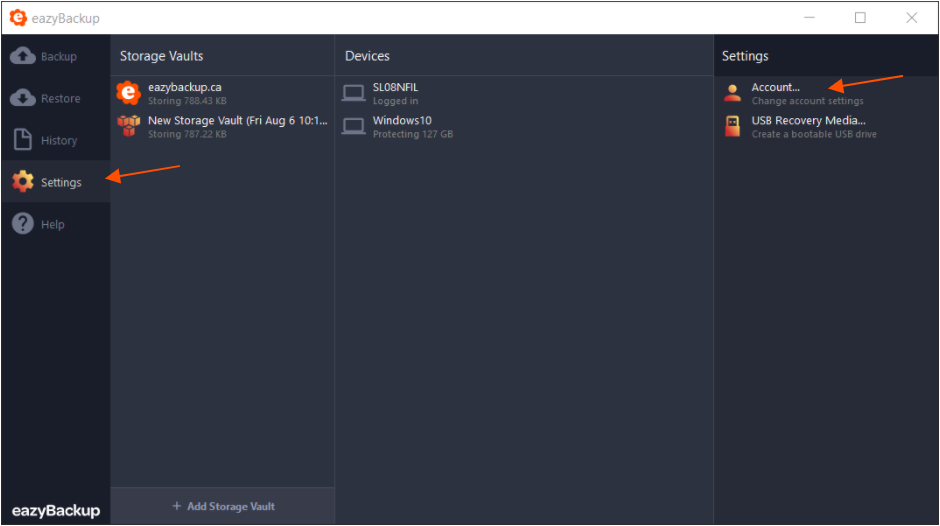
* Open the eazyBackup application, select "**Settings**" at the bottom left side menu,
* Select the "**Account**" button
<img src="https://eazybackup.com/wp-content/uploads/2020/06/Backup_Interface_Application_Settings.png" alt="" width="563">

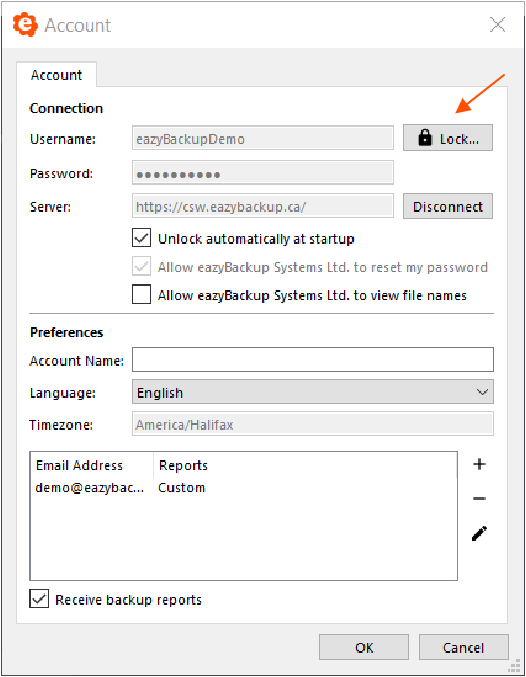
* On the Account tab, click the "**Lock...**" button to the right of the Username field.
* If you confirm, the application will immediately lock and close. Your password is required to open the application again.
* Each time you login to the application, you must lock it again following the steps above.
* Locking the application will not interfere with scheduled backup jobs.
<img src="https://eazybackup.com/wp-content/uploads/2020/06/Backup_Interface_Lock.png" alt="" width="375">

#### Enable 2FA

As an additional layer of security, it is possible to enable Two Factor Authentication for access to the application. Please see this article for steps to [enable 2FA for your backup account](/guides/two-factor-authentication-for-backup-accounts).

{% content-ref url="/pages/BHlJxkMwg0vAcPMqTaxQ" %}
[Two-Factor Authentication for Backup Accounts](/guides/two-factor-authentication-for-backup-accounts)
{% endcontent-ref %}

***

[eazyBackup](https://eazybackup.com)


# How to move your backup to a new computer

If you are replacing a computer and would like to tranfer your backup to the new computer, the guide will explain the process.&#x20;

#### What You’ll Need <a href="#what-youll-need" id="what-youll-need"></a>

Before we begin, you will need the following:

* The Username of your backup account
* The Password associated with the backup account
* A copy of the eazyBackup software on your new computer
* The **bucket name** you’ll use for backups

1. You can find your account Username(s) on the Dashboard -> Users page.&#x20;

<figure><img src="/files/hROu6CV5XChju1VE2Jej" alt=""><figcaption></figcaption></figure>

2. If don't know the password associated with the backup account, you can reset the account password from the Dashboard -> User Profile page.&#x20;

<figure><img src="/files/oGhDkLGsrH5JuZyZKPaV" alt=""><figcaption></figcaption></figure>

2. Download a copy of the eazyBackup software from the 'Download' menu in the client area. You can choose a platform version that matches the OS of new your replacement computer.

<figure><img src="/files/eqSYkR14hAXjXWxsZFqB" alt="" width="563"><figcaption></figcaption></figure>

4. Install the eazyBackup software on your new computer. Open the application and sign-in with your account Username and Password.&#x20;

<figure><img src="/files/PzAjgTkF66GccC3LJV28" alt="" width="289"><figcaption></figcaption></figure>

5. You will be prompted to register the new computer. Give the computer a name press 'Register' to add the new computer to your account.&#x20;

<figure><img src="/files/XAHyV74JjREw2u2cfJuZ" alt="" width="356"><figcaption></figcaption></figure>

6. Once the new computer has been registered, you can create a new [Protected Item](/guides/creating-protected-items). Select the files you want included in the backup and configure your schedule.&#x20;

{% hint style="info" %}
For advanced users, rather than creating a new Protected Item, you can [copy the Protected Item](/documentation/copy-a-protected-item-configuration-to-new-device) from your old computer to the new computer.&#x20;
{% endhint %}

{% hint style="warning" %}
If you have configured custom retention rules on your Protected Item, you will need to [copy the Protected Item](/documentation/copy-a-protected-item-configuration-to-new-device) to retain the retention data.&#x20;
{% endhint %}

7. If you no longer plan to perform backups from the old computer, you should to Revoke the device from your account to stop billing.&#x20;

* From Dashboard -> User -> Devices page, click on the 'Manage' button.
* From the menu that opens, select the 'Revoke' option.&#x20;

<figure><img src="/files/mNBFiBVcwMXnwC4pg38M" alt=""><figcaption></figcaption></figure>

<figure><img src="/files/mBrZe3vuLHvL6gqLVG8U" alt="" width="539"><figcaption></figcaption></figure>

{% hint style="warning" %}
When you revoke a Device, it's Protected Items and retention rules will be deleted. Backup data from the revoked Device will remain in your Storage Vault for the length of time determined by the Vault retention policy (default 30-days). You can [restore data from a revoked device](/documentation/restore-from-deleted-protected-item), if needed.&#x20;
{% endhint %}


# How to Enable Immediate Retention Cleanup

By default, backup retention policies may run separately from the backup job itself. Enabling **Immediate Retention Cleanup** ensures that old backup data is removed **immediately after a backup completes**, helping keep your storage usage under control.

This setting is useful if you want retention rules to be applied right away rather than waiting for a later cleanup process.

***

### Step 1 — Open the Protected Item Configuration

1. Open the **eazyBackup client software**
2. Select the **Protected Item** you want to modify
3. Click **Configure**

***

### Step 2 — Open the Schedule Settings

1. Select the **Schedule** tab
2. Select the schedule you want to edit
3. Click the **Edit (pencil) icon**

<figure><img src="/files/tSUOMEiDkqv1vlDH0hdU" alt="" width="563"><figcaption></figcaption></figure>

***

### Step 3 — Enable Immediate Retention Cleanup

1. In the schedule window, select the **Advanced** tab
2. Locate the option **Apply retention policy after backup**
3. Set this option to **Run immediately**

<figure><img src="/files/ivYb2vYwcPCFOD3ZWo3q" alt="" width="410"><figcaption></figcaption></figure>

***

### Step 4 — Save the Changes

Click **Save** to apply the new schedule settings.

Once enabled, it may take 1-2 backup jobs to:

* Complete the backup and locate expired data
* Run the retention policy
* Remove any old backup data according to your configured retention rules


# Proxmox VE Backup

## Proxmox VE Backup

### How to Configure Proxmox VE Backup

The Proxmox VE Protected Item backs up Proxmox virtual machines and Linux containers by connecting directly to a standalone Proxmox VE server or a Proxmox VE cluster.

For each virtual machine selected for backup, eazyBackup creates a temporary snapshot of the VM and streams the required data directly into the eazyBackup Chunking engine. Changed Block Tracking can optionally be used to reduce the amount of data that must be read during subsequent backups.

After the data has been captured, eazyBackup removes the temporary snapshot from the Proxmox host.

The machine running the eazyBackup client does not require temporary disk space equal to the size of the virtual machines being protected.

### Performance

Virtual machine disk data is streamed from Proxmox VE to the machine running the eazyBackup client. This can generate a significant amount of traffic on the internal network.

For the best performance, install eazyBackup in a virtual machine on the same local network as the Proxmox environment. When practical, run the eazyBackup VM on the same Proxmox cluster being protected.

The eazyBackup client process is named:

```
backup-tool
```

The machine running `backup-tool` must be able to establish SSH connections to the Proxmox server and, for a cluster, every node in the cluster.

You can configure how many virtual machines eazyBackup backs up concurrently. Backing up multiple VMs at the same time may improve overall throughput, but it also increases storage, network, CPU and memory utilization.

Changed Block Tracking can read only disk blocks that have changed since the previous successful backup. Unallocated disk areas are also skipped during both full and Changed Block Tracking backups.

### Requirements

#### eazyBackup client

* A current version of the eazyBackup desktop client.
* The `backup-tool` process must be running.
* The client must be on the same network as the Proxmox environment.
* The client must be able to reach TCP port 22 on the Proxmox server and every node being protected.
* For a cluster, the node names and addresses returned by Proxmox must be reachable and resolvable from the machine running eazyBackup.

#### Proxmox VE

* Proxmox VE 8.x or 9.x.
* SSH access enabled on every Proxmox node.
* Root access during the initial account configuration.
* A root account or a dedicated non-root Linux account with passwordless `sudo` access.

### Authentication Overview

eazyBackup supports the following Proxmox authentication methods:

* Root account with a password.
* Root account with a private SSH key.
* Dedicated non-root account with a password and passwordless `sudo`.
* Dedicated non-root account with a private SSH key and passwordless `sudo`.

Using a dedicated non-root account is recommended.

A Proxmox VE cluster requires two separate SSH authentication stages. Understanding these stages is important because successfully authenticating to the first node does not necessarily mean that eazyBackup can access all nodes in the cluster.

#### Authentication stage 1: Initial Proxmox connection

The eazyBackup `backup-tool` process connects to the Proxmox node entered in the Protected Item configuration.

This first connection uses the authentication method selected in eazyBackup:

* Password; or
* Private SSH key.

The node entered in the eazyBackup configuration is referred to throughout this guide as the **primary node**.

#### Authentication stage 2: Access to discovered nodes

After connecting to the primary node, eazyBackup discovers the nodes that belong to the Proxmox environment.

For a non-root account, eazyBackup looks for a usable private SSH key in the Proxmox user's home directory on the primary node:

```
~/.ssh/
```

For example, if the Proxmox Linux username is `eazybackup`, the directory will normally be:

```
/home/eazybackup/.ssh/
```

The matching public key must be authorized for the same user on every Proxmox node.

The private key entered in the eazyBackup Protected Item is used for the initial connection. It does not replace the requirement to configure the Proxmox user's SSH directory for cluster-node access.

> **Important:** Create the SSH key while logged in as the same Linux user that will be entered in the eazyBackup Protected Item. A key created under `/root/.ssh/` will not be found when eazyBackup is configured to use a different user.

### Recommended Non-Root Account Configuration

The following instructions create a dedicated Linux account named:

```
eazybackup
```

You may use a different username, but the same username must be used consistently throughout the configuration.

Run the account-creation commands as `root`.

### Configure a Single Proxmox VE Server

Use this procedure when the Proxmox environment contains only one server and is not part of a multi-node cluster.

Even on a single-server installation, configure an SSH key in the non-root user's home directory. The eazyBackup client may check this directory while discovering the Proxmox environment.

#### Step 1: Install sudo

Proxmox VE may not have the `sudo` package installed by default.

Log in to the Proxmox server as `root` and run:

```bash
apt update
apt install -y sudo
```

Confirm that `sudo` and `visudo` are available:

```bash
sudo --version
visudo --version
```

#### Step 2: Create the dedicated user

Run:

```bash
useradd -m -s /bin/bash eazybackup
passwd eazybackup
```

The `passwd` command will prompt you to create a password for the account.

If the user already exists, do not run `useradd` again. Confirm its home directory with:

```bash
getent passwd eazybackup
```

The output should show a valid home directory, normally:

```
/home/eazybackup
```

#### Step 3: Add the user to the sudo group

Run:

```bash
usermod -aG sudo eazybackup
```

Confirm the group membership:

```bash
id eazybackup
```

The output should include the `sudo` group.

#### Step 4: Configure passwordless sudo

Open a dedicated sudoers configuration file:

```bash
visudo -f /etc/sudoers.d/eazybackup
```

Add the following line:

```
eazybackup ALL=(ALL:ALL) NOPASSWD: ALL
```

Save and close the file.

Set the required permissions:

```bash
chmod 440 /etc/sudoers.d/eazybackup
```

Validate the configuration:

```bash
visudo -cf /etc/sudoers.d/eazybackup
```

The validation command should report that the file parsed successfully.

#### Step 5: Generate the SSH key as the dedicated user

Switch to the new account using a login shell:

```bash
su - eazybackup
```

Confirm the username and home directory:

```bash
whoami
echo "$HOME"
```

Expected output:

```
eazybackup
/home/eazybackup
```

Create the SSH directory:

```bash
mkdir -p ~/.ssh
chmod 700 ~/.ssh
```

Generate an RSA private key without a passphrase:

```bash
ssh-keygen -t rsa -b 4096 -f ~/.ssh/id_rsa -N ""
```

Authorize the matching public key on the server:

```bash
cat ~/.ssh/id_rsa.pub >> ~/.ssh/authorized_keys
```

Set the required permissions:

```bash
chmod 600 ~/.ssh/id_rsa
chmod 644 ~/.ssh/id_rsa.pub
chmod 600 ~/.ssh/authorized_keys
```

The directory should now contain:

```
~/.ssh/id_rsa
~/.ssh/id_rsa.pub
~/.ssh/authorized_keys
```

* `id_rsa` is the private key.
* `id_rsa.pub` is the public key.
* `authorized_keys` contains the public keys permitted to log in as this user.

#### Step 6: Test SSH and sudo

While still logged in as `eazybackup`, connect to the server using its management IP address or DNS name:

```bash
ssh \
  -i ~/.ssh/id_rsa \
  -o IdentitiesOnly=yes \
  -o StrictHostKeyChecking=accept-new \
  eazybackup@<proxmox-server-address> \
  'sudo -n true && hostname && echo "SSH and sudo are working"'
```

Replace `<proxmox-server-address>` with the IP address or DNS name that will be entered in eazyBackup.

For example:

```bash
ssh \
  -i ~/.ssh/id_rsa \
  -o IdentitiesOnly=yes \
  -o StrictHostKeyChecking=accept-new \
  eazybackup@192.168.1.50 \
  'sudo -n true && hostname && echo "SSH and sudo are working"'
```

The command must complete without requesting a password and should display:

```
SSH and sudo are working
```

Do not continue to the eazyBackup configuration until this test succeeds.

### Configure a Proxmox VE Cluster

Use this procedure for a Proxmox environment containing multiple nodes.

The dedicated Linux user must exist on every node. The primary node must contain the private SSH key, and the matching public key must be authorized for that user on every cluster node.

#### Step 1: Select the primary node

Choose one online Proxmox node to use as the primary node.

This is the node whose address you will enter in the eazyBackup Protected Item.

The private key used for cluster-node access must be generated in the dedicated user's home directory on this node.

#### Step 2: Install sudo on every node

Log in as `root` on every Proxmox node and run:

```bash
apt update
apt install -y sudo
```

#### Step 3: Create the same user on every node

On every node, run:

```bash
useradd -m -s /bin/bash eazybackup
passwd eazybackup
usermod -aG sudo eazybackup
```

Use the same username on every node.

Using the same password on every node can simplify the initial `ssh-copy-id` configuration, although key-based authentication will be used after setup is complete.

If the account already exists on a node, confirm its home directory:

```bash
getent passwd eazybackup
```

#### Step 4: Configure passwordless sudo on every node

On every node, run:

```bash
visudo -f /etc/sudoers.d/eazybackup
```

Add:

```
eazybackup ALL=(ALL:ALL) NOPASSWD: ALL
```

Save the file and run:

```bash
chmod 440 /etc/sudoers.d/eazybackup
visudo -cf /etc/sudoers.d/eazybackup
```

Repeat this process on every node.

#### Step 5: Generate the SSH key on the primary node

On the primary node, switch to the dedicated user:

```bash
su - eazybackup
```

Confirm the account:

```bash
whoami
echo "$HOME"
```

Create the SSH directory:

```bash
mkdir -p ~/.ssh
chmod 700 ~/.ssh
```

Generate the key:

```bash
ssh-keygen -t rsa -b 4096 -f ~/.ssh/id_rsa -N ""
```

Authorize the key on the primary node itself:

```bash
cat ~/.ssh/id_rsa.pub >> ~/.ssh/authorized_keys
```

Set the required permissions:

```bash
chmod 600 ~/.ssh/id_rsa
chmod 644 ~/.ssh/id_rsa.pub
chmod 600 ~/.ssh/authorized_keys
```

#### Step 6: Copy the public key to every other node

While logged in as `eazybackup` on the primary node, run `ssh-copy-id` for every other node:

```bash
ssh-copy-id -i ~/.ssh/id_rsa.pub eazybackup@<node-2-address>
ssh-copy-id -i ~/.ssh/id_rsa.pub eazybackup@<node-3-address>
```

Continue until the key has been copied to every node.

For example:

```bash
ssh-copy-id -i ~/.ssh/id_rsa.pub eazybackup@192.168.1.52
ssh-copy-id -i ~/.ssh/id_rsa.pub eazybackup@192.168.1.53
```

You may be prompted for each node's `eazybackup` account password during this step.

Only the public key is copied to the other nodes. Do not copy `id_rsa` using `ssh-copy-id`.

#### Step 7: Test every node

From the primary node, test the primary node itself:

```bash
ssh \
  -i ~/.ssh/id_rsa \
  -o IdentitiesOnly=yes \
  -o StrictHostKeyChecking=accept-new \
  eazybackup@<primary-node-address> \
  'sudo -n true && hostname'
```

Then test every additional cluster node:

```bash
ssh \
  -i ~/.ssh/id_rsa \
  -o IdentitiesOnly=yes \
  -o StrictHostKeyChecking=accept-new \
  eazybackup@<node-2-address> \
  'sudo -n true && hostname'
```

```bash
ssh \
  -i ~/.ssh/id_rsa \
  -o IdentitiesOnly=yes \
  -o StrictHostKeyChecking=accept-new \
  eazybackup@<node-3-address> \
  'sudo -n true && hostname'
```

Each command must:

* Connect without requesting a password.
* Display the correct node hostname.
* Complete without a sudo password prompt.
* Complete without a permission error.

Do not continue until the test succeeds against every node.

#### Step 8: Verify cluster node addresses

On the primary node, list the cluster members:

```bash
sudo pvecm nodes
```

Verify that every listed node is online.

Confirm that the machine running the eazyBackup `backup-tool` process can resolve and reach each node using the addresses returned by the Proxmox environment.

Test TCP port 22 from the eazyBackup machine where possible:

```bash
nc -vz <node-address> 22
```

If `nc` is not installed, an SSH connection can be used instead:

```bash
ssh eazybackup@<node-address>
```

Firewall rules must permit the eazyBackup machine to reach TCP port 22 on every node.

### Configure Authentication in eazyBackup

After completing the single-server or cluster configuration, open the eazyBackup desktop application and create or edit the Proxmox Protected Item.

You may authenticate using a password or private key.

#### Option 1: Password authentication

Enter:

* **Server address:** The management IP address or DNS name of the primary Proxmox node.
* **Username:** `eazybackup`
* **Authentication method:** Password
* **Password:** The Linux password assigned to the `eazybackup` account.

The password authenticates the initial connection from `backup-tool` to the primary node.

The SSH key stored in:

```
/home/eazybackup/.ssh/id_rsa
```

is still required for the second authentication stage.

This means that selecting Password authentication in eazyBackup does not eliminate the need to create the server-side SSH key.

#### Option 2: Private-key authentication

To use private-key authentication, display the private key on the primary node:

```bash
cat /home/eazybackup/.ssh/id_rsa
```

Copy the entire output, including the opening and closing lines:

```
-----BEGIN OPENSSH PRIVATE KEY-----
...
-----END OPENSSH PRIVATE KEY-----
```

Paste the complete private key into the Private Key field in eazyBackup.

Do not paste the contents of:

```
/home/eazybackup/.ssh/id_rsa.pub
```

The `.pub` file is a public key and cannot be used in a field that expects a private key.

The matching public key must remain in the following file on every applicable node:

```
/home/eazybackup/.ssh/authorized_keys
```

Treat the private key as a sensitive credential. Do not include it in support tickets, screenshots, email messages or documentation.

### Root Authentication

eazyBackup can also connect using the Proxmox `root` account.

Root authentication may be simpler because Proxmox clusters normally maintain SSH access for administrative cluster operations. However, using a dedicated non-root account with passwordless `sudo` provides clearer separation between backup access and general administrative access.

When using root authentication:

* Enter `root` as the username.
* Select Password or Private Key authentication.
* Make sure SSH permits the selected root authentication method.
* Confirm that root can access every required cluster node.
* Do not use a Proxmox API token in the SSH username or password fields.

### Configure the Proxmox Protected Item

#### Protected Item Configuration in the eazyBackup Desktop App

1. Open the eazyBackup desktop application.
2. Add a new Protected Item.
3. Select **Proxmox** from the Protected Item list.
4. Enter the Proxmox server or cluster credentials.

For a cluster, enter the address of the primary node on which the dedicated user's private SSH key was generated.

5. Select **Test Connection**.

A successful test confirms that eazyBackup can authenticate to the primary node and discover the Proxmox environment.

For a cluster, the test must also be able to authenticate to the remaining nodes.

6. Use the resource picker to select the virtual machines, containers and disks to protect.

eazyBackup can protect:

* All supported virtual machines and containers in a cluster.
* All supported workloads on an individual node.
* Individual virtual machines or containers.
* Individual virtual machine disks.

7. Select the isolation method for supported Linux containers.
8. Select the backup type:

* **Changed Block Tracking:** Reads disk blocks that have changed since the previous successful backup.
* **Full backup:** Reads all allocated data from the selected disks.

Changed Block Tracking is the recommended default for supported environments.

9. Save the Protected Item.
10. Configure a Storage Vault and backup schedule.
11. Run an initial backup and review the job log.

### Container Isolation

Isolation mode determines how a Linux container is handled while its backup is being created.

These options currently apply only to containers.

#### Default — Snapshot

eazyBackup creates a temporary snapshot of the container.

The container continues running during the backup. This is normally the fastest and least disruptive option, but the container must reside on storage that supports snapshots.

#### Stop

eazyBackup stops the container before backing it up and restarts it after the backup job completes.

This option is disruptive, but it can be used when the container resides on storage that does not support snapshots.

#### Suspend

eazyBackup suspends the container before backing it up and resumes it after the backup job completes.

This option is disruptive, but it can be used when snapshot-based isolation is unavailable.

### Authentication Troubleshooting

#### No SSH private keys found in `~/.ssh/`

Example error:

```
failed to get connection to other nodes in the cluster:
No SSH private keys found in ~/.ssh/
```

This normally means the initial connection to the primary Proxmox node succeeded, but eazyBackup could not find a private key for the second SSH authentication stage.

Check the account's home directory:

```bash
getent passwd eazybackup
```

Check the SSH directory as that user:

```bash
su - eazybackup
ls -la ~/.ssh
```

Verify that the following file exists:

```
~/.ssh/id_rsa
```

A common cause is generating the key while logged in as `root`. This creates:

```
/root/.ssh/id_rsa
```

That key will not be found when the Protected Item is configured with the username `eazybackup`.

Generate the key again while logged in as the configured user.

#### SSH handshake failed: unable to authenticate using public key

Example error:

```
ssh: handshake failed:
ssh: unable to authenticate, attempted methods [none publickey],
no supported methods remain
```

This means eazyBackup was able to read and parse the private key, but the Proxmox SSH server did not accept it.

Check the following:

* The correct Linux username was entered in eazyBackup.
* The private key belongs to that username.
* The matching public key appears in the user's `authorized_keys` file.
* The public and private keys are a matching pair.
* The SSH directory and files have the correct permissions.
* The account is not locked or disabled.
* The SSH server permits public-key authentication.

Compare the key fingerprints:

```bash
ssh-keygen -lf /home/eazybackup/.ssh/id_rsa
ssh-keygen -lf /home/eazybackup/.ssh/id_rsa.pub
```

The fingerprints should match.

#### Parsing SSH private key: no key found

Example error:

```
Parsing SSH private key: ssh: no key found
```

This usually means a public key was pasted into the Private Key field.

A public key normally appears as a single line beginning with:

```
ssh-rsa
```

A valid OpenSSH private key begins with:

```
-----BEGIN OPENSSH PRIVATE KEY-----
```

Display the correct private key with:

```bash
cat /home/eazybackup/.ssh/id_rsa
```

Never send the private key to eazyBackup support.

#### `visudo`: command not found

Install the `sudo` package:

```bash
apt update
apt install -y sudo
```

Then try:

```bash
visudo -f /etc/sudoers.d/eazybackup
```

#### Sudo requests a password

Test passwordless sudo:

```bash
su - eazybackup
sudo -n true
```

If the command produces an error, validate the sudoers file:

```bash
su -
visudo -cf /etc/sudoers.d/eazybackup
```

The file must contain:

```
eazybackup ALL=(ALL:ALL) NOPASSWD: ALL
```

#### One or more cluster nodes cannot be reached

Confirm that all nodes are online:

```bash
pvecm nodes
```

From the machine running eazyBackup, verify that each node can be reached over TCP port 22.

Also verify that cluster node names resolve to the correct management addresses.

A cluster may return hostnames rather than the IP address originally entered in eazyBackup. Those hostnames must be resolvable from the eazyBackup machine.

#### Test Connection succeeds but the backup fails

A successful Test Connection does not guarantee that every selected VM disk and storage backend can be accessed during a backup.

Review the backup job log and confirm:

* Every node is reachable.
* The configured user has passwordless sudo.
* The selected VM is located on an online node.
* The underlying Proxmox storage is available.
* Snapshot creation is supported and succeeds.
* The eazyBackup machine has sufficient network connectivity.
* No firewall or intrusion-prevention system is terminating long-running SSH sessions.

### Restore

A Proxmox Protected Item can be restored using several methods:

* Direct restore to Proxmox.
* Direct restore to Microsoft Hyper-V.
* Direct restore to VMware.
* Granular restore of individual files and folders from a guest.
* Restore of disk image files in `*.img` format.

### Restore Directly to Proxmox

1. Open the Restore section in eazyBackup.
2. Select the Storage Vault and Protected Item containing the required backup.
3. Select **Restore to Proxmox**.
4. Select the virtual machines to restore.
5. Enter the credentials for the destination Proxmox server or cluster.

The destination may be the original Proxmox environment or a different compatible Proxmox environment.

6. Browse the destination nodes and storage, and select where the VM will be restored.
7. Review the restore configuration.
8. Select **Restore** to begin restoring the selected virtual machines.


# e3 Cloud Backup


# Documentation


# Add and Rename Storage Vaults

### Adding new Storage Vault

New storage vaults can be created through eazyBackup and from the online [Control Panel](/guides/eazybackup-control-panel).

{% content-ref url="/pages/MjB8IIJhhOfB7U5TUXN0" %}
[eazyBackup Control Panel](/guides/eazybackup-control-panel)
{% endcontent-ref %}

**Adding Vaults using the eazyBackup application:**

* Open the application interface
* Select the menu icon
* Click Settings
* On the 'Storage Vaults' tab click the '+' button to add a new vault
* You can add an eazyBackup cloud vault or choose custom to select from other local storage and cloud storage options

{% embed url="<https://eazybackup.com/wp-content/uploads/2019/09/Add-Rename-Storage-Vault.mp4?_=1>" %}

**Adding Vaults using the online Control Panel:**

* Browse to <https://panel.eazybackup.ca/>
* Enter you account username / password to login
* Select 'Storage Vaults' from the navigation menu
* Click the 'Add new vault' button
* You can add an eazyBackup cloud vault or choose custom to select from other local storage and cloud storage options

{% embed url="<https://eazybackup.com/wp-content/uploads/2019/09/Add-and-Reanme-Vaults-from-Panel.mp4?_=2>" %}

***

### Rename Storage Vaults

**Rename Vaults using the eazyBackup application:**

* Open the application interface
* Select the menu icon
* Click Settings
* Select the Storage Vault to rename and select the pencil icon to edit.
* Enter a new name for the Vault on the General tab and then click save

**Rename Vaults using the Control Panel:**

* Browse to <https://panel.eazybackup.ca/>
* Enter you account username / password to login
* Select 'Storage Vaults' from the navigation menu
* Click the name of the Vault you want to edit
* Enter a new name for the Vault in the 'Name' field on the 'General' tab, click Save.

***

[eazyBackup](https://eazybackup.com)


# Available Storage Locations

### Local Path

***

Data will be stored on the local filesystem.

<figure><img src="/files/GslOsWP1QUPQfyYEEUkj" alt=""><figcaption></figcaption></figure>

#### Configuration

The following configuration options are available:

| **Option** | **Requirement** | **Description**        |
| ---------- | --------------- | ---------------------- |
| Local Path | Mandatory       | The path to store data |

#### Simultaneous connections

In this mode, eazyBackup does not place a limit on the number of simultaneous accesses to the storage.

#### Windows

Some versions of Windows have a limit of 255 characters in a path name. eazyBackup works around this issue, so there is no restriction on the path length that you use for local storage.

If the storage path is a mapped network drive, then ensure that you consider any path restrictions on both the mapped drive and its source drive.

### SFTP

***

Data will be stored on an SFTP server, such as OpenSSH.

#### Configuration

The following configuration options are available:

| **Option**         | **Requirement**                                       | **Description**                                                                                                                                                                                                               |
| ------------------ | ----------------------------------------------------- | ----------------------------------------------------------------------------------------------------------------------------------------------------------------------------------------------------------------------------- |
| Address            | Mandatory                                             | The hostname for the SFTP server. You may specify a port by adding a `:22` suffix. The default port is `22`.                                                                                                                  |
| Username           | Mandatory                                             | The username to log in to the SFTP server.                                                                                                                                                                                    |
| Remote path        | Optional                                              | A remote path or subdirectory where data will be stored on the SFTP server. If the path starts with `/`, it is an absolute path. If the path does not start with `/`, the path is relative to the SFTP user's home directory. |
| Authentication     | Mandatory                                             | The authentication type to log in to the SFTP server. Must be one of `Native`, `Password`, or `Private key`. In Native mode, the system OpenSSH configuration is used to log in to the server.                                |
| Password           | Required when Authentication is `Password`            | The account password.                                                                                                                                                                                                         |
| Private key        | Required only when Authentication is `Private key`    | The account private key, unencrypted, in OpenSSH format.                                                                                                                                                                      |
| Verification       | Required only when Authentication is not `Native`     | Whether to verify host keys for the SFTP server. Must be one of `Native`, `Allow any host key`, or `Custom path to known_hosts file`. In Native mode, the system OpenSSH configuration is used to check known hosts.          |
| `known_hosts` file | Required only when Verification is `Custom path` only | A local file path, used to keep track of SFTP server host keys.                                                                                                                                                               |

#### Simultaneous connections

eazyBackup has a limit of 10 simultaneous operations to an SFTP destination.

If multiple protected items are running simultaneously to an SFTP Storage Vault in eazyBackup, the number of network connections may be higher.

### FTP

***

Data will be stored on an FTP server, such as FileZilla Server or ProFTPd.

{% hint style="info" %}
**WARNING:** The FTP protocol has a number of inherent limitations, making this storage type a "last resort" for accessing certain remote data locations. If possible, you may achieve better performance and connectivity by using an alternative server, such as SFTP or the "Local Path" type over a mounted SMB or NFS share.
{% endhint %}

#### Configuration

The following configuration options are available:

| **Option**                 | **Requirement**                                             | **Description**                                                                                             |
| -------------------------- | ----------------------------------------------------------- | ----------------------------------------------------------------------------------------------------------- |
| Address                    | Mandatory                                                   | The hostname for the FTP server. You may specify a port by adding a `:21` suffix. The default port is `21`. |
| Username                   | Mandatory                                                   | The username to log in to the FTP server.                                                                   |
| Password                   | Mandatory                                                   | The account password.                                                                                       |
| Use default home directory | Optional                                                    | Whether to store data in the FTP user's home directory.                                                     |
| Custom directory           | Required only when `Use default home directory` is disabled | A remote path to store data in. Paths are relative unless anchored with a leading `/`.                      |

#### Simultaneous connections

eazyBackup makes 1 single network connection to the FTP server.

If multiple operations are running simultaneously to an FTP Storage Vault in eazyBackup, the number of network connections may be higher.

### Amazon S3

***

<figure><img src="/files/3GetmpddE7b72rXY8wx6" alt=""><figcaption></figcaption></figure>

Data will be stored in an Amazon S3 bucket.

With Amazon S3, bucket names are globally unique across all of the standard regions, so it's not necessary to specify which region the bucket is contained in (e.g. `us-east-1`, `eu-central-1`) as this can be determined automatically. The only exception is if you are storing data in an isolated region such as `China (Beijing) Isolated Region`.

If you specify a bucket name that does not exist, eazyBackup will attempt to create it automatically in the default `US East (N. Virginia)` region.

It's possible to connect to Amazon S3 using the "S3-compatible" storage type, however, a dedicated option is available owing to the popularity of this service.

#### Configuration

The following configuration options are available:

| **Option**   | **Requirement** | **Description**                                                                                                                                                          |
| ------------ | --------------- | ------------------------------------------------------------------------------------------------------------------------------------------------------------------------ |
| Region       | Mandatory       | The endpoint for accessing Amazon S3.                                                                                                                                    |
| Access key   | Mandatory       | The access key for the Amazon S3 account                                                                                                                                 |
| Secret key   | Mandatory       | The secret key for the Amazon S3 account                                                                                                                                 |
| Bucket       | Mandatory       | The globally unique name of the storage bucket                                                                                                                           |
| Subdirectory | Optional        | <p>A prefix to add to all stored blobs. This may be useful to isolate eazyBackup's<br>data within the bucket if the bucket is being shared with another application.</p> |

#### Simultaneous connections

eazyBackup makes up to 10 network connections to the Amazon S3 server.

If multiple operations are running simultaneously to an Amazon S3 Storage Vault in eazyBackup, the number of network connections may be higher.

### Google Cloud Storage

***

<figure><img src="/files/Mo6mejnFLlQjC3WQscN4" alt=""><figcaption></figcaption></figure>

Google Cloud Storage is an S3-compatible storage product within the Google Cloud Platform.

It's possible to connect to Google Cloud Storage using the "S3-compatible" storage type, however, a dedicated option is available owing to the popularity of this service.

You can retrieve credentials under the "Interoperability" section of the Google Cloud Platform web interface.

#### Configuration

<table data-header-hidden><thead><tr><th width="151"></th><th></th><th></th></tr></thead><tbody><tr><td><strong>Option</strong></td><td><strong>Requirement</strong></td><td><strong>Description</strong></td></tr><tr><td>Access key</td><td>Mandatory</td><td>The access key for the Google Cloud Platform account</td></tr><tr><td>Secret key</td><td>Mandatory</td><td>The secret key for the Google Cloud Platform account</td></tr><tr><td>Bucket</td><td>Mandatory</td><td>The globally unique name of the storage bucket</td></tr><tr><td>Subdirectory</td><td>Optional</td><td>A prefix to add to all stored blobs. This may be useful to isolate eazyBackup's data<br>within the bucket if the bucket is being shared with another application.</td></tr></tbody></table>

#### Simultaneous connections

eazyBackup makes up to 10 network connections to the Google Cloud Storage server.

If multiple operations are running simultaneously to a Google Cloud Storage Storage Vault in eazyBackup the number of network connections may be higher.

### S3-compatible

***

The protocol for object storage on Amazon S3 eventually became widespread enough to be called a pseudo-standard. A number of alternative storage providers offer S3-compatible object storage, in order to interoperate with the large body of available software and services surrounding this pseudo-standard.

#### API Compatibility

eazyBackup uses S3's streaming APIs to improve performance. You should ensure that any S3-compatible server implements streaming APIs in order to maintain compatibility.

#### Configuration

| **Option**                 | **Requirement** | **Description**                                                                                                                                           |
| -------------------------- | --------------- | --------------------------------------------------------------------------------------------------------------------------------------------------------- |
| Hostname                   | Mandatory       | The hostname for the S3-compatible server.                                                                                                                |
| Access key                 | Mandatory       | The access key for your user account                                                                                                                      |
| Secret key                 | Mandatory       | The secret key for your user account                                                                                                                      |
| Bucket                     | Mandatory       | The bucket in which to store all data                                                                                                                     |
| Subdirectory               | Optional        | A prefix to apply to all objects stored in the bucket                                                                                                     |
| Use encrypted transmission | Optional        | <p>Whether to access the S3-compatible server using the HTTPS protocol.<br>Data is encrypted and authenticated regardless of whether HTTPS is in use.</p> |

#### Simultaneous connections

eazyBackup makes up to 10 network connections to the S3-compatible Storage server.

If multiple operations are running simultaneously to an S3-compatible Storage Vault in eazyBackup, the number of network connections may be higher.

### Azure Blob Storage

***

<figure><img src="/files/fAY90uvchxrmK2znFnvR" alt=""><figcaption></figcaption></figure>

Azure Blob Storage is a public-cloud object storage service operated by Microsoft under the Azure branding.

#### Compatible implementations

eazyBackup's support for Azure Blob Storage can also be used to connect to third-party storage services that are compatible with the Azure Blob Storage API.

You can enter a custom "Realm Address" in the configuration to use a third-party storage service.

eazyBackup is compatible with storage providers based on

* Microsoft Azure Stack

#### Configuration

| **Option**    | **Requirement** | **Description**                                                                                                                                                                         |
| ------------- | --------------- | --------------------------------------------------------------------------------------------------------------------------------------------------------------------------------------- |
| Realm address | Mandatory       | <p>The hostname or URL for the Azure Blob Storage realm (usually <code>core.windows.net</code>).<br>Use a scheme-qualified URI (e.g. <code>http\://</code>) in order to toggle TLS.</p> |
| Account name  | Mandatory       | The name of your user account                                                                                                                                                           |
| Account key   | Mandatory       | The key for your user account                                                                                                                                                           |
| Container     | Mandatory       | The container in which to store all data                                                                                                                                                |
| Subdirectory  | Optional        | A prefix to apply to all objects stored in the container                                                                                                                                |

#### Simultaneous connections

A limit of 10 simultaneous operations take place to an Azure Blob Storage destination.

If multiple operations are running simultaneously to a Azure Blob Storage -based Storage Vault in eazyBackup, the number of network connections may be higher.

***

[eazyBackup](https://eazybackup.com)


# How to Run Manual Backup

Data should be backed up automatically on schedule as per the schedule setting.

At times, you may wish to immediately start a backup job, or back up to a different Storage Vault. You can back up any Protected Item to any Storage Vault by following these steps:

1. Click on a Protected Item, and click the 'Backup Now' button
2. Step through the wizard to select a destination Storage Vault
3. The backup job will start within the main window interface

***

[eazyBackup](https://eazybackup.com)


# Backing up Windows Network Shares and UNC Paths

eazyBackup can back up Windows network paths and can also back up to Windows network storage (SMB / CIFS). However, because eazyBackup runs as a service user, there are some issues with authentication to be aware of.

Please note that if you are using eazyBackup to back up data from a network device, ideally you should install eazyBackup directly on the device instead of backing it up over the network. This will also significantly improve performance as less data needs to be transferred over the LAN.

### **Mapped network drives**&#x20;

***

On Windows, each logged-on user session has its own set of mapped network drives. The service user account is unlikely to have any mapped drives. If you see error messages such as "WARNING Missing: 'Z:\\'", this is likely due to the lack of mapped drives. You can work around this by using a UNC path instead.

You can also do this manually:

* In eazyBackup, when choosing items in a Files and Folders Protected Item, you can use the "Options" button > "Add " to browse inside a UNC path. Note that this browsing occurs as your logged-in Windows user, not as the service user, and may have different file access as a result. All backup jobs run as the service user.

### **Authentication**&#x20;

***

If the UNC share requires authentication and you see error messages such as "`WARNING Lstat: CreateFile \\?\UNC\...: Access is denied`", the reason is likely that the service user account is probably not logged-in to the UNC share.

Edit the Protected Item, from the "Items" tab click the down arrow next to the "+" button.

<img src="https://eazybackup.com/wp-content/uploads/add_share_credentials.png" alt="" width="563">

Select the "Log in to network share" option from the menu to add your share credentials.
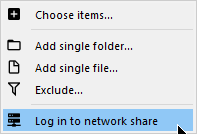
<img src="https://eazybackup.com/wp-content/uploads/login_network_share.png" alt="" width="375">

Add the path to your network share, and add network share username and password as shown in example below.
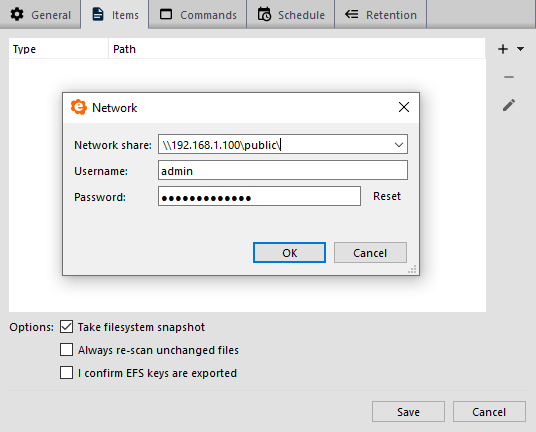
<img src="https://eazybackup.com/wp-content/uploads/network_share_credentials.png" alt="" width="563">

You can also work around this issue in eazyBackup by changing the Windows Service to use a different user account.

* Change service user on the `eazyBackup (delegate service)` service.
* If you are using eazyBackup on a Windows Server machine that is acting as the Domain Controller, you must choose a domain account.

***

[eazyBackup](https://eazybackup.com)


# Browse Job History

Click the "History" button at the top of the application.

### Filter

***

<img src="https://eazybackup.com/wp-content/uploads/backup-interface_ZlHXfRFiBj.png" alt="" width="563">

Click the "Filter" icon to toggle displaying the Filter pane. The Filter pane allows you to filter the displayed jobs by status, classification, Protected Item, Storage Vault, and device.

When the filter bar is closed, the data area shows all jobs from the current device. You can use the filter bar to show historic jobs from other devices in the account.

***

[eazyBackup](https://eazybackup.com)


# Cancel a Running Backup Job

You can cancel a running backup job in the backup app, select the Backup tab, click on the Protected Item with the running status icon.

Selecting the running item will reveal the details pane for that job which includes the Cancel button.
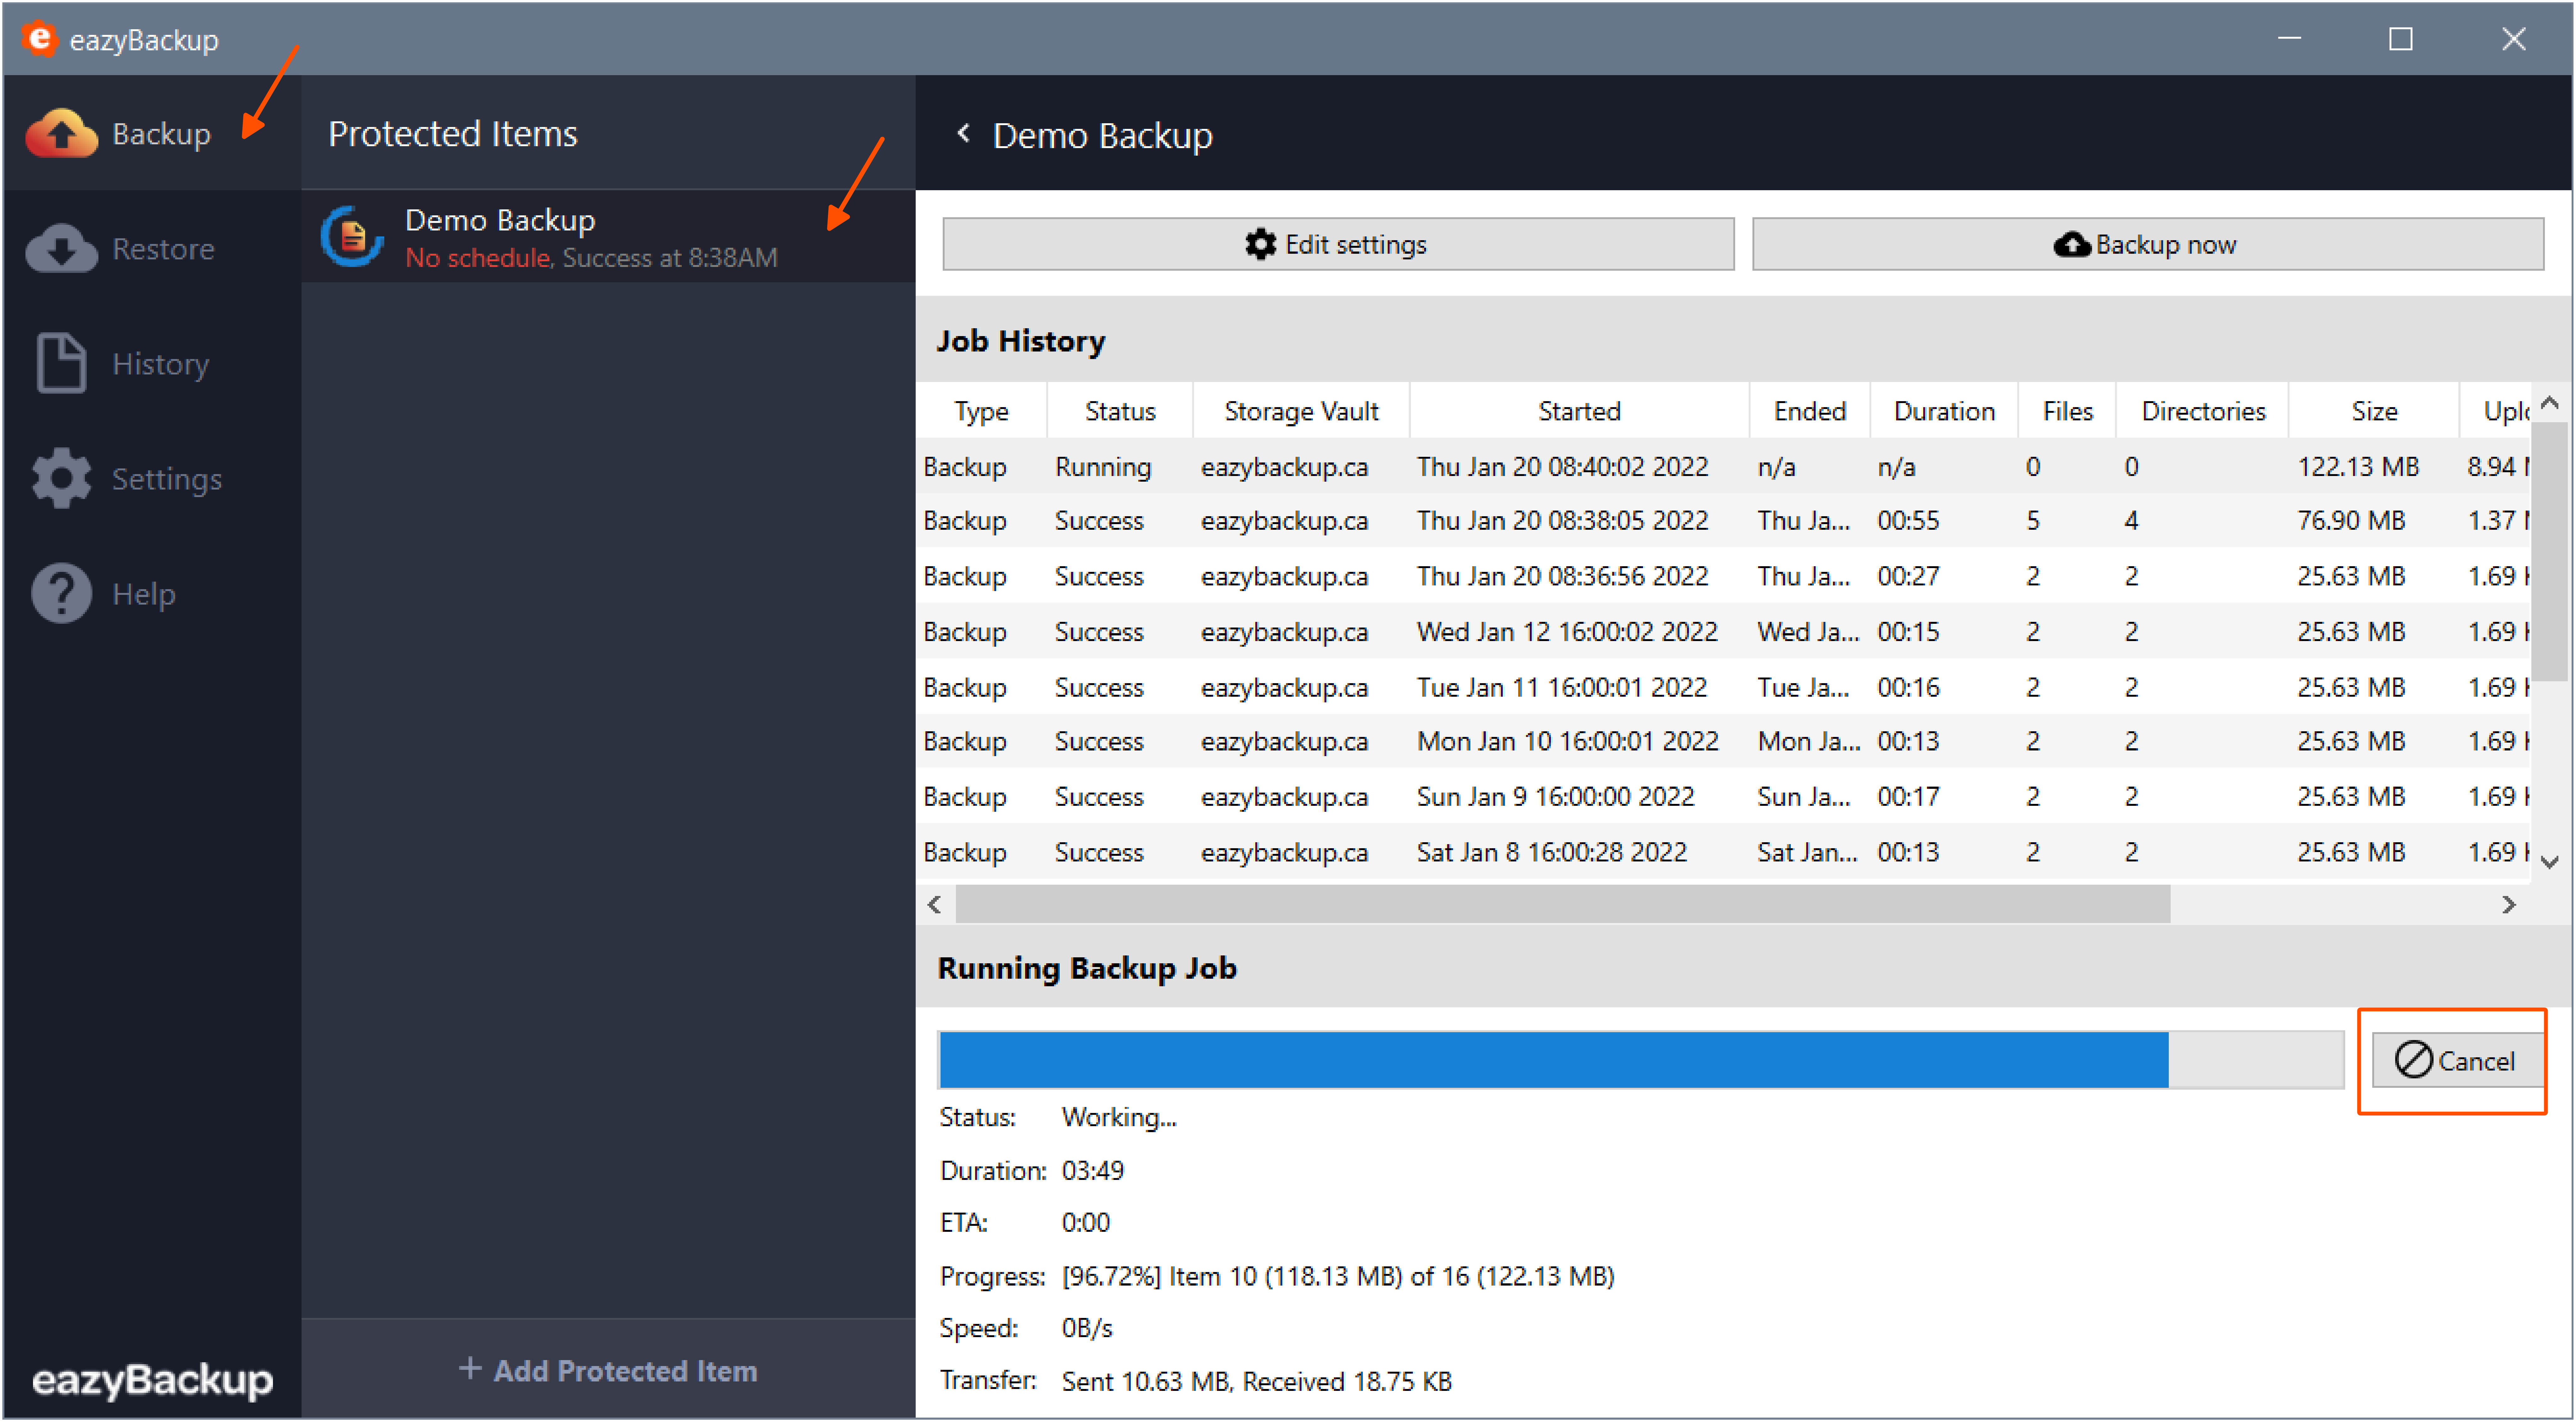
<img src="https://eazybackup.com/wp-content/uploads/2020/01/cancel_running_backup.png" alt="" width="563">

### **Procedure to force stop abandoned backup**

If the backup job appears to be in-progress but cannot be stopped and is no longer showing activity, the job may be abandoned. Please use the following procedure to stop the backup process.

Running backup jobs can be cancelled from within the desktop application or from the Control Panel.

### **Cancel Running Backup from Application**

1. First, try the procedure detailed above to cancel the running job from within the application. If there is no response using the Cancel button in the app, please use the Control Panel to cancel the job.

### **Cancel Running Backup from Control Panel**

1. Log-in to the Control Panel: [https://panel.eazybackup.ca/ ](https://panel.eazybackup.ca/)
   1. From the main menu, select History -> Job History.
   2. You can filter the list to show only running jobs - type Running in the Job History filter field.
   3. Click the Report button next to the Running job you want to Cancel
   4. On the Report page, click the Cancel button to stop the abandoned job.
   5. If the job status does not change to "Cancelled" within a few minutes, please contact support for assistance.

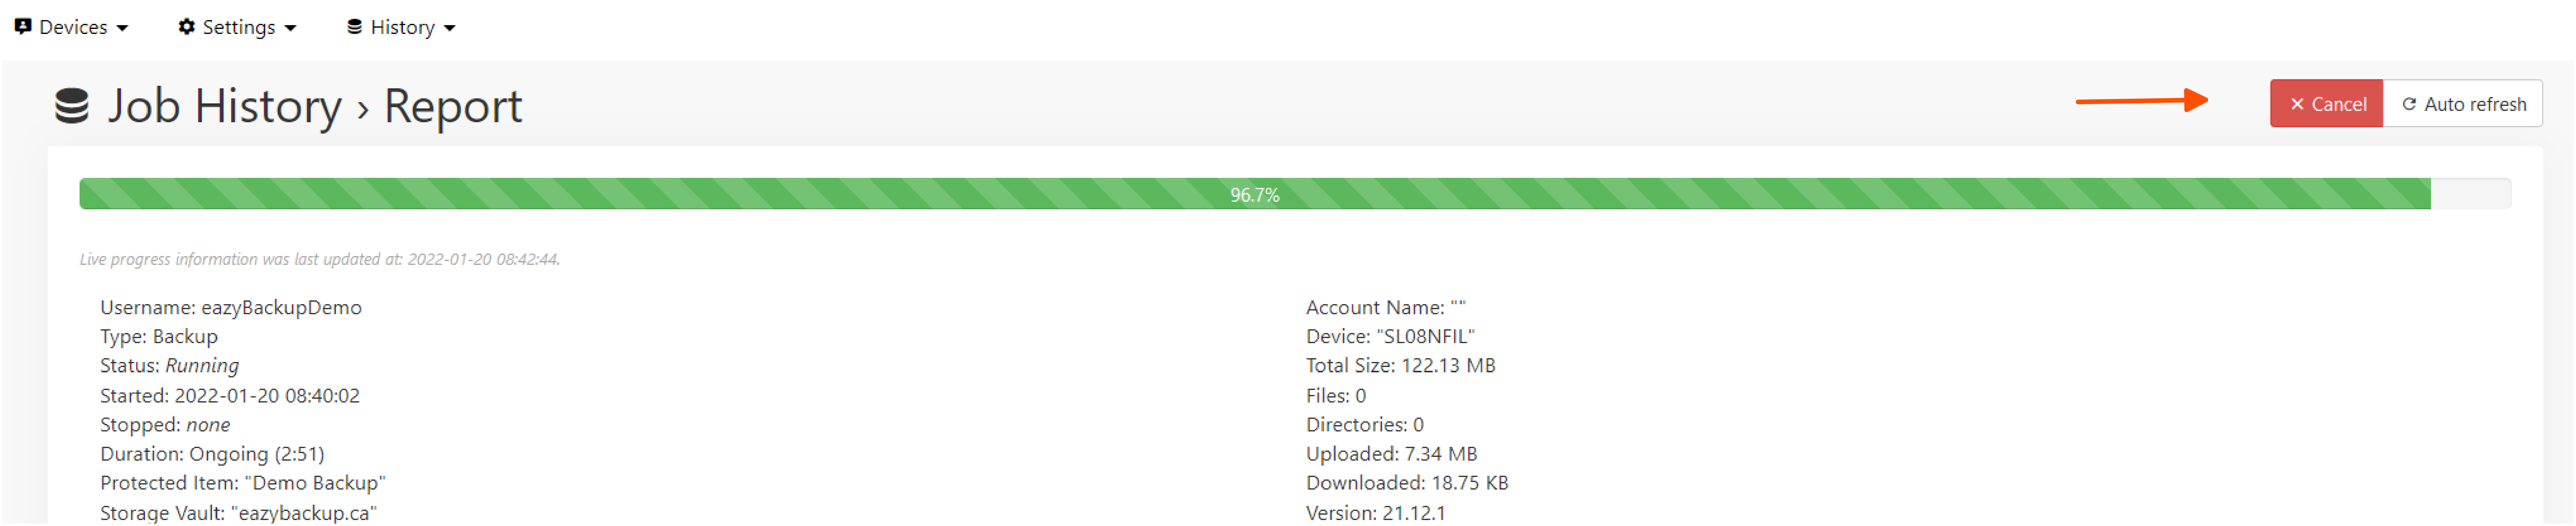
<img src="https://eazybackup.com/wp-content/uploads/2020/01/job_history_running_status.png" alt="" width="563">

<img src="https://eazybackup.com/wp-content/uploads/2020/01/job_history_running_cancel.png" alt="" width="563">

***

[eazyBackup](https://eazybackup.com)


# Commands

You can register additional commands to run before or after any backup job. For maximum flexibility, commands can be registered:

* for a Protected Item (e.g. to dump a database), or
* for a Storage Vault (e.g. to perform custom network authentication), or
* for a Schedule (e.g. to shut down the computer afterward)

During a backup job, the commands are run in this order: Schedule Before, Protected Item Before, Storage Vault Before, Backup, Storage Vault After, Protected Item After, Schedule After.

Shell built-ins can be used as part of the command execution - the specified command is passed to either `cmd.exe` or `/bin/sh` as appropriate for your operating system.

***

[eazyBackup](https://eazybackup.com)


# Backup Report Email Address

Email addresses can be configured from two locations:

* &#x20;Desktop application Accounts Settings page

* Client area Manage Accounts page

* Email reporting can be enabled and disabled per account

* Backup reports can be sent to one or multiple addresses

Open eazyBackup, select the "Account" tab, and click on "Change account settings" to update the email address.

Uncheck "Receive backup reports" to prevent eazyBackup from sending an email copy of the backup job. Logs can still be viewed from the "History" tab in eazyBackup.
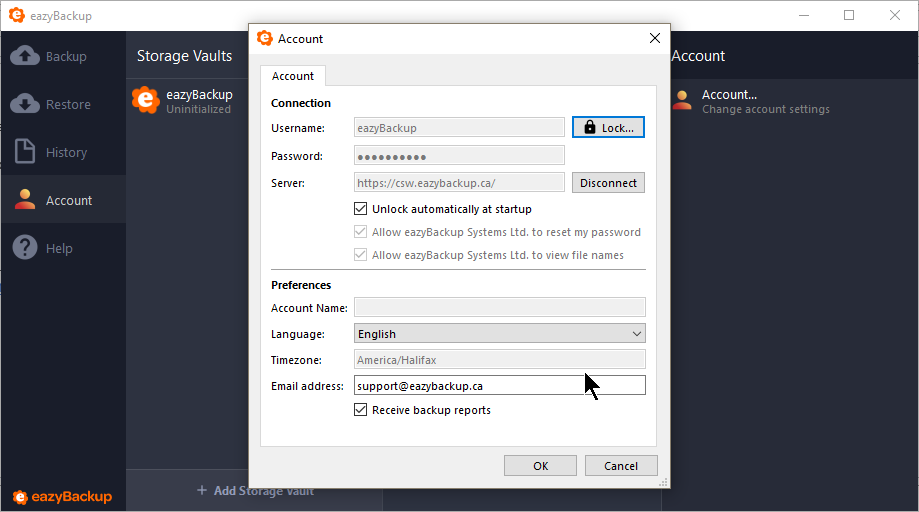
<img src="https://eazybackup.com/wp-content/uploads/backup-interface-change-email.png" alt="" width="563">

### Sending reports to multiple email addresses

You can configure eazyBackup to send reports to multiple email addresses. Use comma separated format as shown below for multiple addresses.
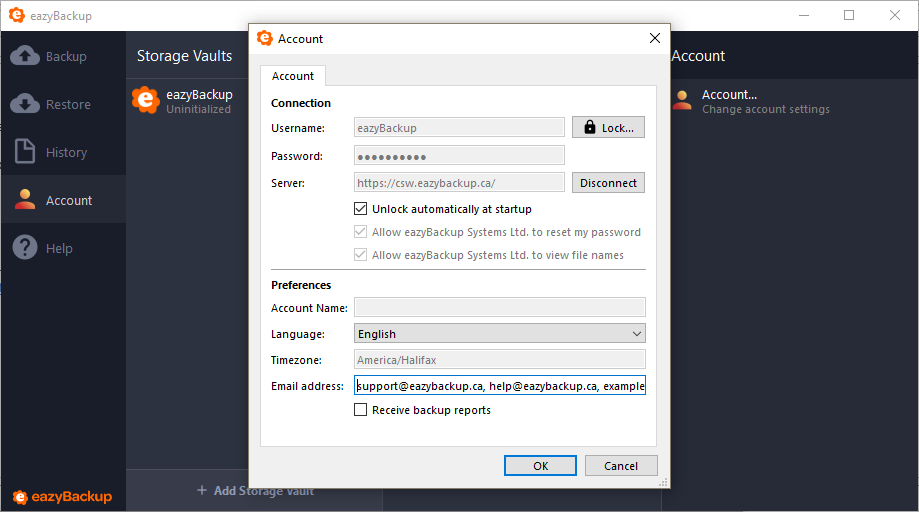
<img src="https://eazybackup.com/wp-content/uploads/backup-interface-multiple-emails.png" alt="" width="563">

### Configure report email from the client area

From the Manage Accounts page in the client area, you can configure basic email report settings

* Enable / disable reporting
* Add / remove and update email addresses

{% embed url="<https://eazybackup.com/wp-content/uploads/2019/09/eazyBackup-email-notification-settings.mp4?_=1>" %}
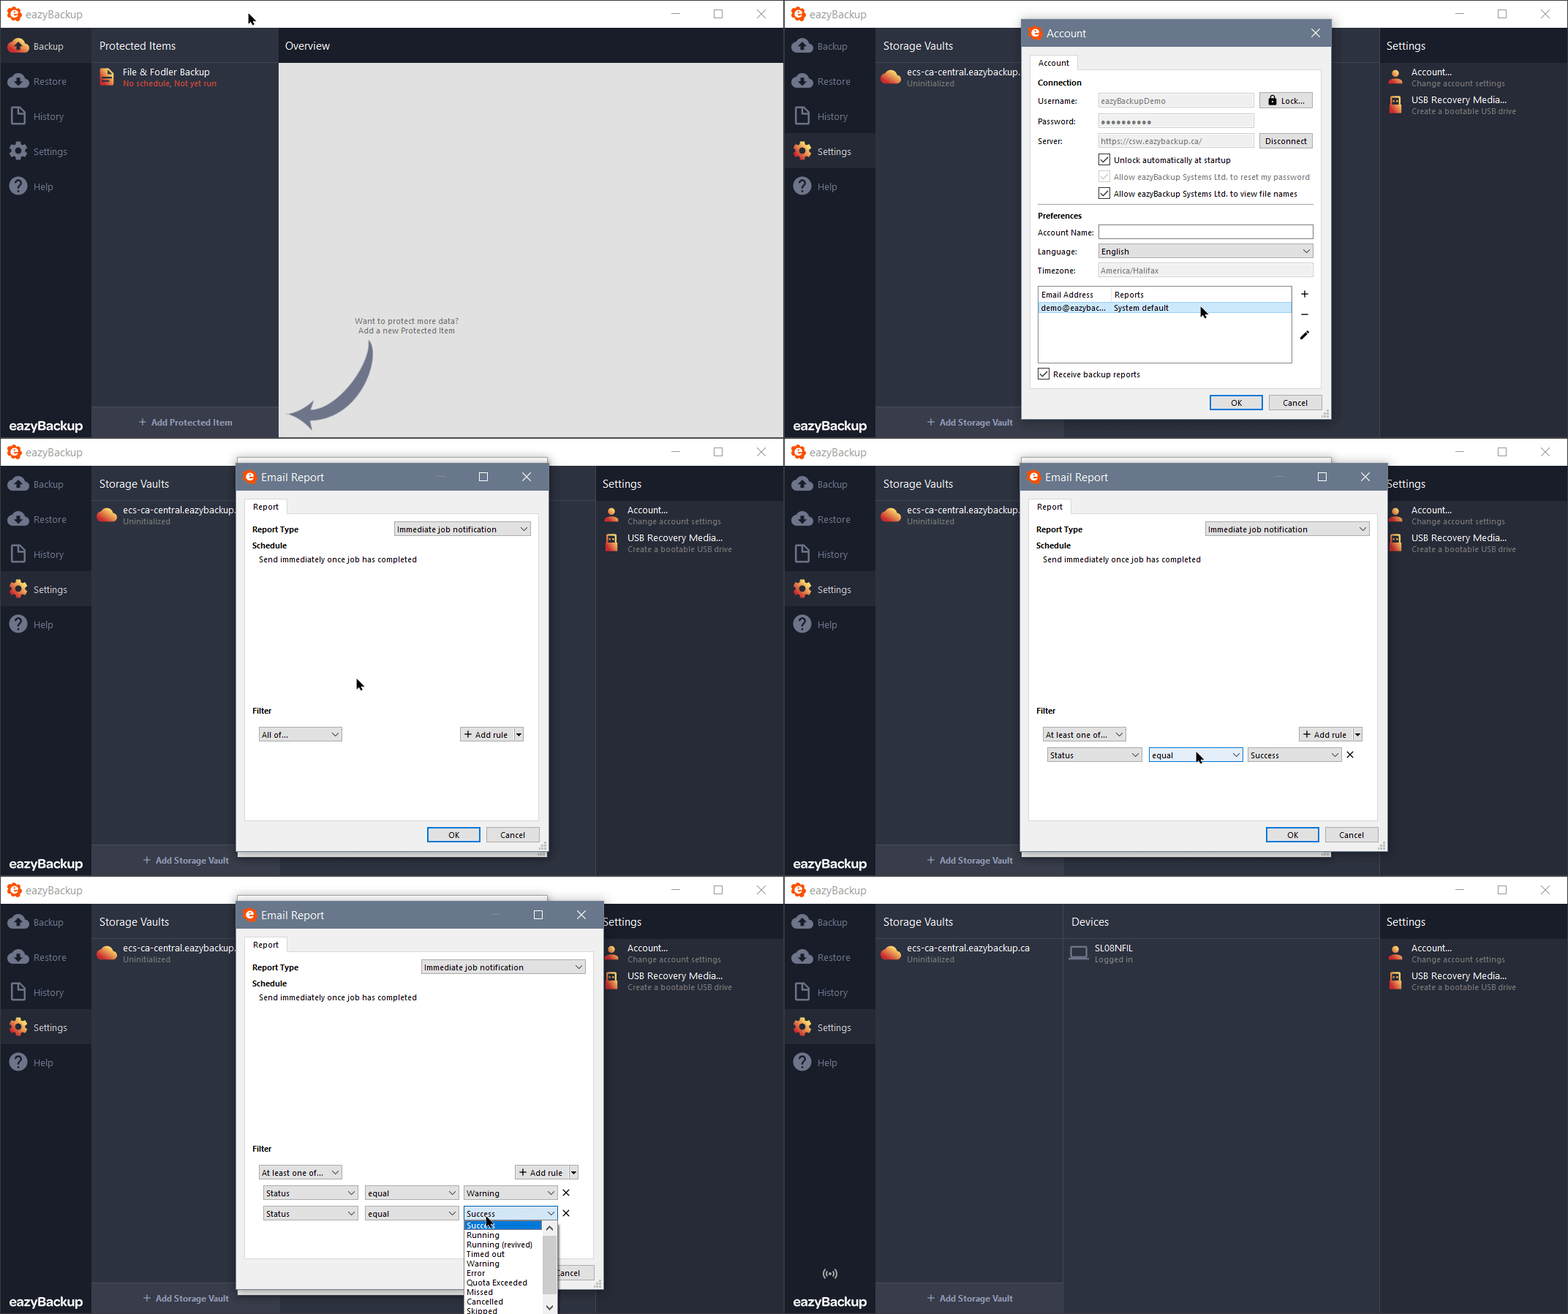
***

[eazyBackup](https://eazybackup.com)


# Custom Email Reports

The default backup report is sent immediately when a backup job of any status completes.

It is possible to customize the email reports to suit your specific needs.

You can filter on a large number of criteria including but not limited to the job's type classification, status, start time, duration, Protected Item, and Storage Vault. For advanced queries, the search system supports boolean logic (AND/OR) and arbitrary-depth clause grouping.

### **Steps to Enable Custom Reports**

Open the eazyBackup application, from the Settings tab click the "Account" button. Select the email address with the System default reports and click the Pen button to modify. Tick the box to enable custom reports and click the + to create a new filter.

<img src="https://eazybackup.com/wp-content/uploads/2021/05/Custom-Email-Reports.gif" alt="Custom Email Reports" width="563">

### **Only Send Reports When Jobs Fail**

It is possible to filter reports so that you only receive an report email when the backup jobs fails. To accomplish this, you need to set the filter to "At least one of" and create a status filter for each condition where you want to receive an email. "Status" "equal" "Variable"

**Warning Status** - This means the backup completed but the backup could be incomplete, possibly some files were missed.

**Error Status** - This status means the backup failed and did not complete

**Cancelled** - The job was manually cancelled by the customer

**Missed** - The job did not run at the scheduled time

**Skipped** - Another backup job was already running, the next schedule job was skipped
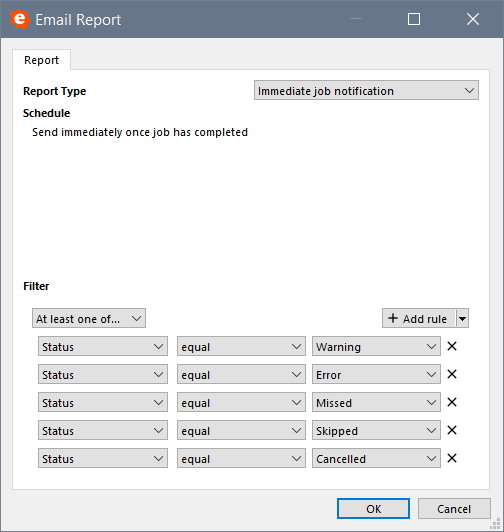
<img src="https://eazybackup.com/wp-content/uploads/2021/05/backup-interface_FIks1THF4g.png" alt="" width="563">

***

[eazyBackup](https://eazybackup.com)


# Deleting a Protected Item

You can delete a Protected Item from the client user interface. Open eazyBackup, select the "Backup" tab, right click on the Protected Item and choose "Delete". Confirm you want to delete the Protected Item.

{% hint style="info" %}
Removing a protected item does not immediately delete customer data. Data from a deleted Protected Item will remain safe in your storage vault until the retention policy on the storage vault has expired.
{% endhint %}
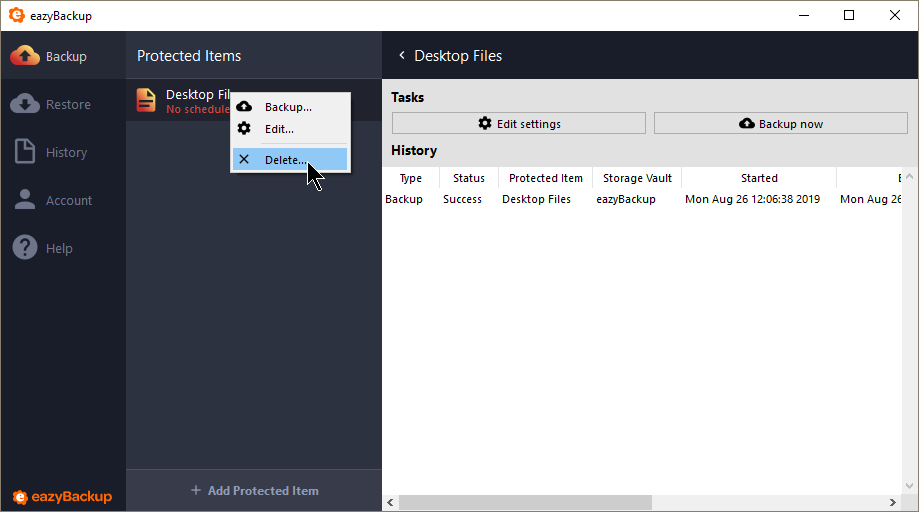
<img src="https://eazybackup.com/wp-content/uploads/backup-interface_q7SK8N3MdE.png" alt="" width="563">

***

[eazyBackup](https://eazybackup.com)


# Disk Image Backup

> *This feature requires eazyBackup 20.8.0 or later.*

> *This feature requires Windows 7, or Windows Server 2008 R2, or later.*

eazyBackup now supports taking disk image backups.

This backup type is only applicable when running on Windows. Disk Image backup on other operating systems is not currently supported by this Protected Item type.

When using the "Disk Image" Protected Item type, on the Items tab, you can select any currently-attached drives for backup, or individual partitions from any drive. It is possible to select "all drives" and exclude individual disks or partitions.

Any change to the partition structure of a drive will cause that drive to be recognized differently in eazyBackup. If you had selected such a drive, eazyBackup will warn you that the drive can no longer be found. You would need to reselect the drive and/or partitions in the eazyBackup app interface.

eazyBackup feeds raw data from each disk partition directly into its chunking deduplication engine. The disk image is deduplicated, compressed, and encrypted as it is being saved to the Storage Vault. No extra temporary spool data is generated and no additional disk space is required.

The backed-up disk image data will deduplicate with other data inside the Storage Vault. A 'Files and Folders' type backup of the same data volumes should achieve a high degree of space savings. The effectiveness of any such deduplication may be negatively affected by: (A) filesystem fragmentation on the physical volume; and/or (B) small file sizes.

eazyBackup does not currently allow additional file exclusions within a partition. A future version of eazyBackup may allow selecting files to exclude from supported filesystems (NTFS and FAT32). The files will appear to exist on the resulting disk image but contain only compressed zero ranges, saving disk space.

### Unused disk sectors&#x20;

On supported filesystems, eazyBackup will exclude unused space from the disk in the backup image. Unused space is represented as zero ranges, that are compressed during the backup phase. When restoring the disk image, the file will include uncompressed zero ranges. Please see the "Supported volume types" section for more information about what filesystems are compatible with this feature. You may disable skipping free space by enabling the "Include unused disk sectors for forensic data recovery" option.

The disk must be set as Online in Windows for eazyBackup to exclude unused space. If the disk is set as Offline in Windows, eazyBackup is unable to exclude free space, even from a supported filesystem. You can change a disk's Online/Offline state from Disk Management (`diskmgmt.msc`) or from `diskpart`.

If a disk extent does not contain a filesystem (e.g. if it is a raw byte range), then eazyBackup is unable to determine which disk sectors are needed. If you select a "Raw byte range" extent, it is backed up in its entirety, even if the "Include unused disk sectors for forensic data recovery" option is selected. If the raw data contains mostly zero bytes, it will be highly compressed during the backup phase and when stored as chunks in the Storage Vault; however, if the raw data contains mostly random data, it will not compress well.

eazyBackup always skips backing up the pagefile of the booted Windows installation (`pagefile.sys` / `swapfile.sys`), even if the "Include unused disk sectors for forensic data recovery" option is enabled.

### Supported volume types&#x20;

Please refer to the following table of filesystem support notes:

<table data-header-hidden data-full-width="false"><thead><tr><th></th><th></th><th></th></tr></thead><tbody><tr><td><strong>Filesystem</strong></td><td><strong>Skip unused space</strong></td><td><strong>Consistency</strong></td></tr><tr><td>NTFS (Microsoft)</td><td>Yes</td><td>Snapshot</td></tr><tr><td>ReFS (Microsoft)</td><td>Yes</td><td>Snapshot</td></tr><tr><td>FAT32 (Microsoft)</td><td>Yes</td><td>If volume is not in use</td></tr><tr><td>exFat (Microsoft)</td><td>Yes</td><td>If volume is not in use</td></tr><tr><td>UDF (Microsoft)</td><td>No</td><td>If volume is not in use</td></tr></tbody></table>

Third-party filesystem drivers (e.g. WinBtrfs, Ext2Ifs, Paragon Linuxfs, ZFSin) have not been officially tested against eazyBackup.

Please refer to the following table of special volume type notes:

|                       |                     |                                                                                                                                                                                                                                                                                                                                                                                                                                                                                                                                                                                             |
| --------------------- | ------------------- | ------------------------------------------------------------------------------------------------------------------------------------------------------------------------------------------------------------------------------------------------------------------------------------------------------------------------------------------------------------------------------------------------------------------------------------------------------------------------------------------------------------------------------------------------------------------------------------------- |
| **Volume type**       | **Supported**       | **Notes**                                                                                                                                                                                                                                                                                                                                                                                                                                                                                                                                                                                   |
| Basic disks           | Yes                 | Fully supported                                                                                                                                                                                                                                                                                                                                                                                                                                                                                                                                                                             |
| Dynamic disks         | Yes                 | The underlying volume will appear as "Raw byte range". For a span or striped volume, you should make sure to only select the dynamic volume for backup, not the underlying raw disk. Please also note that Dynamic disks are deprecated in Windows 8 and above.                                                                                                                                                                                                                                                                                                                             |
| Storage Spaces        | Yes                 | The underlying volume will appear as "Orphaned volume". You should make sure to select only the Storage Space for backup.                                                                                                                                                                                                                                                                                                                                                                                                                                                                   |
| Bitlocker             | Yes, while unlocked | The backup can succeed if the Bitlocker volume is unlocked. If the Bitlocker volume is locked, it should be unlocked before running the backup job, otherwise you may experience an error `This drive is locked by BitLocker Drive Encryption. You must unlock this drive from Control Panel.`. The resulting partition backup is not protected by Bitlocker and you may extract single files from it without the Bitlocker encryption key, as described below. If you restore to a physical partition, you may wish to re-enable Bitlocker after restoring, via the Windows Control Panel. |
| Cluster Shared Volume | *not tested*        | *not tested*                                                                                                                                                                                                                                                                                                                                                                                                                                                                                                                                                                                |
| Truecrypt / Veracrypt | *not tested*        | *not tested*                                                                                                                                                                                                                                                                                                                                                                                                                                                                                                                                                                                |

Please refer to the following table of physical media notes:

| **Physical media**  | **Supported** | **Notes**                                                                                                                                                                                 |
| ------------------- | ------------- | ----------------------------------------------------------------------------------------------------------------------------------------------------------------------------------------- |
| Hard drive (512n)   | Yes           | Fully supported                                                                                                                                                                           |
| Hard drive (AF)     | Yes           | 512e and 4Kn (Advanced Format) harddrives are supported.                                                                                                                                  |
| Mounted VHD / VHDX  | Yes           | Fully supported                                                                                                                                                                           |
| Removable USB drive | Yes           | Some removable drives cannot be completely offlined by the operating system; a restore operation back to the physical removable USB drive may be interrupted by other programs on the PC. |
| Remote iSCSI LUN    | *not tested*  | *not tested*                                                                                                                                                                              |
| Mounted ISO         | No            | Only harddrive (HDD / SSD) disks are supported.                                                                                                                                           |
| Optical drive       | No            | Only harddrive (HDD / SSD) disks are supported.                                                                                                                                           |
| Floppy drive        | No            | Only harddrive (HDD / SSD) disks are supported.                                                                                                                                           |

Please refer to the following table of partition table notes:

| **Partition table** | **Supported** | **Notes**                                            |
| ------------------- | ------------- | ---------------------------------------------------- |
| MBR                 | Yes           | Fully supported, including Extended partitions (EBR) |
| GPT                 | Yes           | Fully supported                                      |

### Consistency&#x20;

eazyBackup tries to take a VSS snapshot of the selected partition (*without* invoking any specific writers for quiesence). If this succeeds, the partition backup is crash-consistent.

eazyBackup tries to lock the volume handle. If this succeeds, the partition backup is crash-consistent.

Otherwise, eazyBackup will print a warning to the job log, and back up the partition in a rolling way. The backup may be inconsistent if other processes are writing to the partition at the same time.

### Restoring&#x20;

eazyBackup stores the disk image files in VMDK format. You can restore these files normally using eazyBackup.

There is one plain-text VMDK descriptor file representing metadata about the whole drive, plus separate raw image files for each partition's extent on the disk.

Partitions of the disk that were not selected for backup are represented as zero extents in the VMDK descriptor file. This means the restored disk image appears to have the full disk size, even if only a small amount of partitions inside it were selected. The zero extents will be compressed inside the Storage Vault.

On Windows, the eazyBackup Backup desktop app offers the option to restore the disk images either back to physical partitions, or as files.

Recovery of single files, with spooling&#x20;

You can restore the VMDK disk images and then extract single files from them.

At the time of writing, we recommend the following software:

* [7-Zip](https://www.7-zip.org/)
  * Free and Open Source, Windows (GUI) and macOS / Linux (command-line)
  * Can open VMDK disk descriptor and also the individual extent files
  * Supports many filesystems, including NTFS, FAT32, EXT 2/3/4, UDF, HFS, SquashFS
  * Known issues:
    * When loading the VMDK disk descriptor directly instead of the extent files, if no partition table is present (i.e. "Raw byte range" containing the MBR/GPT area at the start of the disk was not selected for backup) then the descriptor will only show an interior 'disk.img' file instead of partition contents
      * You can workaround this issue by opening the individual partition extent files
    * Early versions of 7-Zip had only limited support for disk image features. Please manually ensure your 7-Zip installation is up-to-date, as 7-Zip does not have a built-in software update feature.
* [DiskInternals Linux Reader](https://www.diskinternals.com/linux-reader/)
  * Freeware, Windows-only
  * Despite the product name, also supports Windows filesystems (NTFS, FAT)
  * Can mount VMDK files as a drive letter
    * from the menu > Drives > Mount Image > "VMware virtual disks (\*.vmdk)"
  * Known issues:
    * Fails to open the VMDK disk descriptor if there is junk data in "Raw byte range" areas.
      * You can workaround this issue by editing the descriptor file to replace these with zero extents.
      * e.g. edit `disk.vmdk` change `RW 16065 FLAT "disk-f0000.vmdk" 0` to `RW 16065 ZERO`
* [Passmark OSFMount](https://www.osforensics.com/tools/mount-disk-images.html)
  * Freeware, Windows-only
  * Can mount VMDK extent files as a drive letter
  * Known issues:
    * When loading the VMDK disk descriptor directly instead of the extent files, the disk partitions can be discovered, but mounting fails - both of the individual partitions and also when attempting to mount the VMDK as a raw disk ("Physical Disk Emulation" mode)
      * You can workaround this issue by selecting the individual extent files to mount (works using "Logical Drive Emulation" mode)
* [ImDisk Virtual Disk Driver](https://sourceforge.net/projects/imdisk-toolkit/)
  * Freeware, Windows-only
  * Can mount individual RAW extents
  * Can parse the VMDK disk descriptor, scanning for disk volumes, and allows mounting them individually
  * Not able to mount the VMDK as a whole physical disk, only able to mount its discovered volumes
* [VMware Workstation](https://www.vmware.com/)
  * Commercial software with free trial available (Windows / macOS / Linux)
  * Has a feature to mount VMDK files as a local drive letter. From the "File" menu, choose "Map Virtual Disks"
  * See more information in the [VMware Documentation (docs.vmware.com)](https://docs.vmware.com/en/VMware-Workstation-Pro/15.0/com.vmware.ws.using.doc/GUID-896E61F5-0865-4D3B-975E-DE476AFC7168.html).
* [Guestfs](http://libguestfs.org/)
  * Free and Open Source (Linux-only, command-line)
  * Install the guestfs-tools package (Debian/Ubuntu: `libguestfs-tools`, SuSE: `guestfs-tools`, RHEL/CentOS/Fedora: `libguestfs-tools-c`)
  * Supports mounting the VMDK disk descriptor file using an unprivileged FUSE backend
    * Usage: `guestmount -a disk.vmdk`
* Loop device
  * Free and Open Source (part of the Linux kernel, command-line)
  * Use the `losetup` tool (from `util-linux`)
  * Supports mounting individual partition extents, but not the VMDK disk descriptor file

### Recovery of single files, without spooling&#x20;

Depends on the 'live mount restore' planned feature

### Booting into a recovered Windows OS installation&#x20;

When migrating a Windows OS installation to different hardware, any products which use hardware identifiers as a software licensing component may lose their activation status. This includes, but is not limited to

* Windows OS activation, and
* eazyBackup device detection.

The "C:" does not contain everything needed to boot an operating system. For best results when creating a bootable image, you may wish to ensure that your backup includes

* the disk's non-partition space (that includes the GPT/MBR partition table)
* the "System Reserved Partition", if present (that contains the volume boot record)
* the EFI ESP partition, if present (on GPT disks and/or UEFI-booting machines)

### Windows 8.1, Windows 10, and later&#x20;

Current versions of Windows do generally handle being booted on dissimilar hardware without any issues.

Earlier versions of Windows&#x20;

When you boot a Windows OS installation, it may automatically become specialized for the running hardware (physical or virtual). This improves performance, but can prevent the same OS installation from booting on different hardware if the hardware is sufficiently different. The tolerable differences depend on the hardware in question.

If you experience errors booting a backed-up Windows OS disk image on different hardware (physical or virtual), it may be necessary to prepare the Windows installation for hardware-independence. You can do this by running `sysprep` inside the installation before taking the disk image; or, you can do this by booting a Windows recovery environment, mounting the image, and running `sysprep` against the attached disk.

The `sysprep` tool is installed in the `C:\Windows\system32\Sysprep\` directory and is available on all Windows SKUs. From Windows 8.1 onward, its GUI is deprecated in favor of command-line use.

### Filesystem smaller than target volume&#x20;

When restoring a smaller partition into a larger one, eazyBackup will automatically extend the restored filesystem to the fill the target partition. This feature is available on Windows if the filesystem driver supports it (the NTFS and ReFS file systems).

In other cases, the result will be a large partition containing a small filesystem. It appears to have the large size in Disk Management (that looks at the partitions) but the small size in This PC (that looks at the filesystem). The extra space from the new larger partition cannot be practically used until the filesystem is extended, to fill the partition around it.

On Windows, you can independently repeat eazyBackupet's attempt at manually extending the filesystem to fill its containing partition by

1. opening Command Prompt as administrator
2. run `diskpart.exe`
3. type `list volume`
4. Identify the target volume from the list, and then type `select volume TARGET_NUMBER`
5. type `extend filesystem`

On Linux, you can resolve this issue by using the `ntfsresize` command.

### Filesystem larger than target volume&#x20;

eazyBackup does not support restoring a large backed-up partition into a smaller physical partition. If you are trying to do this, please shrink the partition using the OS's partition manager prior to performing the backup.

### Recovery to physical hardware&#x20;

In order to restore to physical hardware, the target disk or partition should be unmounted. eazyBackup may be able to do this automatically from your current booted OS, if no programs are using the target drive (e.g. for a non-boot drive); but in order to restore to your boot drive, you should first reboot the PC into a recovery environment.

The eazyBackup desktop app supports creating a USB Recovery Media from the wizard on the Account screen.

The following options are available:

### WinRE&#x20;

WinRE is the default option for creating USB Recovery Media within the eazyBackup application.

Selecting this option allows you to create a minimal USB Recovery Media based on the Windows Recovery Environment. It requires a removable USB drive of at least 2GB in size. The size requirements may be larger if additional drivers get installed into the image.

This option requires that Windows Recovery Environment is installed and available on your PC. If it is not installed, you may be able to install it via the `reagentc /info` command.

If you choose to create a WinRE drive from inside the eazyBackup Backup desktop application, the resulting USB drive is created as follows:

* Choose an available removable USB drive
* Select options
  * You can choose whether the current OS drivers are embedded into the image
    * This feature extracts in-use third-party drivers from the current OS using the `dism /export-driver` technology. The exact selected drivers may depend on your running OS. In our experience it mostly includes OEM drivers. The included drivers could be of any type (chipset/network/graphics/audio/usb/pcie/storage/...). There are no guarantees about what drivers will be added, but it should generally be helpful in making sure you can use the device.
* The drive is created
  * No additional download is required to create the drive
  * The drive uses a hybrid MBR/EFI boot and should boot correctly on both MBR and UEFI PCs
  * The drive uses the Microsoft ntldr bootloader and should boot correctly on UEFI PCs requiring Secure Boot. If you experience issues booting the USB Recovery Media drive, you could try to temporarily disable Secure Boot from your UEFI firmware menu
  * The drive preserves the custom branding of the installed eazyBackup application
  * The drive impersonates your own Device ID and will appear to eazyBackup as the same device (when booted on the same physical hardware)
  * The drive will be either x86\_32 only, or x86\_64 only, depending on your installed Windows OS version
  * When booting the drive, the eazyBackup desktop app will appear directly. You can use eazyBackupto restore data. When exiting eazyBackup, the Windows Recovery Environment will appear, allowing you to perform any other pre-boot tasks (e.g. boot repair or access Command Prompt) before rebooting the PC normally.

#### **Limitations**

Some features are unavailable from inside the created WinRE USB drive:

* Wifi support
  * Workaround: Connect to the network via wired Ethernet instead
* VSS for backup operations
  * Workaround: It should not be necessary to use VSS for backup operations from inside the WinRE boot environment
* The Windows Disk Management GUI
  * Workaround: Use `diskpart` commands

A future version of eazyBackup may be able to resolve these issues.

The resulting WinRE USB drive is based on your PC's version of WinRE. WinRE is provided and updated by Microsoft and contains a version of the Windows kernel that is specific to the latest feature upgrade (e.g. 1903 / 1909 / 2004). For best results when using the "fix Windows boot problems" feature after a full disk restore, you should avoid using an old USB Recovery Media drive for a newer version of Windows (e.g. using a 2004-based WinRE should be able to boot-repair a 1903-based Windows installation, but perhaps not vice-versa).

#### Windows To Go&#x20;

Windows To Go is an alternative option for creating USB Recovery Media within the eazyBackup application.

Selecting this option allows you to create a full Windows boot environment. It requires an external harddrive of at least 32GB in size.

This option requires the Portable Workspace Creator (`pwcreator.exe`) to be installed and available on your PC. This tool is included in Windows Server 2012, Windows 8 Pro, Windows 8.1 Pro, Windows 10 Pro but was removed in Windows 10 update 2004 owing to the difficulty of deploying critical software updates to this platform.

No customisations are applied to the generated Windows To Go boot drive. You should boot into the drive, then install eazyBackup normally and use it to perform recovery operations such as restoring data.

### Other boot environment&#x20;

You may also create a recovery environment in any other way. Either Windows or Linux can be used as a suitable recovery environment. Some possible methods include

* creating a Linux bootable USB drive, or
* using a third-party tool like [Rufus](https://rufus.ie/) to create a Windows To Go drive, or
* using recovery media from your PC OEM vendor (e.g. Lenovo / Dell / HP)

In these cases you will need to manually launch the eazyBackup Backup app once booted into the recovery environment.

Restore from Windows boot environment&#x20;

From the Windows boot environment, run eazyBackup, and open the Restore wizard. The Restore wizard inside eazyBackup allows restoring the backed-up disks and partitions directly to your physical disks and partitions, without requiring any temporary spool space.

You can use the "edit" button to repartition the local drives using Windows Disk Management. After doing so, use the "refresh" button to refresh the local disks and partitions for restore.

To do so:

1. Select a backed-up disk or partition to restore, from the left-hand pane
2. Select a target disk or partition to write to, from the right-hand pane
3. Click the "Add to restore queue" button
4. Repeat steps 1-3 as necessary
5. Click the "Restore" button to begin the restore job.

### Restore from Linux boot environment&#x20;

#### **To restore an entire disk, with spooling:**

Restore all the `*.vmdk` disk image files to a spool drive.

Convert the main vmdk descriptor file to a physical drive, using the following command: `qemu-img convert disk.vmdk -O raw /dev/sdx`

Alternatively, you can mount the main vmdk descriptor file as an NBD volume if your kernel has NBD support (you may need to `modprobe nbd` first):

`qemu-nbd --connect /dev/nbd0 disk.vmdk`

`dd if=/dev/nbd0 of=/dev/sdx bs=8M status=progress`

#### To restore an entire disk, without spooling:

1. Restore just the `disk.vmdk` file (without the data extents), and open it in a text editor in order to read the partition sizes.
2. Recreate partitions to the exact target size.
3. Then you can restore single partitions without any local spool disk, using the "Program Output" restore option, and selecting only a single partition file for restore: `dd of=/dev/sdx1 bs=8M`

#### **To restore a single partition, with spooling:**

Recreate a partition to the exact target size.

Restore the target extent file (e.g. `disk-f0000.vmdk`)

Use `dd` to clone the selected extent file (e.g. `disk-f0000.vmdk`) to a physical partition (e.g. `/dev/sdx1`) as follows: `dd if=disk-f0000.vmdk of=/dev/sdx1 bs=8M status=progress`

#### **To restore a single partition, without spooling:**

Recreate a partition to the exact target size.

Select the file for backup, and use the "Program Output" restore option to stream the file into a command like `dd of=/dev/sdx1 bs=8M`, choosing a single partition only

A future version of eazyBackup will add built-in support for physical disk restores from a Linux boot environment.

### Recovery to local VM&#x20;

You can attach the `*.vmdk` disk image files to a new- or existing Virtual Machine. If the disk image contains a Windows OS installation, it may be bootable.

| **Virtualisation platform** | **Supports `*.vmdk` file format**       |
| --------------------------- | --------------------------------------- |
| VMware                      | Yes                                     |
| QEMU                        | Yes                                     |
| Virtualbox                  | Yes                                     |
| Hyper-V                     | No - must convert to VHD or VHDX format |

If your PC boots using EFI - for instance, if the source disk contains an EFI System Partition (ESP) - then you should configure the VM to boot in EFI mode ("Generation 2" in Hyper-V). Otherwise, you should configure the VM to boot in "Legacy" / MBR mode ("Generation 1" in Hyper-V).

### Recovery to cloud server&#x20;

You can upload the `*.vmdk` disk image files to a cloud provider. Depending on the cloud provider's capabilities, it may be possible to boot a new VM from them, or to attach them as extra disks to an existing VM.

If the disk image contains a Windows OS installation, it may be bootable. Not all cloud providers support booting Windows OS installations.

| **Provider** | **Supports `*.vmdk` file format** | **Information**                                                                                                                                                                                                                                                                           |
| ------------ | --------------------------------- | ----------------------------------------------------------------------------------------------------------------------------------------------------------------------------------------------------------------------------------------------------------------------------------------- |
| Amazon EC2   | Yes                               | <p><a href="https://aws.amazon.com/ec2/vm-import/"><https://aws.amazon.com/ec2/vm-import/></a><br><a href="https://docs.aws.amazon.com/vm-import/latest/userguide/vmimport-image-import.html"><https://docs.aws.amazon.com/vm-import/latest/userguide/vmimport-image-import.html></a></p> |
| Azure        | No - must convert to VHD format   | <https://docs.microsoft.com/en-us/azure/virtual-machines/windows/upload-generalized-managed>                                                                                                                                                                                              |
| DigitalOcean | Yes                               | <https://blog.digitalocean.com/custom-images/>                                                                                                                                                                                                                                            |
| UpCloud      | Yes                               | <https://upcloud.com/community/tutorials/import-vmware-images/>                                                                                                                                                                                                                           |

***

[eazyBackup](https://eazybackup.com)


# eazyBackup Software Structure

### Application structure

The software is split into two components; `backup-tool` is a command-line tool which implements all the software functionality. The graphical user interface is `backup-interface`, which wraps this command-line tool.

Additionally, in future versions of eazyBackup, customers will be able control their installed software remotely by logging in to the customer portal at <https://eazybackup.com/accounts/>.

On platforms without a desktop interface available (e.g. Linux / FreeBSD server), only the `backup-tool` part is used, and you can control the application via the web interface.

### Device registration

Each backup account can be used by multiple devices. This allows you to deduplicate backups from multiple accounts, since backups can be targeted to the same Storage Vault. Billing works on a per device basis, each device is allocated 1TB of storage. If you would like to add a device to your backup account, you can purchase an additional plan from the customer portal at <https://eazybackup.com/accounts/>.

When you log in to the same backup account from another device, such as a laptop or tablet, you will see a private view of Protected Items but a public view of Storage Vaults.

* You can view, edit, and use Storage Vaults configured by other devices
* You cannot view, edit, nor use Protected Items configured by other devices
* You can restore data from any device's Protected Item (hidden by default)
* You can view job logs from any device (hidden by default)

***

[eazyBackup](https://eazybackup.com)


# Error “Access to the cloud file is denied” backing up OneDrive

To save on disk space, OneDrive (and some other cloud storage providers) use a system where some files are only "virtually" stored on the local disk, and are materialized from the cloud storage on-demand.

If you encounter the "Access to the cloud file is denied" error message, this means that file in question does not exist on the local PC, and the OneDrive virtual filesystem driver is refusing to download this file on-demand for eazyBackup to read it.

At the time of writing, the only available workaround is to disable the "Files-On-Demand" feature in OneDrive. However, this may cause an unacceptable increase in local disk usage for some customers.

#### To disable the "Files-On-Demand" feature in OneDrive:

1. Right-click OneDrive in the System Tray
2. Click the menu icon -> Settings -> Sync and backup -> "Files-On-Demand" section -> Click "Download all files", Click Continue

<figure><img src="/files/ztImxVkmHhwLYR23UmDP" alt=""><figcaption></figcaption></figure>

***

[eazyBackup](https://eazybackup.com)


# Retention Concept

"Retention" is the concept of classifying backed-up data to determine what data should be kept and what data can be safely removed in order to free up disk space. For instance, you may choose to keep backed-up data from the last 30 days or all data from the last 100 backup jobs. Keep in mind any data older than this is unlikely to be useful and can be safely removed.

During a retention pass, eazyBackup looks at each backed-up job within the Storage Vault and determines whether it meets the retention policy. If the retention policy states that the backed-up job can be safely removed, the backed-up job is removed from the Storage Vault. Once all backed-up jobs are checked against the retention policy, any data chunks that are no longer referenced by a backed-up job can then be pruned to save disk space.

### Retention Rules

eazyBackup allows you to configure retention for a Storage Vault as well as for a Protected Item / Storage Vault pair.

The retention rule for the Protected Item will override the retention rule for the Storage Vault. The retention rule for the Storage Vault is therefore only applied when:

* There is no overridden retention rule for the Protected Item; or
* The Protected Item is unknown, deleted, or belongs to a different eazyBackup user account

### Retention policies

There are two categories of retention policy:

* A policy that keeps all data forever, and
* A policy that keeps data as long as it falls within any of a set of configurable ranges. You can combine multiple ranges to create a more complex policy.

#### **Retention ranges**

A retention range is a time period or job count during which a backup job should be kept.

The following ranges are available:

| Range                                              | Parameters                                       | Description                                                                                                                          |
| -------------------------------------------------- | ------------------------------------------------ | ------------------------------------------------------------------------------------------------------------------------------------ |
| `Last [...] backups`                               | Specify a number of backups to keep.             | If the backup job was within the last `X` backups, then the backup job will be kept                                                  |
| `All backups in the last [...]`                    | Specify a number of days, weeks, and/or months.  | If the backup job occurred recently within the specified range, then the backup job will be kept                                     |
| `All backups newer than a specific date`           | Specify a specific date.                         | If the backup job occurred after that specific date, then the backup job will be kept                                                |
| `One backup each day, for the last [...] days`     | Specify a number of days.                        | eazyBackup will keep the single first backup job from each of that most recent days                                                  |
| `One backup each week, for the last [...] weeks`   | Specify a number of weeks, and a day of the week | eazyBackup will keep the single first backup job that occurred on that day of the week, for each of that number of most recent weeks |
| `One backup each month, for the last [...] months` | Specify a number of months, and a calendar date  | eazyBackup will keep the single first backup job that occurred on that calendar date, for each of that number of most recent months  |

### Protected Item Retention

In the Retention section of the Protected Item, you can configure a retention policy to apply when backing up this Protected Item to a specific Storage Vault. If no policy is configured for a specific Storage Vault, the default retention policy will apply.

The retention section will display (`default`) to indicate that the Storage Vault default rules apply, `Keep (X rules)` to indicate that specific Protected Item retention rules have been applied.

If a Protected Item is removed, or has its retention rules removed, then the Storage Vault retention rules will take precedence once more, and the data associated with the Protected Item will be kept, or removed, in accordance with the Storage Vault retention rules.

### Retention Pass

When you apply retention rules, you are performing a "retention pass". A "retention pass" is the act of cleaning up data from the Storage Vault that exceeds the configured retention policy.

During a retention pass, the desktop application looks at each backed-up job within the Storage Vault and determines whether it meets the retention policy. If the retention policy states that the backed-up job can be safely removed, the backed-up job is removed from the Storage Vault. Once all backed-up jobs are checked against the retention policy, any data chunks that are no longer referenced by a backed-up job can then be pruned to save disk space.

***

[eazyBackup](https://eazybackup.com)


# Confirm EFS keys are Exported (Windows EFS)

EFS is a Windows feature that allows you to encrypt individual files on disk. eazyBackup supports backing up EFS-encrypted files on Windows. The files will be silently decrypted if possible (e.g. if eazyBackup Backup is running as the encryption user, or if eazyBackup Backup is running as the EFS Recovery Agent user).

If it is not possible to automatically decrypt the file for backup, eazyBackup will back up the file in its encrypted form, and will only be able to restore it in its encrypted form. EFS-encrypted files are displayed with green text in the Restore browser dialog in eazyBackup.

If you have a PC failure, the EFS encryption keys may be lost. In this situation, the EFS-encrypted files may be unusable, even after restoring from backup. eazyBackup warns you about this situation by adding a warning message in the backup job log.

In order to safely prepare for this scenario, you should export the PC's EFS encryption keys, so that the files can be accessed after a PC failure. On Windows, you can do this via `certmgr.msc`; or on Windows Server, taking a System State backup may be sufficient.

Once you have safely backed up the PC's EFS encryption keys, you can suppress the warning in eazyBackup by enabling the "I confirm EFS keys are exported" option in the Protected Item settings.

If you have only a partial PC failure (e.g. files lost, but OS installation and user accounts remain intact), the EFS-encrypted files will be restorable without any further attention to the EFS keys.

#### Finding files using EFS:

You can use the cipher `/u /n` command to list all files on the local PC that are EFS-encrypted.

#### Finding the certificate used to encrypt a file:

You can use the cipher `/C C:\path\to\file.txt` command to display the user accounts and certificates that are able to decrypt a file. This may indicate which user originally encrypted the file and/or which EFS certificates are necessary for backup.

***

[eazyBackup](https://eazybackup.com)


# Data Encryption – Understanding Our AES-256 Encryption & Key Management

eazyBackup always encrypts all user data before storing or transmitting it, using strong AES-256-CTR with Poly1305 in AEAD mode with high-entropy random keys.

{% hint style="info" %}
**Encryption is enabled by default and cannot be disabled.**
{% endhint %}

Encryption keys for your data are automatically generated and managed by the eazyBackup app. The data encryption keys are then encrypted against your backup account password, and stored on the Server.

&#x20;This means that (A) eazyBackup is unable to decrypt data without the customer's password; and (B) in the event of a customer PC loss, only the customer's password is necessary to log in to the account and restore data.

1. **AES-256-CTR with Poly1305 in AEAD mode**: This is the core encryption technology used. AES-256-CTR refers to the Advanced Encryption Standard with a 256-bit key in Counter mode, which is a form of symmetric key cipher. This mode encrypts data in blocks, making it highly efficient and secure. Poly1305 in AEAD (Authenticated Encryption with Associated Data) mode adds an additional layer of security by providing message authentication, which checks the integrity and authenticity of the data.
2. **High-entropy random keys**: High-entropy keys are used to increase the cryptographic strength of the encryption, making it much harder for attackers to predict or brute-force the encryption keys.
3. **User's password and key derivation**: The user's password is not used directly as an encryption key. Instead, it undergoes a process called PBKDF2-SHA512 (Password-Based Key Derivation Function 2 using SHA-512 hashing), which derives two 192-bit keys (labeled as "L" and "R"). This method involves using the password to generate a unique key, fortified by the hashing process, making it more secure against brute force attacks.
4. **Hard-coded parameters for repeatable output**: The use of hard-coded parameters in the key derivation process ensures that the output (derived keys) is consistent every time, based on the same input parameters. This is important for system reliability and user authentication.

&#x20;

***

[eazyBackup](https://eazybackup.com)


# eazyBackup Chunking Overview

#### **Overview**

At the core of eazyBackup is our technology which allows us to back-up and restore faster than the competition: this is called "Chunking".

#### **Backing up**

We back up data by first splitting it into variable-sized chunks, which are individually compressed, encrypted, and uploaded. eazyBackup uses data-dependent chunking, efficiently splitting a file into consistent chunks even in the face of random inserts.

Further incremental back-up jobs simply realize that chunks already exist on the server and do not need to be re-uploaded.

#### **Restoring**

When it comes to restoring, eazyBackup is just as fast. eazyBackup directly downloads only the chunks it needs for the file and requires no additional space other than the size of the file. Additionally, there are no CPU intensive merging processes.

***

[eazyBackup](https://eazybackup.com)


# eazyBackup Chunking and Deduplication

eazyBackup starts by first splitting data into variable-sized chunks, which are individually compressed, encrypted, and uploaded. eazyBackup uses data-dependent chunking, efficiently splitting a file into consistent chunks even in the face of random inserts.

A backup job consists of a list of files and which chunks would be needed to reconstruct them. Any successive incremental backup jobs simply realize that chunks already exist on the server and do not need to be re-uploaded.

This chunking technique has the following properties:

* Both the oldest and the most recent backup jobs can be restored with the same speed
* Duplicate data does not require any additional storage, since the chunks are the same ("deduplication")
* There is never any need to re-upload the full file, regardless of the number of backup jobs
* There is no need for the server to be trusted to decrypt data

***

[eazyBackup](https://eazybackup.com)


# Storage Vaults

### General tab

***

On the 'General' tab, you can give a name to the Storage Vault. You can use any name; if you have multiple Storage Vaults within an account, we would recommend using a name that identifies the content and/or purpose of the particular Storage Vault.

On this tab, you can also configure a retention policy for the Storage Vault.

#### **Quota (Storage Vault)**

When a backup job is performed, the total size of the Storage Vault is measured and checked against your quota limit. As the job proceeds, the amount of uploaded data is compared against the remaining available size, and the backup job will be aborted once reaching this limit.

#### **After a quota has been exceeded**

A backup job that is abandoned as a result of reaching its Storage Vault quota does not remove the chunks that were uploaded to the Storage Vault. Future backup jobs will almost certainly fail immediately. In this situation, you have two choices:

1. Contact eazyBackup to increase your Storage Vault quota and retry the backup. This will cause any existing chunks in the vault to be re-used, accelerating the backup quickly up to the point where it was interrupted; or
2. Use the "Apply retention rules now" feature to clear unused chunks from the Storage Vault. This will reduce the data size within the Storage Vault and allow future backups to proceed

You should choose one of the two options depending on your particular situation.

### Storage tab

***

On the "Storage" tab, you can configure the data storage location for this Storage Vault. A number of types are available, including local disk storage, network accounts, and cloud storage providers.

### Commands

***

The "Commands" feature on a Protected Item works the same way as for "Commands" on a Storage Vault or on a Schedule. For more information about the Commands feature, please see the [Commands article](/documentation/commands).

{% content-ref url="/pages/L7Q3LJw9lYmaVpKnkEgO" %}
[Commands](/documentation/commands)
{% endcontent-ref %}

### Encryption

***

eazyBackup automatically enables encryption for all Storage Vaults. This is not customizable; the "Encryption" tab solely serves to indicate that fact.

Storage Vault encryption is initialized upon first-use. You can use this tab to tell whether a Storage Vault has been initialized with an encryption key and when the initialization was performed (according to records in the user account profile).

***

[eazyBackup](https://eazybackup.com)


# Re-scan Unchanged Files

In a regular "Files and Folders" backup, eazyBackup will skip over files that have the same file size and modification time as the last backup job. If these properties are the same, eazyBackup will refer to previous chunks and not re-chunk the file. This dramatically improves performance.

If you are working with certain types of files that change content without updating their modification time attribute on the filesystem - for instance, applications that use direct disk I/O instead of filesystem functions; some database data files; or VeraCrypt container files - then the above is obviously unsatisfactory for ensuring backup integrity. In this case, you can enable the "Rescan unchanged files" feature to cause eazyBackup to chunk every encountered file. This has some performance penalty but does ensure backup integrity in the presence of such files.

***

[eazyBackup](https://eazybackup.com)


# Required URLs and Ports for eazyBackup

This reference article lists every endpoints used by eazyBackup and OBC. If your organization restricts computers on your network from connecting to the Internet, this article lists the Fully Qualified Domain Names (FQDNs) and ports that you should include in your 'outbound allow lists' to ensure your computers can successfully use the eazyBackup and OBC services.

#### **To use eazyBackup, the following endpoints need to be accessible to client computers**

<https://csw.eazybackup.com> Destination Port: 443\
<https://ca-central-1.eazybackup.com> Destination Port: 443

#### **To use OBC, the following endpoints need to be accessible to client computers**

<https://csw.onlinebackupcanada.ca> Destination Port: 443\
<https://ca-central.onlinebackupcanada.ca> Destination Port: 443

***

[eazyBackup](https://eazybackup.com)


# Setting up a New Backup Account (license) in My Dashboard

1. Log into Your [Client Area](https://accounts.eazybackup.ca/) to access your dashboard.
2. From your dashboard, under the PLANS dropdown menu, choose the product license you require.

*You'll see Workstation and Fileserver licensing for both the eazyBackup and Private Label (OBC) products.*

> *\* Each license can also be chosen with the DiskImage add-on if you would like the ability to create an image backup as well as the standard file/folder backup.*

3. Once you’ve chosen your product, you'll move through a few quick questions setting up the license - choose a Username, Password and billing term (monthly, yearly).

> *\*Each license comes with 1TB storage - it is at this stage where you'll be able to add on additional storage if you require more than 1TB.  The same applies to add-on devices - if you require more than 1 endpoint (device), you can add on another device if needed.*

> *\*Add-on storage and devices can also be applied at a later date if/when required.  \* please contact your eazyBackup account representative if you have any questions.*

Click **CONTINUE**.

4. The last step will ask for your Partner Validation (Promo) Code.  Each Partner/Reseller is issued a Validation code.

Enter your code and click "VALIDATE CODE".

Click **CHECKOUT**.

5. At the end of the transaction you'll be able to download the product software and carry on with your setup and deployment.

> *\* Using your validation code will extend billing for 30 days.  Your activation code can be used with every license you set up, whether it be a backup account for a client or a prospective client who's just Trialing.*

> *\* Backup accounts/licensing can be cancelled anytime within 30days.  You can do this from within your dashboard area, or by contacting your ezB rep.*

***

[eazyBackup](https://eazybackup.com)


# Before and After Commands

You can register additional commands to run before- or after any backup job. For maximum flexibility, commands can be registered:

* for a Protected Item (e.g. to dump a database), or
* for a Storage Vault (e.g. to perform custom network authentication), or
* for a Schedule (e.g. to shut down the computer afterward).

During a backup job, the commands are run in this order:

1. Schedule Before
2. Protected Item Before
3. Storage Vault Before
4. Backup Job
5. Storage Vault After
6. Protected Item After
7. Schedule After

Shell built-ins can be used as part of the command execution - the specified command is passed to either `cmd.exe` or `/bin/sh` as appropriate for your operating system.

***

[eazyBackup](https://eazybackup.com)


# eazyBackup Hotfix Install

Hotfixes are normally released with a replacement `backup-tool` file.

### Applying backup-tool.exe hotfixes on Windows <a href="#applying-backup-toolexe-hotfixes-on-windows" id="applying-backup-toolexe-hotfixes-on-windows"></a>

1. Exit the eazyBackup app from the system tray
2. Stop eazyBackup's background services
   * Use `services.msc` or Task Manager to stop the "eazyBackup (delegate service)" and "eazyBackup (elevator service)" services
3. Replace files inside `C:\Program Files\eazyBackup\backup-tool.exe` with updated version
4. Restart all stopped background services
5. Open the eazyBackup app

### Applying backup-tool hotfixes on macOS <a href="#applying-backup-tool-hotfixes-on-macos" id="applying-backup-tool-hotfixes-on-macos"></a>

1. Exit the eazyBackup app from the system taskbar
2. Stop eazyBackup's background services
   * `sudo launchctl unload /Library/LaunchDaemons/backup.delegate.plist`
   * `sudo launchctl unload /Library/LaunchDaemons/backup.elevator.plist`
3. Replace files inside `/Applications/eazyBackup.app/Contents/MacOS/backup-tool` with updated version
4. Restart all stopped background services
   * `sudo launchctl load /Library/LaunchDaemons/backup.elevator.plist`
   * `sudo launchctl load /Library/LaunchDaemons/backup.delegate.plist`
5. Restart the eazyBackup app

***

[eazyBackup](https://eazybackup.com)


# Default File / Folder Exclusions From Backup

By default eazyBackup will apply a number of rules to exclude specific files and folders from your backup. These files and folders are excluded to help ensure that backups will complete successfully, without error.

The exclusion rules that follow are global and can not be removed or altered for an individual account. In cases where you need to backup one of the excluded locations, we recommend customers create a local backup solution to copy files from one of the excluded locations to a different location that can be included in your cloud backup.

There are currently no exclusions on macOS.

The following files folders (and subfolders) locations are excluded on Windows Operating Systems.

> C:\Users\\\*\AppData\Local\Comms\\\
> C:\\$Recycle.Bin\\\
> C:\Infected-Files\\\
> C:\System Volume Information\\\
> C:\Users\\\*\AppData\Local\Microsoft\WindowsApps\\\
> C:\Users\\\*\AppData\Local\Packages\\\
> C:\hiberfil.sys\
> C:\pagefile\sys\
> C:\swapfile.sys\
> \*\\$RECYCLE.BIN\
> C:\Windows\
> C:\Program Files (x86)\LenovoBrowserGuard\\\
> C:\ProgramData\Dell\\\
> C:\ProgramData\Microsoft\Diagnosis\\\
> C:\Users\\\*\AppData\Local\Microsoft\WindowsApps\\\
> C:\Users\\\*\AppData\Local\Packages\\\
> \*/.Spotlight-V100/

***

[eazyBackup](https://eazybackup.com)


# Restore from Deleted Protected Item

To restore files from a protected item that has been deleted, open the restore menu in the eazyBackup app , select the storage vault, check "show unknown items"

Step 1. Select the restore menu.

<img src="https://eazybackup.com/wp-content/uploads/2022/08/restore_deleted_item_1.png" alt="" width="563">

Step 2. Select a storage vault or continue with the default if you only have one.
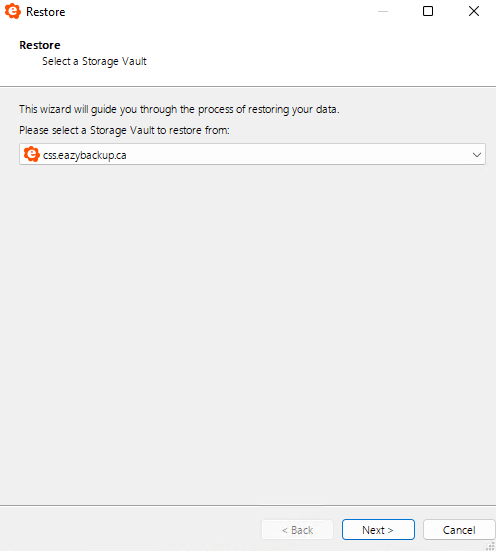
<img src="https://eazybackup.com/wp-content/uploads/2022/08/restore_deleted_item_2.png" alt="" width="563">

Step 3. Tick the "Show unknown items" box.

* Deleted Protected Items will appear as "Unknown" items
* Click the caret to expand the Protected Item to view all available dates you can restore from.
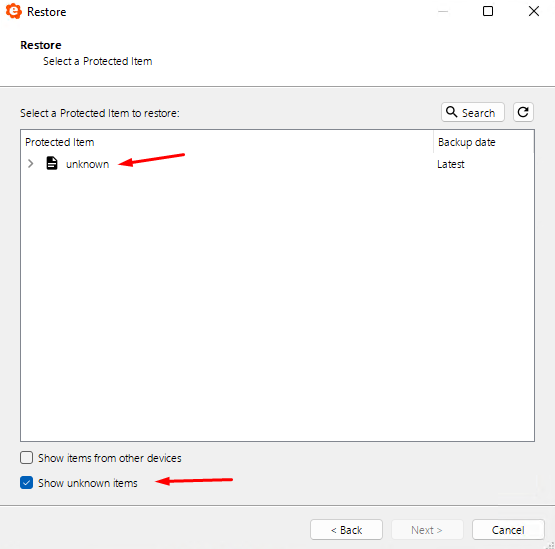
<img src="https://eazybackup.com/wp-content/uploads/2022/08/restore_deleted_item_3.png" alt="" width="563">

***

[eazyBackup](https://eazybackup.com)


# Random Job Delay – Protected Item Schedule

This feature will delay the start of each job by a random number of minutes between 0 and the configured number.

If your Protected Item is scheduled to start at 9:00, and you set a 30 minute Random Delay, this would mean that the jobs would randomly start somewhere between 9:00 and 9.30. The start time is chosen on a per-job basis, so different delays between 0 and the maximum configured number will apply to each job.

If you have several backups starting at the same time, this means that instead of all jobs starting within seconds of each other, the load will be distributed approximately evenly over the configured number of minutes, which will reduce the peak CPU / Network.

If you have a site with 100 backups starting at 9:00 and use a 30 minute random job delay, this would result in the 100 jobs being relatively evenly spread over the 30 minutes between 9:00 and 9:30. Typically the 100 jobs would start all at once.

A random job delay on all jobs starting at 9:00, for e.g., will help spread the load out over time; you could additionally change the start times of some of these jobs to help as well

{% embed url="<https://eazybackup.com/wp-content/uploads/2023/03/Protected-Item-Backup-Random-Job-Delay.mp4?_=1>" %}

***

[eazyBackup](https://eazybackup.com)


# Copy a Protected Item Configuration to New Device

From the eazyBackup Control Panel, you can copy and paste Protected Item configurations between your devices. To copy a Protected Item, follow these steps:

* Log in to the control panel:  <https://panel.eazybackup.ca/>
* Select the Protected Items icon
* On the Protected Items page, click the 'Copy' button next to the item you want to move
* Click the 'Paste' button that appears at the top of this page
* Select the new device from the list

Copying and pasting a Protected Item does not copy backup data, this function is only moving the configuration including file selection, retention settings and schedules.

{% embed url="<https://eazybackup.com/wp-content/uploads/2023/04/eazyBackup-Copy-Protected-Item.mp4?_=1>" %}

***

[eazyBackup](https://eazybackup.com)


# Manage Vaults on Protected Items – Add/Remove/Update

Protected Item schedules can be configured to back up to one or multiple storage vaults. It is also possible to change the vault used by the Protected Item schedule at any time.

* The vault used during scheduled backups can be managed from the Schedule settings of the Protected Item.
* By defining more than one schedule for a Protected Item, you can use that Protected Item to backup to multiple locations
* You do not need to create a separate Protected Item to backup to different vaults. For example, if you want to back up to a both a local vault and a cloud vault, you can configure two schedules on one Protected Item. Each schedule you create can use a different vault, those schedules can run simultaneously or at different times.

The Protected Item schedule can be managed in the desktop application or online using the control panel. The video examples below show how to manage the vaults on a Protected Item schedule using either the application or the control panel.

### Managing vaults using the application

{% embed url="<https://eazybackup.com/wp-content/uploads/2023/04/manage_protected_item_vault_settings.mp4?_=1>" %}

### Managing vaults from the control panel

{% embed url="<https://eazybackup.com/wp-content/uploads/2024/07/control_panel_manage_vault_on_Protected_item.mp4>" %}

<figure><img src="https://eazybackup.com/wp-content/uploads/2023/04/manage_protected_items_vault_online.mp4" alt=""><figcaption></figcaption></figure>

***

[eazyBackup](https://eazybackup.com)


# How to Remove a Registered Device

## How to Revoke a Registered Device

You can revoke a registered device directly from the eazyBackup Dashboard. This is useful when a device is no longer in use, has been replaced, or should no longer be associated with a user's eazyBackup account.

> **Note:** Revoking a device removes its registration from the eazyBackup account. If you also need to remove the eazyBackup software from the computer, use the **Uninstall Software** action separately.

### Revoke a Device

1. Sign in to the **eazyBackup client portal**.
2. From the main navigation, select **Dashboard**.
3. In the **Backup Dashboard**, select **Users**.
4. Click the **username** that owns the registered device.
5. From the user navigation menu, select **Devices**.
6. Locate the device you want to revoke and click **Manage**.
7. The **Manage Device** panel will open on the right side of the screen.
8. Click **Revoke**.
9. Confirm the action if prompted.

The device registration will be revoked from the user's eazyBackup account.

<figure><img src="/files/b3JqZXRXSQSXTHQHwICq" alt=""><figcaption></figcaption></figure>

<figure><img src="/files/QVbOscbHilYK2y3BZdFs" alt=""><figcaption></figcaption></figure>

### Revoke vs. Uninstall

The **Revoke** and **Uninstall Software** actions serve different purposes:

* **Revoke** removes the device's registration from the eazyBackup account and stops billing.
* **Uninstall Software** instructs the device to remove the eazyBackup client software.

If the computer is being permanently retired or removed from service, you may want to uninstall the software in addition to revoking the device.

***

[eazyBackup](https://eazybackup.com)


# Retention Configuration and Cleanup

### Retention Configuration <a href="#retention" id="retention"></a>

eazyBackup uses retention policies to determine what data should be kept, for how long, and what data can be safely removed in order to free up storage space. Retention rules can be configured for individual Protected Items and for Storage Vaults.

### Configure Retention (Protected Item) <a href="#retention-protected-item" id="retention-protected-item"></a>

{% embed url="<https://eazybackup.com/wp-content/uploads/2023/09/Configure-Protected-Item-Retention.mp4?_=1>" %}

### Configure Retention (Storage Vault) <a href="#retention-protected-item" id="retention-protected-item"></a>

{% embed url="<https://eazybackup.com/wp-content/uploads/2023/09/Configure-Vault-Rentention-Policy.mp4>" %}

### Retention (Protected Item) <a href="#retention-protected-item" id="retention-protected-item"></a>

In the Retention section of your Protected Item, you can configure a retention policy to apply when backing up this Protected Item to a specific Storage Vault.

If you have not previously configured a retention policy on the Protected Item, the retention section will display `(default)` to indicate that the Storage Vault default rules apply. If a policy has been configured on the Protected Item you will see `Keep (X rules)` to indicate that specific Protected Item retention rules have been applied.&#x20;

If a Protected Item is given its own set of retention rules, these Protected Item rules will normally take precedence over the Storage Vault retention rules.

***

### Retention (Storage Vault) <a href="#retention-storage-vault" id="retention-storage-vault"></a>

Storage Vault retention rules are the default for all data stored, unless a Protected Item has its own set of retention rules.

If a Protected Item is removed from the list of things to backup, or has its retention rules removed, then the Storage Vault retention rules will take precedence once more, and the data associated with the Protected Item will be kept, or removed, in accordance with the Storage Vault retention rules.

#### **Example Usages of Retention Rules:**

* Change the default Storage Vault retention rule to 'Keep all data for 60 days', plus
* Add a Protected Item rule to keep all snapshots for 90-days, plus
* Add a Protected Item rule to keep a representative snapshot from each week, on a Monday at 6am, for 2 years.

#### **Permanently Delete / Revoke Device**

* When a customer permanently removes a device from their backup account, the Protected Items for the device are also deleted, as well as any retention rules.
* The snapshot data that belonged to the deleted device will now be governed by the Storage Vault retention rules.

#### **Explanation**

* When you revoke a device, it will remove all of its Protected Items and all of the associated retention rules.
* If the user-profile still has at least one live device that stores data in the Storage Vault, it will run the retention pass into the Vault, eventually deleting the old Protected Item data.

#### **Example Solution**

* Set all Storage Vaults to have a changed-default retention rule of 'keep all data for 60 days', or some other period.
* When a device is revoked, or a Protected Item is removed from the list of Items to protect, the next retention pass will fallback to the Storage Vault rules.
* A Storage Vault retention period of 60 days will allow for mistakes to be discovered. A mistakenly-deleted Protected Item can be reinstated into the list of things to protect; or the snapshots of the Protected Item can be restored via another device registered to the same user-profile.
* A Storage Vault retention period of 60 days will allow for genuinely-unwanted data to be automatically removed at the end of 60 days, thereby keeping storage sizes to a minimum.

### Retention Pass

After each backup job, a "retention pass" runs for the Storage Vault. You can also run a retention pass for a Storage Vault on demand, by right-clicking the Storage Vault within the eazyBackup application.

* Open the eazyBackup application
* Click on the ellipsis -> Settings
* Right click on your storage vault -> Advanced -> Apply retention rules now
* To monitor the progress, login to the eazyBackup Control Panel and open the Job Logs page to view all activity.&#x20;

{% embed url="<https://eazybackup.com/wp-content/uploads/2024/07/eazyBackup_storage_vault_retention_pass.mp4>" %}

***

[eazyBackup](https://eazybackup.com)


# macOS Installation

### **System Requirements**&#x20;

* x86\_64 CPU architecture
* OS X 10.9 or later (10.11 or later recommended)

### **Install**&#x20;

The macOS operating system requires codesigning to be enabled in order to launch a downloaded `.pkg` file. If you have not configured codesigning for macOS, you will be unable to launch the installer. However, you can bypass this by right-clicking the `.pkg` file and choosing Open.

Run the `eazyBackup.pkg` file and follow the prompts.

Once installed, the client software prompts for account details to log in.

If you are running the `.pkg` file from the Downloads directory, macOS will offer to move the `.pkg` file to the Trash after a successful installation.

### **Upgrading**&#x20;

The installer will safely remove and upgrade any prior versions of eazyBackup, including those with a different software branding.

#### Silent upgrade (advanced)

You can silently upgrade the software remotely via the eazyBackup Server interface, or by running `/usr/sbin/installer -allowUntrusted -pkg "eazyBackup.pkg" -target /` via your remote management software.

### **Uninstall**&#x20;

macOS does not have a standard system for uninstalling programs. However, you can still uninstall eazyBackup by running the following command from a terminal window:

`sudo -u root "/Applications/eazyBackup.app/Contents/MacOS/uninstall"`

This will automatically stop all running eazyBackup processes, unregister eazyBackup's launched services, and remove all application files from the disk.

Uninstalling the software preserves any username/password credentials saved on this computer. To remove the saved credentials, delete the `/Users/USERNAME/Library/Preferences/backup-interface/config.sys` file.

&#x20;

***

[eazyBackup](https://eazybackup.com)


# Windows Installation

### **Windows**&#x20;

### **System Requirements**

* x86\_32+SSE2 or x86\_64 CPU architecture
* Minimum 1024x600 screen resolution
* Windows Vista, 7, 8, 8.1, 10, or newer
* Windows Server 2008, 2008 R2, 2012, 2012 R2, 2016, or newer

Microsoft will end Extended support for Windows 7, Server 2008, and Server 2008 R2 in early January 2020. Future versions of eazyBackup may drop support for older versions of Windows no longer under active security support from Microsoft.

**Not compatible with Windows XP (released 2001)**

At the time of writing, there is no version of eazyBackup available for Windows XP / Server 2003. All versions of eazyBackup rely heavily on features that were only introduced in Windows Vista / Server 2008.

Windows XP / Server 2003 no longer receives security patches from Microsoft. *It is **unsafe** to connect such a machine to the internet.* If you are attempting to supply backup services to a customer in this situation, you should arrange to first upgrade their operating system *with urgency*.

Despite the above warning, our company would like to support as many platforms as possible. It might become supported in the future.

**Workarounds**

You can work around this issue by:

* installing eazyBackup on another machine, and then backup the XP machine over the network; or
* virtualizing the XP machine, and backing up the VM guest from the VM host. This also allows you to remove internet access from the XP machine.

### **Installation**

Visit our downloads page to obtain the latest copy of eazyBackup <https://eazybackup.com/download/>

You should now have a .zip file which contains the installer. Right click the .zip file and choose 'Extract Here'

<img src="https://eazybackup.com/wp-content/uploads/2019/09/eazyBackup-Installer-Zip.png" alt="" width="563">

The .zip archive contains two files, install.dat & install.exe. Right click the 'install.exe' choose Run as administrator.

<img src="https://eazybackup.com/wp-content/uploads/2019/09/eazyBackup-run-as-admin.png" alt="" width="563">

"Do you want this app to make changes to your device?" Click Yes.

When you complete the install, eazyBackup asks for your account details the first time you open the program.

You can find your backup account username and reset the account password within the  [client area](https://accounts.eazybackup.ca/) from **Services -> Manage Accounts**.

<img src="https://eazybackup.com/wp-content/uploads/2019/09/Backup-interface-login.png" alt="" width="375">

#### **Silent install (advanced)**

eazyBackup allows you to install and configure the software silently, by running install.exe /CONFIGURE=user:password via your remote management software.

#### **Service account**&#x20;

eazyBackup 18.6.0 and later automatically create a Virtual Account (NT SERVICE\backup.delegate) with all necessary permissions to back up files on the PC.

Isolating eazyBackup under a Virtual Account is supported on Windows 7 or later, and Windows Server 2008 R2 or later when that server is not a Domain Controller. On other machines (e.g. Windows Server 2008 RTM, and domain controllers) the backup service will run as LOCAL SYSTEM by default.

On a Domain Controller running Windows Server 2008 R2 or later, we recommend configuring a Managed Service Account inside Active Directory for the backup service. This allows you to isolate the backup service permissions in a password-less service account. You should apply this to the backup.delegate service (but not the backup.elevator service, used for software updates).

### **Upgrading**

The installer will safely remove and upgrade any prior version of eazyBackup, including those with a different software branding.

If the product name is changed as a result of the installation process, the newly-branded software may be installed into the old-branded directory name. You can avoid this issue by completely uninstalling and reinstalling the software.

#### **Silent upgrade (advanced)**

You can silently upgrade the software remotely via the eazyBackup Server interface, or by running install.exe /S via your remote management software.

#### **Service account**

In eazyBackup 19.3.0 and later, if you customize the backup.delegate service to use any user account other than LOCAL SYSTEM or NT SERVICE\backup.delegate, your changes will be preserved in any future software upgrade.

In eazyBackup 18.6.1 and later prior to 19.3.0, such changes will be preserved. However, if the chosen user account requires a password, it may need to be reconfigured after the software upgrade.

Prior to eazyBackup 18.6.1, any changes to the service user account were not preserved across software upgrades.

### **Uninstall**

The software can be uninstalled via the "Programs and Features" section in the Windows Control Panel.

During this process, you may be prompted whether you wish to preserve any username/password credentials saved on this computer.

You can also remove the saved credentials manually by deleting the AppData/Roaming/backup-interface/config.sys file.

You should also remove the saved credentials from the backup.delegate service. This is stored in the C:\Users\backup.delegate\AppData\Roaming\backup-tool\config.dat file (if the backup.delegate service was running as the NT SERVICE\backup.delegate user; the path may differ if the service was running as another user account).

#### **Silent uninstall**&#x20;

You can silently uninstall eazyBackup for Windows by passing the /S command-line argument (e.g. "C:\Program Files\eazyBackup\Uninstall.exe" /S).

***

[eazyBackup](https://eazybackup.com)


# Linux (Other Distribution)

This is a distribution-agnostic package that can be used if eazyBackup does not have a more specific package available for your Linux distribution.

Please note that in order to avoid distribution-specific differences, the package does not automatically start on boot. You should configure your system to run the launch script in `/opt/` on boot (e.g. via a systemd unit, upstart script, `/etc/init.d/` script, or a line in `init.rc`).

### **System Requirements**

***

* CPU: `x86_64`, or `x86_32` with `SSE2`, or `ARM` (see below)
* Kernel 2.6.23 or later
* Dependencies
  * `bash`, `xz`, GNU `awk`, and standard GNU/Linux system utilities
  * `ca-certificates` and `tzdata` (see below)

#### **ARM CPU support**

eazyBackup is available for multiple ARM platform variants. The eazyBackup installer will select the best available binary for your hardware at install-time.

| **Platform** | **Description**                                                                 |
| ------------ | ------------------------------------------------------------------------------- |
| ARMv8l       | ARM 64-bit (Aarch64), no glibc required                                         |
| ARMv7l       | ARM 32-bit with vfp, and a glibc-based OS with the "hard-float" ABI (gnueabihf) |
| ARMv6kl      | ARM 32-bit with vfp, no glibc required                                          |

Timezone database dependency

eazyBackup on Linux requires the OS to provide an up-to-date timezone database, to perform timezone calculations

* On many Linux distributions, installing the `tzdata` or `timezone` package should be sufficient
* Otherwise, eazyBackup will look for a timezone database in all of the following locations;
  * `/usr/share/zoneinfo`
  * `/usr/share/lib/zoneinfo`
  * `/usr/lib/locale/TZ`

#### **CA certificate database dependency**

eazyBackup on Linux requires the OS to provide an up-to-date set of root certificate authorities, to validate HTTPS / SSL connections.

* On many Linux distributions, installing the `ca-certificates` package should be sufficient
* Otherwise, eazyBackup will look for a certificate bundle in all of the following locations;
  * `/etc/ssl/certs/ca-certificates.crt` (used by Debian/Ubuntu/Gentoo etc.)
  * `/etc/pki/tls/certs/ca-bundle.crt` (used by Fedora/RHEL 6)
  * `/etc/ssl/ca-bundle.pem` (used by OpenSUSE)
  * `/etc/pki/tls/cacert.pem` (used by OpenELEC)
  * `/etc/pki/ca-trust/extracted/pem/tls-ca-bundle.pem` (used by CentOS/RHEL 7)

### **Installation**&#x20;

***

Run the `.run` file. This is a self-extracting archive, and will need to be executed in an elevated environment.

The installer will:

1. Install the software into `/opt/eazyBackup`
2. Prompt you for an initial username and password
3. Register the current Linux device into that eazyBackup account
4. Start running eazyBackup in the background.

If you make a mistake with the username/password prompt, you can run the `/opt/eazyBackup/backup-tool login prompt` command to re-enter login details.

#### **Linux Install options**

You can control the installer by setting environment variables in your shell before running the `.run` file.

The following options are available:\
`WRITE_INSTALL_LOG` Set this to a file path, to record details of the installation.\
`OVERRIDE_INSTALL_SERVER` Set this to a URL (including `http`/`https` and trailing slash) to override the authentication Server URL used by eazyBackup.

You can set an environment variable in bash either on the same line e.g. `WRITE_INSTALL_LOG=install.log ./install.run`\
or as a separate `export` command e.g. `export WRITE_INSTALL_LOG=install.log` followed by `./install.run`<br>

### **Restarting at boot**

***

The installer creates a `backup-daemon-start.sh` script that can start the service. The eazyBackup agent on "Other Distribution" Linux can be restarted by running the `backup-daemon-start.sh` script.

In order for eazyBackup to start after a system reboot, you must configure this script to be run on system boot. Different Linux distributions support different methods for running commands on system boot: choose the most appropriate method for your Linux distribution. Some common choices are documented below.

#### **Preserve HOME environment variable**

eazBackup uses the `$HOME` environment variable to find its saved credentials. When configuring eazyBackup to start at system boot, ensure that the `$HOME` environment variable is set (i.e. to `/root/`), to ensure that eazyBackup can find its saved credentials. If eazyBackup is unable to log in, it's possible that your Linux distribution does not set `$HOME` at this early-boot stage. In that case, you should try running `HOME=/root/ /opt/eazyBackup/backup-daemon-start.sh &` instead. eazyBackup will automatically try to use `/root/` as the `$HOME` directory if `$HOME` is not already set or if it is set to a blank path.

Note: If you execute the .run installation script as root, this may have different results than if you execute the .run script using an elevated terminal session with 'sudo'. The 'sudo' command preserves the `$HOME` variable on Ubuntu; whilst on Debian the `$HOME` variable is erased, and sudo then sets it to the home directory of the originating user.

#### **Start in the background**

If you are running commands over SSH, please be aware that the backup-daemon-start.sh script runs in the foreground and will die when the SSH session is closed. You can avoid this by running the script in the background.

You can run the script in the background (daemonize) by using the `backup-daemon-start-background.sh` file instead.

#### **Startup via** `rc.local`

You can make eazyBackup start at system boot by adding an entry to the `rc.local` file.

First, find the `rc.local` file on your system:

* `/etc/rc.local` (Debian/Ubuntu)
* `/etc/rc.d/rc.local` (CentOS/RHEL)

Add the following content to the `rc.local` file:

`/opt/eazyBackupBackup/backup-daemon-start.sh &`

If the `rc.local` file contains an `exit 0` statement, the additional command should be added *before* such a statement.

As of CentOS 7, the `rc.local` file is not executable by default. You should run `chmod +x` on the `rc.local` file to enable using this method for startup scripts.

#### **Startup via** `rc.d`

You can make eazyBackup start at system boot by adding a file to the `rc.d` directory.

First, find the `rc.d` directory on your system:

* `/usr/local/etc/rc.d` (Synology DSM 6.1+)

Add a new file to the `rc.d` directory with the following contents:

```
#!/bin/bash
/opt/eazyBackupBackup/backup-daemon-start-background.sh
```

Mark the file as executable: `chmod +x /usr/local/etc/rc.d/my-eazybackup-startup-script.sh`

#### **Startup via** `cron`

You can make eazyBackup start at system boot by adding an entry to `root`'s crontab.

1. Run `crontab -e -u root` to launch a crontab editor
2. Add the line `@reboot /opt/eazyBackupBackup/backup-daemon-start-background.sh`

#### **Startup via** `init.d`

*No further documentation is available for this topic.*

#### **Startup via** `systemd`

You can use the following unit as an basic example:

```
[Unit]

Description=eazyBackup Client

After=network.target


[Service]

Type=simple

RemainAfterExit=true

User=root

ExecStart=/opt/eazyBackupBackup/backup-daemon-start.sh


[Install]

WantedBy=multi-user.target
```

This unit file correctly starts the eazyBackup service at system boot.

However, the process management in `systemd` is not fully compatible with the way eazyBackup's multi-process model works. In particular, there are compatibility issues with the software updater. As a result, the above unit is (A) unable to take advantage of process group cleanup; (B) unable to auto-restart the eazyBackup agent service; and (C) after a software upgrade, eazyBackup will keep running but the unit will remain in "exited" state.

#### **Autostart for graphical desktop application**

In the "Other Distribution" package, the graphical application is not automatically configured to start when the desktop logs in. You may add `backup-interface --background` as an autostart command to your desktop environment's settings.

### **Upgrading**

***

The "Other Distribution" version of eazyBackup supports upgrading the software, with some caveats:

* The `.run` file will automatically upgrade the existing version
* The software can be remotely upgraded via the eazyBackup Server web interface.

However, the existing service will only be replaced with the upgraded version if the product brand name is unchanged.

Future "Other Distribution" versions of eazyBackup will support upgrading between installations regardless of product brand name.

### **Uninstall**

***

To uninstall "Other Distribution" versions of eazyBackup, you should

1. Stop all eazyBackup processes
2. Remove the relevant subdirectory under `/opt/`
3. Remove any custom startup scripts

### **Change password on Linux client**

***

Use the 'Change Password' function in the eazyBackup [client area](https://accounts.eazybackup.ca/).

Then fully uninstall and reinstall the client, using the new credentials. Your device settings and Protected Items will be preserved.

***

[eazyBackup](https://eazybackup.com)


# Linux (Red Hat Enterprise Linux (RHEL), CentOS)

Install eazyBackup using the "Linux Other distribution" package. For more information, please see the [Linux (Other Distribution)](/documentation/linux-other-distribution) article.

{% content-ref url="/pages/Kzm9l3K4VXJbPT2wutwx" %}
[Linux (Other Distribution)](/documentation/linux-other-distribution)
{% endcontent-ref %}

***

[eazyBackup](https://eazybackup.com)


# Linux NAS (Synology, QNAP)

Install eazyBackup using the "Linux Other distribution" package. For more information, please see the [Linux (Other Distribution)](/documentation/linux-other-distribution) article.

{% content-ref url="/pages/Kzm9l3K4VXJbPT2wutwx" %}
[Linux (Other Distribution)](/documentation/linux-other-distribution)
{% endcontent-ref %}

***

[eazyBackup](https://eazybackup.com)


# “Application-Aware Writer” Backups

VSS is a technology for taking a consistent point-in-time snapshot of a disk volume. A VSS Writer is an extra software plugin that detects when this action is taking place and ensures that application-specific files are in a safe state on disk. eazyBackup's "Application-Aware Writer" feature allows you to invoke a single VSS Writer, or a sub-component of a single VSS Writer, and back up only the files that it was protecting.

This is also an important third-party integration point for application vendors. If your third-party application includes a VSS Writer, you can use this Protected Item type to back it up using eazyBackup.

Some products that can be backed up with this Protected Item type are:

* Oracle DB;
* MailStore Server;
* Microsoft Dynamics CRM;
* Microsoft Sharepoint;
* Pervasive PSQL;
* other products natively supported by eazyBackup, including Microsoft Exchange Server, Microsoft Hyper-V, and Microsoft SQL Server;
* and other products.

{% hint style="info" %}
**NOTE:** This Protected Item type is intended for integration with specific custom applications. If you want to back up normal files with a VSS snapshot, use the "Files and Folders" Protected Item type with the "take filesystem snapshot" option enabled.
{% endhint %}

### Selecting components

In eazyBackup, click the Edit button (pencil icon) to browse the available VSS Writers installed on your device.

You can select the top-most checkbox to include all components within the VSS Writer, or you can select individual components within the VSS Writer. For instance, the Microsoft SQL Server VSS Writer allows you to select individual databases for backup.

The VSS Writer itself may mark some components as non-selectable. This is shown in eazyBackup as a grey subcomponent without a checkbox.

### VSS Mode

You can perform the operation in "VSS Full", "VSS Copy", "VSS Incremental", or "VSS Differential" modes. If a specific VSS Writer does not support the selected backup mode, it will perform the backup in "Full" mode.

The actual behaviour of these modes is specific to each VSS Writer. For more information, consult the documentation for your VSS Writer.

### Backing up Oracle Database

eazyBackup can back up the contents of any installed VSS Writer using the "Application Aware Writer" option. Oracle Database officially supports backup via its installed VSS Writer.

You may need to install the Oracle VSS Writer separately. It is available with Oracle Database 11g and later (including 12c and 18c); newer versions of the Oracle VSS Writer can be installed separately to back up a 10g or 9i database.

You should use the "Application Aware Writer" option and select the Oracle VSS Writer - ORCL component. Inside this option, you can select individual tablespaces for backup, or select the entire component.

The Oracle VSS Writer reads the database with SYSDBA privileges.

The Oracle VSS Writer supports log, copy, full, differential, and incremental backups:

* if you take "full" or "copy" backups at the VSS component, eazyBackup will deduplicate them together, producing its own incremental backups
* if you take "incremental" backups at the VSS component, it may be slightly more space-efficient than eazyBackup's incremental system as Oracle has more specific understanding of the file formats. However, when restoring, you must take care to restore the full backup and all incremental/log backups too, that adds complexity.

More information about the Oracle VSS Writer is available in [Oracle's documentation](https://docs.oracle.com/cd/B28359_01/win.111/b32010/vss.htm#NTQRF280).

***

[eazyBackup](https://eazybackup.com)


# “Microsoft Exchange Server” Backup

This Protected Item type backs up Microsoft Exchange Server databases. The underlying technology is VSS and is compatible with Microsoft Exchange Server 2007 and later, including Exchange Server 2016 (the latest version at the time of writing).

The appropriate VSS writer must be installed.

As Exchange Server can only be installed on Server SKUs of Windows, this backup type is only applicable when running on Windows Server.

Some forms of Exchange Server backup will cause log truncation to occur on the Exchange Server. For more information, please see the official Exchange Server documentation. If circular logging is enabled on the Exchange Server, the 'Incremental' and 'Differential' backup types have limited effect.

***

[eazyBackup](https://eazybackup.com)


# “Microsoft Hyper-V” Backup

This Protected Item type backs up Microsoft Hyper-V virtual machines. The underlying technology is VSS and is compatible with all versions of Hyper-V running on Windows Server, including Windows Server 2016 (the latest version at the time of writing).

This backup type is only applicable when running on Windows Server. Hyper-V on Windows Desktop is not supported by this Protected item type.

eazyBackup integrates with the Hyper-V VSS writer to perform a Hyper-V backup snapshot, including support for in-VM quiescence on supported guest operating systems.

Backing up a Hyper-V virtual machine with eazyBackup includes, but is not limited to:

* its configuration file
* all attached virtual drives
* the contents of memory (if the machine was running)
* the full tree of saved checkpoints

You can select individual virtual machines for backup, or choose "All virtual machines".

### Consistency and guest additions

{% hint style="info" %}
*The following information applies to all products that perform Hyper-V backup.*
{% endhint %}

When backing up a guest VM, it's important to get a consistent state of the VM. There are some different ways this happens.

If the guest OS has all necessary Hyper-V integration services installed, then the host can request for the guest VM to take a VSS snapshot. The snapshot is then exposed to Hyper-V on the host for eazyBackup to back up. It shouldn't interrupt the guest OS. The VM backup is application-consistent. This is known as a "Production checkpoint".

If the host OS is running Server 2012 R2 or newer, but there are no integration services inside the guest OS, then Hyper-V will take a checkpoint of the VM; eazyBackup will back up the checkpoint; and then the checkpoint will be removed. This kind of checkpoint does not interrupt the guest OS. The VM backup is crash-consistent. This is known as a "Standard checkpoint".

* You can also achieve this behaviour by disabling "Production checkpoints" in the Hyper-V settings for the VM.

If the host OS is older than Server 2012 R2, and there are no integration services inside the guest OS, then the VM will be paused; Windows will take a VSS snapshot of Hyper-V's files in paused state; the VM will be resumed and eazyBackup will back up from the VSS snapshot. It would cause a short interruption to the guest OS. The VM backup is crash-consistent.

* You can also achieve this behaviour by disabling checkpoints in the Hyper-V settings for the VM.

### Replica VM

*The following information applies to all products that perform Hyper-V backup.*

If you are using Hyper-V replication, you can back up your virtual machines from either the primary or replica host.

A backup taken on the primary VM host is application-consistent (if possible), by quiescing a VSS snapshot inside the VM guest; or crash-consistent otherwise. However, a backup taken on the secondary VM host is only ever crash-consistent, because the replica VM is not running in order for guest integration services to take a VSS snapshot.

Current versions of Hyper-V do not allow backing up a VM that is currently replicating. If a VM is found to be currently replicating at the time of backup, eazyBackup will retry the operation a few times. If you repeatedly see errors of the form The virtual machine '...' cannot start a backup operation because it is currently executing a conflicting operation. Try the backup again., and you are running backups from the replica VM host, you could consider

* scheduling the backup job to run at a time when it's more likely that the VM replication is up-to-date; or
* using Before / After commands in eazyBackup to temporarily stop VM replication while the backup job is running.

> For more information about backing up a replica VM, see: <https://blogs.technet.microsoft.com/virtualization/2014/04/24/backup-of-a-replica-vm/>
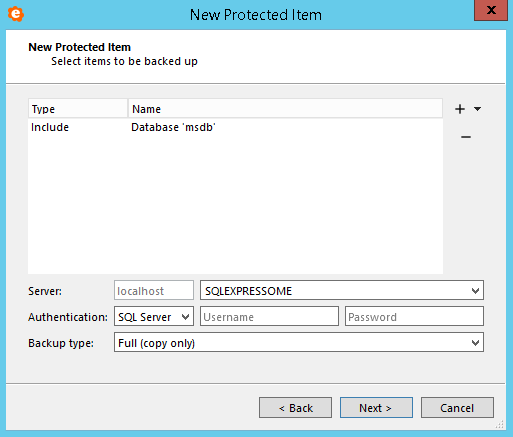
### Pass-through disks

*The following information applies to all products that perform Hyper-V backup.*

Hyper-V supports passthrough disks, to attach a physical disk from the host directly into the guest VM. This unmounts it from the host OS.

Hyper-V itself does not support backing up passthrough disks (nor does it support replicating them). A Hyper-V backup of the guest machines can be taken from the host, but does not include any data from passthrough disks.

You can work around this issue by either

* installing eazyBackup inside the guest VM, and backing up the extra data at a file level (this will use an extra Device license); or
* changing your passthrough disks to be a real disk containing a large .vhd or .vhdx file. The "New Virtual Disk Wizard" in Hyper-V Manager has an option to convert an existing disk to a .vhd or .vhdx file.

> For more information about backing up passthrough disks in Hyper-V, see:  <https://blogs.technet.microsoft.com/virtualization/2009/03/03/working-around-the-pass-through-limitations-of-the-hyper-v-vss-writer/>

***

[eazyBackup](https://eazybackup.com)


# “Microsoft SQL Server” Backup

This Protected Item type backs up a Microsoft SQL Server database. The underlying technology is VDI and is compatible with SQL Server 2005 and later.

No data is spooled to the local disk. As per the "Program Output" type, no progress bar or ETA appears during a Microsoft SQL Server backup.

Databases are backed up one-at-a-time. If you require point-in-time consistency across multiple databases, please use the "Application-Aware Writer" option instead.

#### Connection details

As you setup the new MSSQL protected item, connection details should be supplied before selecting databases. eazyBackup will only connect to SQL Server running on the local machine. You must enter the instance name, or leave the field blank to use the default instance.

<img src="https://eazybackup.com/wp-content/uploads/MSSQL-Backup-Config.png" alt="" width="563">

#### Address

The address is always localhost, but eazyBackup does not use TCP addresses or TCP ports to connect to SQL Server instances. eazyBackup uses "Shared Memory" to connect to SQL Server instances.

eazyBackup's use of "Shared Memory" connection does improves performance for some operations, at the expense of only working on the local machine; but eazyBackup's use of VDI requires it to run against the local machine anyway.

If you encounter issues connecting to your SQL Server, you must ensure that "Shared Memory protocol" is enabled in SQL Server Configuration Manager.

Open Sql Server Configuration Manager -> SQL Server Network Configuration -> Protocols -> Shared Memory -> Enable<br>
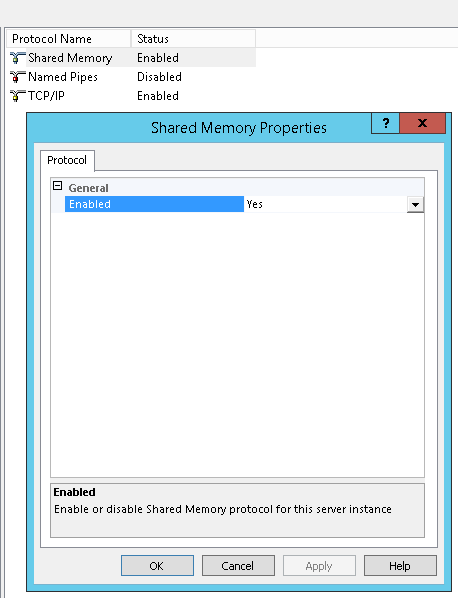
<figure><img src="https://eazybackup.com/wp-content/uploads/SQL-Server-Shared-Memory-Configuration.png" alt="" width="563"><figcaption></figcaption></figure>

#### Driver

OLE DB and ODBC are data access methods that use pluggable "drivers" / "providers" for connecting to databases like SQL Server. The following drivers for OLE DB / ODBC support SQL Server:

<table data-header-hidden><thead><tr><th width="179"></th><th width="157"></th><th></th></tr></thead><tbody><tr><td><strong>Driver</strong></td><td><strong>TLS 1.2 Support</strong></td><td><strong>Notes</strong></td></tr><tr><td>MSOLEDBSQL</td><td>Yes</td><td>Included with SQL Server 2016 and 2017; Optional download from <a href="https://www.microsoft.com/en-us/download/details.aspx?id=56730">https://www.microsoft.com/en-us/download/details.aspx?id=56730</a></td></tr><tr><td>SQLNCLI11</td><td>Yes</td><td>Included with SQL Server 2012 and 2014; Optional download from <a href="https://www.microsoft.com/en-us/download/details.aspx?id=50402">https://www.microsoft.com/en-us/download/details.aspx?id=50402</a></td></tr><tr><td>SQLNCLI10</td><td>No</td><td>Included with SQL Server 2008</td></tr><tr><td>SQLNCLI</td><td>No</td><td>Included with SQL Server 2005</td></tr><tr><td>SQLOLEDB</td><td>No</td><td>Included with SQL Server (all versions); Included with Windows since XP / Server 2003</td></tr></tbody></table>

eazyBackup has been upgraded over time to support trying additional drivers:

<table data-header-hidden><thead><tr><th width="186"></th><th width="156"></th><th></th></tr></thead><tbody><tr><td>e<strong>azyBackup Version</strong></td><td><strong>Preferred driver</strong></td><td><strong>Fallback driver(s)</strong></td></tr><tr><td>>= 18.9.6, >= 18.8.6</td><td>MSOLEDBSQL</td><td>SQLNCLI11, SQLOLEDB</td></tr></tbody></table>

You can list your installed drivers

* for ODBC, via the odbcad32.exe program > "Drivers" tab; or
* for OLE DB, via [this PowerShell snippet](https://stackoverflow.com/a/48298700).

### Authentication

eazyBackup allows you to connect to SQL Server using either Windows authentication (running as the backup service account - usually NT SERVICE\backup.delegate or SYSTEM), or native SQL Server authentication.

* If you are using Windows Authentication, the connection occurs as the backup service account.
  * You can assign this Windows user account to have sysadmin rights within SQL Server.
* If you are using SQL Server authentication, you must enter a valid username and password to connect to SQL Server.

> Impersonation is not currently available for Windows authentication. Future versions of eazyBackup will support impersonation for Windows authentication.

<img src="https://eazybackup.com/wp-content/uploads/MSSQL-Authentication-Type.png" alt="" width="563">

### Multiple instances

eazyBackup supports backing up multiple instances from SQL Server. You can select an instance for backup, by entering the instance name in the "Instance Name" field. Leave this field blank to use the default instance.

eazyBackup Backup automatically lists available instances for selection in the drop-down menu.

### Backup mode

By default, eazyBackup opts to make a full database export from SQL Server, and then uses its own deduplication system to optimise the stored/uploaded data.

This is the "Full (copy only)" option. It is equivalent to the BACKUP WITH COPY\_ONLY T-SQL statement.

Because eazyBackup can efficiently deduplicate full image backups, it is normally sufficient to only take full backups of SQL Server in eazyBackup.
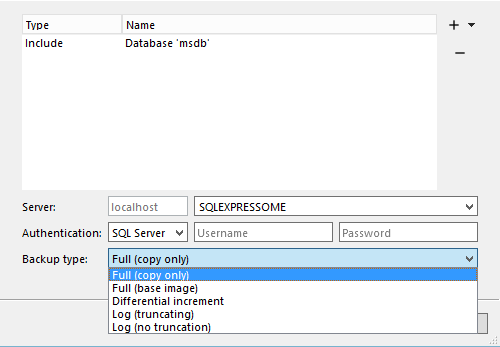
<img src="https://eazybackup.com/wp-content/uploads/MSSQL-Server-Backup-Type-Full-1.png" alt="" width="563">

### Base images

You have the option to use SQL Server's own differential/log backup system. This may be more efficient, but it does require additional administrative work, and complicates the process of restoring data.

The SQL Server maintains one single point-in-time reference, from which it can produce differential backups and/or log-based backups. When you take a new "Full (base image)" backup, the point-in-time reference is moved forward, so that any future differential and/or log-based backups are based on the last base-image backup.

To use SQL Server's own differential/log backup system, you must create multiple Protected Items (each with a different schedule) in order to capture both a base image and a differential/log backups. By creating multiple Protected Items, you can individually schedule, report-on, and manage retention policies for both base and differential/log backups.

If you are using eazyBackup alongside another product for SQL server backups, you should ensure that only one product is taking base-image backups. Otherwise, it's possible that a chain of differential/log backups would be incomplete.

### **Differential**&#x20;

eazyBackup can use SQL Server's own systems for differential backup. In this mode, you can regularly make "differential base" backups, and then a series of small "differential increment" backups, each containing the difference from the last base backup. These operations are equivalent to the BACKUP and BACKUP WITH DIFFERENTIAL T-SQL statements respectively. eazyBackup will still deduplicate multiple base backups that are sent to the same Storage Vault.

This is the "Differential increment" option.

### **Log**&#x20;

You can opt to use SQL Server's own systems for log backup. In this mode, you must periodically take full (base image) backups, and regularly take log backups.

You have the choice of whether to apply log truncation. These operations are equivalent to the BACKUP LOG and BACKUP LOG WITH NO\_TRUNCATE T-SQL statements respectively. eazyBackup will still deduplicate all data that is sent to the same Storage Vault.

To use SQL Server's own log system, you must create multiple Protected Items (each with a different schedule) in order to capture both full and log backups.

This mode requires that the database Recovery Model is set to "Full" or "Bulk Logged" in SQL Server. For more information, please see: <https://msdn.microsoft.com/en-us/library/ms189275.aspx> .

### **Recommendations**&#x20;

In general, we would recommend using the default "Full" backup technique.

SQL Server's native differential/log systems may be used if you experience performance issues with the default mode, however, you must ensure that

1. No other backup systems are resetting the last base backup;
2. Whenever the differential/log backs up successfully, that the base has also recently backed up successfully;
3. Base backups are performed regularly to minimise differential overhead; and
4. Retention is carefully managed to ensure that recovery is possible

### Alternative ways to back up Microsoft SQL Server

You can use the "Application-Aware Writer" type to back up SQL Server using the VSS Writer. Compared to eazyBackup's standard VDI approach, this option enables more detailed progress information, and can take a consistent point-in-time snapshot of multiple databases at once; but offers more limited control over SQL Server features such as log truncation. The resulting files also must be restored in a different way.

You can use eazyBackup's "Commands" feature to call osql/sqlcmd to run a T-SQL BACKUP statement against the database, and then back up the resulting spooled file with the "Files and Folders" type. This option requires more temporary disk space than the built-in system above.

You can use the "Files and Folders" type to back up individual database files if the "Take filesystem snapshot" option is selected. However, the "Files and Folders" backup type does not invoke SQL Server's VSS writer, so this would (at best) produce a "crash-consistent" backup and is *not recommended*.

***

[eazyBackup](https://eazybackup.com)


# “MySQL” Backup

This Protected Item type backs up a MySQL database. It is also compatible with MySQL-compatible servers such as MariaDB and Percona Server. It works at the logical (SQL) level.

No data is spooled to the local disk. As per the "Program Output" type, no progress bar or ETA appears during a MySQL backup.

Databases are backed up one-at-a-time. Point-in-time consistency is only preserved on a per-database basis.

### Connection details

Connection details should be supplied before selecting databases. Fill in the fields at the bottom of the dialog window.

### Selecting databases

Use the plus button on the right to open a database browser, allowing you to select individual databases for backup. Use the dropdown-plus button to add a custom property.

### Custom mysqldump

eazyBackup Backup's MySQL support works at the logical (SQL) level using mysqldump. A copy of this program must be found on the device in order for the backup job to run.

The mysqldump binary is selected as follows:

* If a custom path to mysqldump has been set, this binary is used.
* Otherwise, if there is a version of mysqldump installed (e.g. you are backing up a MySQL server from the server itself), the local version of mysqldump will be used to ensure maximum compatibility.
* Otherwise, if no copy of mysqldump can be found, the Windows version of eazyBackup Backup bundles a recent mysqldump binary in compliance with its license.
* If no suitable mysqldump binary is found, the MySQL backup job will fail with an error message Couldn't find 'mysqldump' anywhere. This failure can be detected via the backup job's status or its log entries.

#### On Linux, you can install a copy of mysqldump as follows:

| **Distro**     | **Command**                  |
| -------------- | ---------------------------- |
| Debian, Ubuntu | apt-get install mysql-client |
| CentOS, RHEL   | yum install mysql            |

### System databases

EazyBackup supports backing up the built-in system databases if desired.

* The mysql database contains server configuration, including user accounts and grants. It should only be restored to the same major release of MySQL.
* The information\_schema database is a set of read-only views and does not need to be restored.
* The performance\_schema database is a set of aggregated statistics and does not need to be restored.
* [The sys database](https://dev.mysql.com/doc/refman/5.7/en/sys-schema.html) (in MySQL 5.7.7 and higher) is a set of performance statistics and does not need to be restored. If your version of MySQL does not successfully back up this table, it is safe to exclude it from the eazyBackup Backup settings.

### Isolation modes

> *This feature is available in eazyBackup 19.3.0 and later.*

eazyBackup allows you to select the isolation mode used when reading data from MySQL. You should select the most appropriate isolation mode for your MySQL engine type.

The following options are available:

<table data-header-hidden><thead><tr><th width="139"></th><th width="132"></th><th width="130"></th><th></th></tr></thead><tbody><tr><td><strong>Isolation Mode</strong></td><td><strong>InnoDB</strong></td><td><strong>MyISAM</strong></td><td><strong>Detail</strong></td></tr><tr><td>Transaction</td><td>Consistent</td><td>Inconsistent</td><td>Wrap all read access in a single transaction, so that the read data is consistent</td></tr><tr><td>Lock tables <em>(default)</em></td><td>Consistent, but slow</td><td>Consistent, but slow</td><td>Lock access to database before reading it, so that the read data is consistent. This requires that the MySQL user account has been granted the LOCK TABLES permission</td></tr><tr><td>None</td><td>Inconsistent</td><td>Inconsistent</td><td>Do not take a transaction and do not lock tables.</td></tr></tbody></table>

***

[eazyBackup](https://eazybackup.com)


# “Program Output” items

The "Program Output" backup type backs up the `stdout` (Standard Output) stream of any command execution. This stream data is saved as a virtual file within the backup job. You can choose the virtual file name.

The data is streamed directly to the backup destination and never touches the local disk. This has the consequence that no progress bar or ETA can be calculated or displayed during backup jobs.

If the target application produces any content on `stderr` (Standard Error), it will be logged in the backup job report, and the final job status will show a "Warning".

If the target application exits with a non-zero error code, the error code will be logged in the backup job report, and the final job status will show an "Error".

***

[eazyBackup](https://eazybackup.com)


# “Windows Server System State” Backup

eazyBackup integrates with Windows Server System State to support backing up System State `.vhd` files using the wbadmin technology. This feature is only available on certain versions of Windows Server with the "Server Backup Role" feature enabled.

A Windows Server System State backup may include Active Directory, boot files, the COM+ registration, the system Registry hive, and/or other system files.

A local path must be used for spooling temporary data. Spooled temporary data will be removed once the backup job completes. The selected path

<figure><img src="/files/gVny7QKRMgBO4o7OOY8w" alt=""><figcaption></figcaption></figure>

* must be a bare root drive, and
* must support VSS, and
* must have at minimum 10GB free space, and
* on Server 2008 and Server 2008 R2, must not reside on a "critical" volume
  * You can work around this issue by applying the registry change in [Microsoft KB944530](http://support.microsoft.com/kb/944530).
* must appear to Windows as fixed, not removable - regardless of whether it is physically an internal or external drive
  * You can work around this issue for a removable drive by sharing a folder on the drive, and setting its UNC path as the spool directory

For more information about Windows Server System State backups, please see:

* Backing Up System State Data <https://technet.microsoft.com/en-us/library/cc938537.aspx>
* Wbadmin <https://technet.microsoft.com/en-us/library/cc742124(v=ws.11).aspx>

### Restoring

Once you restore the `.vhd` file with eazyBackup, you can use the wbadmin start `systemstaterecovery` command to apply a System State `.vhd` backup to an installed copy of Windows Server.

### Alternative ways of backing up System State

Note that because wbadmin is used, spool space is required. As an alternative, you can back up System State by using the "Application-Aware Writer" Protected Item type. This produces a similar result, but

* no spool space is required; and
* the files are not collected in a `.vhd file` - This may produce better deduplication at the expense of missing bootloader files

***

[eazyBackup](https://eazybackup.com)


# “Windows System Backup”

eazyBackup integrates with Windows System Backup to support backing up entire system volumes as `.vhd / .vhdx` files using the wbadmin technology.

Choose volumes to back up, and/or choose "all critical volumes".

* You can choose a volume by its drive letter (e.g. `C:\`), or by a qualified Windows volume reference for volumes without a drive letter (see the output of `fsutil` volume list).

A local path must be used for spooling temporary data. Spooled temporary data will be removed once the backup job completes. The selected spool path

* must be a bare root drive, and
* must not be included as one of the selected volumes, and
* must appear to Windows as fixed, not removable - regardless of whether it is physically an internal or external drive
  * You can work around this issue for a removable drive by sharing a folder on the drive, and setting its UNC path as the spool directory

### Restoring (Data drive)

Once you restore the `.vhd` file with eazyBackup, it can be mounted in Windows, or it can be browsed (e.g. in 7-Zip), or it can be attached to a virtual machine, or it can be written out to a physical volume. This will allow you to access and extract individual files and folders within the backup.

### Restoring (Bootable Operating System)

If you included the OS drive in the backup, it is possible to restore the OS to a bootable state, provided some additional conditions are met:

The following method of restoring the OS requires that you included the "System Reserved" partition in the backup job; either by manually including the volume, or by choosing "All Critical Volumes" in the volume selection.

If you do not include the "System Reserved" partition in the backup job, the resulting `.vhd / .vhdx` is a data-only file. In that situation you may need to manually recreate an NTLDR bootloader (using the `bootsect` and `bcdedit` commands) before the machine can be booted.

If you are backing up a machine that booted via EFI, you may also need to backup and restore the EFI System Partition (ESP).

Note that Windows OS installations do specialize themselves for the current hardware, and backup images are not automatically pre-prepared for hardware independence. An operating system image may only boot on identical- or highly-similar hardware. This issue originates from the wbadmin "Windows System Backup" technology and is not specific to eazyBackup's implementation. You may find more information online.

### **Using Windows Recovery**&#x20;

Once you restore the `.vhd / .vhdx` file(s) with eazyBackup, you can boot into either Windows Recovery or the Windows install media, and choose the "System Image Recovery" option.

It may be mandatory to keep the files in the `WindowsImageBackup` subdirectory on the root drive, in order for the "System Image Recovery" GUI to find the files. "System Image Recovery" is only able to restore a system image if the backup included the "System Reserved" partition.

* In this dialog, you can click the "Select a system image" option to find the `.vhd / .vhdx` file, so that Windows can write it back to your physical disk.
* More information is available online, including a visual walkthrough:
  * Windows 10 / Server 2016: [via answers.microsoft.com](https://answers.microsoft.com/en-us/windows/forum/windows_10-update/how-to-restore-a-windows-10-system-image-to-an/e20992ca-5641-4f7c-bb09-3895d0732162)
* Later versions of the Windows install media are able to recover `.vhd` files of older versions of Windows, and may have better driver support. For instance, if you experience problems recovering a `.vhd` file using the Server 2008 install media, consider trying with install media from a newer version of windows.

#### **Using wbadmin**&#x20;

You can use the wbadmin start recovery or wbadmin start sysrecovery commands to restore the OS without using the Windows "System Image Recovery" GUI.

#### **Using qemu-img**&#x20;

The `.vhd` file can be manually written out to a physical volume using qemu-img (e.g. `qemu-img convert -f vpc image.vhd /dev/sda`) or any similar tool.

#### **Using the hypervisor**&#x20;

The `.vhd` file can be attached to a virtual machine and booted as-is.

### Alternative ways of backing up Windows System Backup

{% hint style="info" %}
Note that because wbadmin is used, spool space is required. It may be preferable to use the "Files and Folders" backup type instead, that does not require spool space. However, backing up a Windows OS installation in this way does not result in a bootable image.
{% endhint %}

***

[eazyBackup](https://eazybackup.com)


# Silent installation for RMM (Windows advanced)

eazyBackup allows you to install and configure the software silently, by running the following example via your remote management software. Silent installations must be started by running from the installer directory. Incorrect quotations may result in errors.

### Arguments

**Account username and password**

```
/CONFIGURE=user:password
```

**Silent install**

```
/S
```

For example:

**Command Prompt:**&#x20;

```
 install.exe /S /CONFIGURE=user:password PowerShell Start-Process -Wait .
```

**PowerShell:**

```
Start-Process -Wait .\install.exe -ArgumentList "/S /CONFIGURE=user:password"
```

If you make a mistake with the username/password prompt, you can run the following command to re-enter your login details:&#x20;

```
cd "C:\Program Files\eazyBackup"; echo "USERnPASSWORD" | .\backup-tool.exe login prompt 
```

{% hint style="info" %}
Please take care with the n character separating the username and password.
{% endhint %}

### Optional arguments

#### Disable shortcuts&#x20;

eazyBackup allows you to disable the software shortcuts during the silent installation, by adding the command-line argument `/SHORTCUT=disable`.&#x20;

For example, if you want to install and have no shortcuts created, you can run the following command.

**Command Prompt:**&#x20;

```
install.exe /S /SHORTCUT=disable
```

**PowerShell**

```
Start-Process -Wait .\install.exe -ArgumentList "/S /SHORTCUT=disable"
```

#### Disable tray icon

eazyBackup allows you to disable the tray icon during the silent installation, by adding the argument.

```
/TRAYICON=disable.
```

#### Log on `backup.delegate` service as Local System account

eazyBackup allows you to explicitly have the background service `backup.delegate` log on as the Local System account during the silent installation with the following argument.

```
/ISLOCALSYSTEM=yes
```

## RMM Deployment Examples

#### Silent install example for a single user &#x20;

```
$dlPath = "C:\TEMP"
$serverURL = "https://csw.eazybackup.ca"
$installFile = "$dlPath\install.exe"

if (-not (Test-Path $dlPath)) {
    mkdir $dlPath
}

# Set location to the download path
Set-Location $dlPath

# Download our installer
Invoke-WebRequest -Uri "$($serverURL)/dl/1" -OutFile $installFile

# Verify the installer file exists and is not empty
if (-not (Test-Path $installFile) -or (Get-Item $installFile).Length -eq 0) {
    Write-Error "The file was not downloaded correctly."
    exit 1
}

# Start the silent install
Start-Process -Wait -FilePath $installFile -ArgumentList "/S /CONFIGURE=myusername:mypassword"

# Perform clean up 
Remove-Item -Path $installFile
```

#### Silent install with RMM software

In this example the script accepts `username` and `password` as parameters, which could be supplied by your RMM software:

To dynamically replace the "username" in the `Start-Process` command for each user, when running the script from RMM software, you can pass parameters from the RMM system to the script at runtime.

**PowerShell**

```
param (
    [string]$username,
    [string]$password
)

$dlPath = "C:\TEMP"
$serverURL = "https://csw.eazybackup.ca"
$installFile = "$dlPath\install.exe"

if (-not (Test-Path $dlPath)) {
    mkdir $dlPath
}

# Set location to the download path
Set-Location $dlPath

# Download our installer
Invoke-WebRequest -Uri "$($serverURL)/dl/1" -OutFile $installFile

# Verify the installer file exists and is not empty
if (-not (Test-Path $installFile) -or (Get-Item $installFile).Length -eq 0) {
    Write-Error "The file was not downloaded correctly."
    exit 1
}

# Build the argument list with the user and password
$arguments = "/S /CONFIGURE=$username:$password"

# Start the silent install
Start-Process -Wait -FilePath $installFile -ArgumentList $arguments

# Perform clean up 
Remove-Item -Path $installFile

```

Most RMM software should allow you to pass values for `username` and `password` when you execute the script.&#x20;

* **Direct Input in the RMM Software:** If your RMM supports passing parameters to PowerShell scripts (Kaseya, Datto, N-able), you can pass `username` and `password` as arguments when running the script.
* **Using Variables:** If your RMM software stores user-specific data (like usernames or passwords), you can substitute them into the script as variables at runtime.


# Microsoft 365 Backup

The "Microsoft Office 365" back up service allows you to back up data from your Office 365 cloud account. This is a cloud backup up service that runs our hardware, so there is no software for you run on a local computer. This service makes use of the same technologies as our client application providing  eazyBackup's client-side encryption, compression and deduplication to store data efficiently.

The following Office 365 services are supported:

* Exchange Online
  * Mailbox (Email)
  * Calendar
  * Contacts
* Sites
  * SharePoint
  * OneDrive for Business
  * Teams Files

{% hint style="info" %}
NOTE: Microsoft Online Services are responsible for the availability of the Office 365 online service and meeting their SLA guarantees. There are first-party archival and history solutions such as Retention Policy and Litigation Hold. Back up your Office 365 cloud account, for purposes of data safety; redundancy; resilience to tampering, misconfiguration, and accidental loss; legal compliance; unified reporting with other backup sources; and ease of restoring single items.
{% endhint %}

#### Office 365 Services

<table data-header-hidden><thead><tr><th width="119"></th><th width="93"></th><th width="99"></th><th width="91"></th><th width="114"></th><th></th></tr></thead><tbody><tr><td><strong>Services</strong></td><td><strong>Backup</strong></td><td><strong>Restore to Local</strong></td><td><strong>Restore to Cloud</strong></td><td><strong>Supported</strong></td><td><strong>Not Supported</strong></td></tr><tr><td><strong>Exchange Online</strong></td><td></td><td></td><td></td><td></td><td></td></tr><tr><td>Mailbox (Email)</td><td>Yes</td><td>Yes</td><td>Yes</td><td>Active users, shared mailboxes</td><td>Guest users, Deleted users, Discovery mailbox, Archive mailbox, Journal mailbox, Outlook group mailboxes</td></tr><tr><td>Calendar</td><td>Yes</td><td>Yes</td><td>Yes</td><td>Restore to local:JSON format</td><td></td></tr><tr><td>Contacts</td><td>Yes</td><td>Yes</td><td>Yes</td><td>Restore to local:JSON format</td><td></td></tr><tr><td>Tasks</td><td>No</td><td>No</td><td>No</td><td></td><td></td></tr><tr><td><strong>SharePoint Online</strong></td><td></td><td></td><td></td><td></td><td></td></tr><tr><td>Sites</td><td>Yes</td><td>Yes</td><td>No</td><td>Restore lists, documents and pages individually</td><td></td></tr><tr><td>Lists</td><td>Yes</td><td>Yes</td><td>Yes</td><td></td><td></td></tr><tr><td>Pages</td><td>Yes</td><td>Yes</td><td>No</td><td></td><td></td></tr><tr><td><strong>OneDrive for Business</strong></td><td></td><td></td><td></td><td></td><td></td></tr><tr><td>Document Library (Word, Excel, PowerPoint, OneNote)</td><td>Yes</td><td>Yes</td><td>Yes</td><td>Displayed under "Documents" in associated SharePoint site</td><td></td></tr><tr><td><strong>Teams</strong></td><td></td><td></td><td></td><td></td><td></td></tr><tr><td>Files</td><td>Yes</td><td>Yes</td><td>Yes</td><td>Displayed under "Documents" in associated SharePoint site</td><td></td></tr><tr><td>Chat</td><td>No</td><td>No</td><td>No</td><td></td><td></td></tr><tr><td>Calendar</td><td>No</td><td>No</td><td>No</td><td></td><td></td></tr><tr><td>Meetings</td><td>No</td><td>No</td><td>No</td><td></td><td></td></tr><tr><td>Call</td><td>No</td><td>No</td><td>No</td><td></td><td></td></tr></tbody></table>

#### Authentication

For backups, grant eazyBackup the ability to read data from your Office 365 account. Please pay attention to the credentials provided as a significant amount of access to the Office 365 organization occurs. This grant is done by creating an "Application" inside Azure AD. This application can be created automatically or manually.

#### Automatic application registration

Click the "Azure Active Directory" button. This opens a registration application wizard dialog that steps you through the process to automatically register. Authenticate with Azure as a top-level

<figure><img src="/files/tSWe9SQPUZvXyhPKZo4m" alt=""><figcaption></figcaption></figure>

#### Manual application registration

If you are unable to use the automatic application registration, you can register the application manually via the Azure AD web interface via the following steps:

1. Register a branded application inside the Azure Active Directory panel:

<figure><img src="/files/4Vs1gUAJTgQoid93dXOP" alt=""><figcaption></figcaption></figure>

* Visit <https://aad.portal.azure.com/>
* Click "Azure Active directory"

<figure><img src="/files/P3zMhPbPOICRnwEVSVPl" alt=""><figcaption></figcaption></figure>

* Click "App registrations" > "New registration"
* Enter an application name (e.g. "eazyBackup"). The other options can be left as default
* Click the "Register" button.
* Copy the `Application (client)` ID field into eazyBackup's `Application ID` field
* Copy the `Directory (tenant) ID` field into eazyBackup's `Tenant ID` field
  * Ensure that there are no extra spaces in the field after the Tenant ID
* Register an authentication secret for the application:

<figure><img src="/files/w4vRTvRr9VoLxe4EWxUo" alt=""><figcaption></figcaption></figure>

* Click the "Certificates & secrets" left-hand tab
* In the "Client secrets" section, click the "New client secret" button
* Create a new secret
  * Specify any name (e.g. "eazyBackup credentials") and any expiry (e.g. "Forever / No expiry")
* Copy the `Value` column into eazyBackup's `Application Secret` field
* Grant this application permission to read Office 365 data:
  * Click the "API permissions" left-hand tab
  * Click the "Add a permission" button

<figure><img src="/files/LH81kWbqPgTlVKToU1fg" alt=""><figcaption></figcaption></figure>

Find and add the following permissions:

* "APIs my organization uses" > "Office 365 Exchange Online" > Application permissions > ...
  * "Other permissions" > `full_access_as_app`
* "Microsoft APIs" > "Microsoft Graph" > Application permissions > ...

```
Application.Read.All
Calendars.Read
ChannelMessage.Read.All
Contacts.Read
Directory.Read.All
Files.Read.All
Files.ReadWrite.All
Group.Read.All
GroupMember.Read.All
Mail.Read
Notes.Read.All
Reports.Read.All
Sites.FullControl.All
Sites.Manage.All
Sites.Read.All
Sites.ReadWrite.All
TeamMember.Read.All
TeamMember.ReadWrite.All
User.Read.Alle code
Application.Read.All
Calendars.Read
ChannelMessage.Read.All
Contacts.Read
Directory.Read.All
Files.Read.All
Files.ReadWrite.All
Group.Read.All
GroupMember.Read.All
Mail.Read
Notes.Read.All
Reports.Read.All
Sites.FullControl.All
Sites.Manage.All
Sites.Read.All
Sites.ReadWrite.All
TeamMember.Read.All
TeamMember.ReadWrite.All
User.Read.All
```

<figure><img src="/files/8TRI5S8BtrBkhtPwr7zY" alt=""><figcaption></figcaption></figure>

* Back on the API permissions page, click the top "Grant admin consent for (My Organization Name)" button

The authentication details are automatically populated in the desktop app, use the "Test Connection" button to validate the Office 365 credentials.

#### Configuring selections

eazyBackup supports backing up different items from your Office 365 account. Use the pencil button in the desktop app to configure which mailboxes and sites will be backed up. Make separate selections for both mailboxes and sites using the dropdown arrow beside the plus button.

User has the following options for backups:

* Back up all mailboxes/sites
* Back up only the selected mailboxes/sites
* Back up all mailboxes/sites except for the selected ones

<figure><img src="/files/hb9mQhuWpQDE9RcHPe7Q" alt=""><figcaption></figcaption></figure>

When selecting users or sites for backup, the first dialog shows your current selection. Inside the first dialog, click the plus button to open a second dialog, to find users and sites from the Office 365 server.

The Search field in the second dialog box can be used to quickly filter for a known user or site.

When selecting users, the dialog also shows groups (Azure AD groups of user accounts). If you select a group, eazyBackup will backup all the mailboxes for user accounts belonging to this group.

eazyBackup supports Azure AD groups of user accounts, but does not currently support Outlook groups. If email messages are in an Outlook group, eazyBackup will not be able to to back them up. You can see the Outlook groups via the Sites view, but group messages are not included via the Sites backup job.

The only mailboxes available for selection are:

* Active Users (as shown in the Office 365 Admin Centre), and
* Shared Mailboxes (created with an Exchange E5 license plan or higher).
  * eazyBackup supports backing up Shared Mailboxes. Shared Mailboxes are counted as a full separate mailbox for the purposes of billing, regardless of the number of other accounts with access to the Shared Mailboxes.

The Protected Item configuration is also available remotely via the control panel web interface. Remote configuration from the panel can be used when the device is online with a live-connection to the service.

***

[eazyBackup](https://eazybackup.com)


# VMware vSphere Backup

This Protected Item backs up VMware vSphere virtual machines by connecting directly to either a vCenter server or an ESXi host. Guest virtual machines do not have to be offline for the backup to happen.

For each virtual machine selected for backup, eazyBackup takes a snapshot of the VM, then streams all necessary files (including the vmx configuration, vmdk disks, and other files) into the Chunking engine, optionally using Changed Block Tracking (CBT) for improved performance. eazyBackup then frees the VM snapshot on the host. The machine running eazyBackup does not require any temporary disk space.&#x20;

### Performance

Large disk image files are streamed from the datastore to eazyBackup. A large amount of traffic takes place over the internal network. For the best performance, eazyBackup should be installed as a VM on the same ESXi cluster and/or specific host that it is backing up.

You can choose how many VMs eazyBackup backs up at a time. Backing up multiple VMs at a time may increase performance.

Changed Block Tracking can be used to read only blocks that have changed since the last successful backup. Additionally, unallocated disk areas are skipped (Standard and CBT) to further improve the backup performance.

If Changed Block Tracking is used, eazyBackup accesses the VMware datastore using the NBDSSL protocol with fastlz compression mode for improved performance.&#x20;

### Requirements

```
Desktop Client
    Only available for Windows x86_64 clients
    Running on the same network with the target ESXi/vCenter
Server
    vSphere 6.7 (ESXi or vCenter) or later.
```

### Role

```
Global
    Enable methods
    Disable methods
Datastore
    Allocate space
    Browse datastore
    Low level file operations (ESXi: FileManagement)
Virtual machine
    Provisioning
        Allow read-only disk-access
        Allow virtual machine download
    Snapshot management (ESXi: State)
        Create snapshot
        Remove snapshot
```

### Protected Item configuration (desktop client)​

Select VMware vSphere on the protected item list.

<figure><img src="/files/AEWAkCACOgCUTxpqWzRh" alt=""><figcaption></figcaption></figure>

Select `vSphere API` under Connection and click `Configure`... to enter user credentials.

<figure><img src="/files/YllXGpwG9s5dh5Z2hqIk" alt=""><figcaption></figcaption></figure>

Populate vSphere credentials. Make sure that the credentials used has the required roles set. See vSphere Connection for details.

<figure><img src="/files/PO1a194HtL1ptLVTQMbo" alt=""><figcaption></figcaption></figure>

Run Test Connection to check the connectivity of the client to the host.

<figure><img src="/files/t52Ypwuy11YqEJjKIjd5" alt=""><figcaption></figcaption></figure>

Click on the plus sign on the right to start selecting virtual machines. All virtual machines can be backed up by selecting the top level `VMware vSphere`. Individual virtual machine selection is also possible as well.

<figure><img src="/files/IBC3pSiLgNgi25oxX3EJ" alt=""><figcaption></figcaption></figure>

Select the backup type to use for all selected virtual machine. See options for more details on the possible modes.

<figure><img src="/files/H678yOaV82F0fudxUZuF" alt=""><figcaption></figcaption></figure>

### Details

### vSphere Connection​

eazyBackup connects to the vSphere server using the vSphere's SOAP API (VADP). eazyBackup transfers files from the datastore NBDSSL protocol.

| Setting                       | Detail                                                                                                                                   |
| ----------------------------- | ---------------------------------------------------------------------------------------------------------------------------------------- |
| Server                        | The vCenter/ESXi host. Also accepts `host:port` in case the host is running on a [custom port](https://kb.vmware.com/s/article/1021199). |
| Thumbprint *(Optional)*       | If supplied, this will be the SSL certificate hash used to compare against the received server certificate for extra security.           |
| Allow invalid SSL certificate | Ignore SSL certificate validation errors                                                                                                 |
| Username/Password             | vCenter/ESXi credentials for authentication                                                                                              |

### Options

**Latest VM state (Changed Block Tracking)​**

* Recommended for best performance.
* Back up only changed disk sectors since the last successful backup (this option can be selected even for the first backup job).

**Latest VM state (Standard)**

* Back up current state of all disks and VM configuration. Past snapshots will be flattened, resulting in a single disk with the most recent state.

### **Virtual Machine List (web)​**

When configuring VMware vSphere protected item using the web UI, there are some manual options which can be configured for a more customized selection.

<figure><img src="/files/UYmqdtieGva3qpdjDOvx" alt=""><figcaption></figcaption></figure>

* Include All Virtual Machines: Backup all virtual machines on found on host. Selecting the top level item in the picker will select all and apply this filter. This is useful for dynamically include new virtual machines to the backup without having to reconfigure the protected item.&#x20;
* Include specified Virtual Machine: Only virtual machines with matching name will be backed up.
* Exclude specified Virtual Machine: Virtual machines with matching name will be skipped.&#x20;
* If manually specifying a virtual machine, a couple of formats are accepted <br>
  * `[datacenter-name]` vm-name to back up a specific VM on a datacenter&#x20;
  * `vm-name` to target all matching virtual machines across all datacenters

### Notes

For **Changed Block Tracking** and **Standard** mode

* Performance is optimized by seeking over unallocated disk sectors.
* Data transfer occurs over the NBDSSL protocol.
* Separate snapshot files are not included in the backup. Current VM state is flattened in a single disk image.
* Disks with independent disk mode is not supported and will be skipped during the backup process.

### Restore

eazyBackup can restore the `vmx`, `vmdk`, and other files to the local disk. You must then copy them to the ESXi datastore, and import the VM from the ESXi/vCenter interface.

eazybackup also supports restoring directly to the datastore.

If backup is made while a VM is running off a snapshot, the resulting disk will be a flattened version of the snapshot branches. Do the following to reimport this virtual machine.

* Update VMX config with `scsi0:N.fileName =`
* (Optional): Reclaim disk space (`vmkfstools -K` ) to reset unallocated spaces for improved backup performance.

If CBT was enabled. It is recommended to disable/restart CBT before the first boot.

Granular restore of single files and folders is available for supported filesystems.


# Granular Restore

eazyBackup supports granular restore to recover individual files and folders from within a virtual disk image.

The granular restore feature is available as part of eazyBackup at no additional cost.

Compared to an ordinary File and Folder backup, the extra work involved to perform granular extraction of individual files from within a virtual disk image results in a small performance penalty. If you expect to restore individual files regularly, a File and Folder-type Protected Item may offer better performance. We recommend using the latest version of eazyBackup for best performance and compatibility.

The available granular restore capabilities do not depend on the backup device's operating system. For example, restoring files from an NTFS image is possible on a macOS device, and restoring files from an EXT4 image is possible on a Windows device.

For the following Protected Item types, Granular restore is available as an option during the Restore wizard process:&#x20;

| Protected Item type | Supported | Notes                                                          |
| ------------------- | --------- | -------------------------------------------------------------- |
| Disk Image          | Yes       |                                                                |
| Hyper-V             | Yes       | `vhdx` files only, not `vhd` nor any `avhdx` differencing disk |
| VMware vSphere      | Yes       |                                                                |

The granular restore feature requires that the virtual disk uses a compatible partitioning scheme:

| Disk partition structure | Supported | Notes                    |
| ------------------------ | --------- | ------------------------ |
| GPT                      | Yes       |                          |
| MBR                      | Yes       | Including EBR partitions |
| Windows Dynamic Disk     | Partial   | See note 1               |
| Windows Storage Spaces   | Partial   | See note 1               |
| Linux LVM2               | Partial   | See note 1               |
| Linux MD                 | Partial   | See note 1               |

{% hint style="info" %}
Note 1: The underlying physical format is not supported for granular restore. However in a Disk Image backup, you may have the option to back up either the underlying physical format or the resulting virtual volume. If you back up the resulting volume, it may be supported for granular restore.
{% endhint %}

The granular restore feature requires that the partition uses a compatible filesystem type:

| Filesystem | Supported | Notes                                                                                                                                               |
| ---------- | --------- | --------------------------------------------------------------------------------------------------------------------------------------------------- |
| NTFS       | Yes       | Advanced metadata and reparse points may not be available. Filesystems using Windows Server Data Deduplication may present files as reparse points. |
| FAT        | Yes       | Filesystem recognition depends on the original format utility used                                                                                  |
| EXT4       | Yes       | Symlinks are not supported                                                                                                                          |
| XFS        | Yes       |                                                                                                                                                     |
| ReFS       | No        |                                                                                                                                                     |
| exFAT      | No        |                                                                                                                                                     |

### Alternative solutions​

If your backup scenario uses an unsupported virtual disk partition type, or an unsupported filesystem type or filesystem feature, granular restore will not be available. In this case you can still achieve granular restore of individual files by first performing a full image restore, and then using a third-party tool to extract individual files from the virtual disk image file.

&#x20;We recommend the following software:&#x20;

#### &#x20;   7-Zip

* Free and Open Source, Windows (GUI) and macOS / Linux (command-line)
* Can open VMDK disk descriptor and also the individual extent files
  * Supports many filesystems, including NTFS, FAT32, EXT 2/3/4, UDF, HFS, SquashFS
  * Known issues:
  * When loading the VMDK disk descriptor directly instead of the extent files, if no partition table is present (i.e. "Raw byte range" containing the MBR/GPT area at the start of the disk was not selected for backup) then the descriptor will only show an interior 'disk.img' file instead of partition contents.. You can workaround this issue by opening the individual partition extent files
  * &#x20;Early versions of 7-Zip had only limited support for disk image features. Please manually ensure your 7-Zip installation is up-to-date, as 7-Zip does not have a built-in software update feature.

#### &#x20;   DiskInternals Linux Reader

* Freeware, Windows-only
* Despite the product name, also supports Windows filesystems (NTFS, FAT)
* Can mount VMDK files as a drive letter  from the menu > Drives > Mount Image > "VMware virtual disks (\*.vmdk)"
* Known issues:
  * Fails to open the VMDK disk descriptor if there is junk data in "Raw byte range" areas.                You can workaround this issue by editing the descriptor file to replace these with zero extents.              e.g. edit disk.vmdk change RW 16065 FLAT "disk-f0000.vmdk" 0 to RW 16065 ZERO

#### &#x20;   Passmark OSFMount

* Freeware, Windows-only
* Can mount VMDK extent files as a drive letter
* Known issues:
  * When loading the VMDK disk descriptor directly instead of the extent files, the disk partitions can be discovered, but mounting fails - both of the individual partitions and also when attempting to mount the VMDK as a raw disk ("Physical Disk Emulation" mode). You can workaround this issue by selecting the individual extent files to mount (works using "Logical Drive Emulation" mode)

&#x20; &#x20;


# How to Set a Storage Vault Quota

Setting a storage quota allows you to control storage growth and keep your billing predictable.

When a vault reaches its quota limit, **backups will stop automatically** until space is freed or the quota is increased.

### Step 1 — Open the Vault Management Page

<figure><img src="/files/Pv2NIEf9UxydHKFynQc9" alt=""><figcaption></figcaption></figure>

From the **Client Area Dashboard**:

1. Navigate to **Backup Dashboard**
2. Click **Vaults** in the left menu
3. Find the vault you want to edit
4. Click **Manage**

This will open the **Manage Storage Vault** window.

### Step 2 — Configure the Quota

<figure><img src="/files/BlgHjBlKRCxHi1Zf1xGR" alt="" width="563"><figcaption></figcaption></figure>

Inside the **General** tab:

1. Locate the **Quota** section
2. **Uncheck the “Unlimited” option**
3. Enter the desired storage limit
4. Select the unit (GB, TB, etc.)

For example:\
`500 GB` will limit the vault to 500 gigabytes of storage.

### Step 3 — Save Your Changes

Click **Save** to apply the new quota.

Your vault will now enforce the configured storage limit.

### What Happens When the Quota Is Reached?

When the vault reaches its quota:

* New backup data **cannot be written**
* Backup jobs will **pause or fail until space is available**
* This prevents the vault from using more storage than expected

To continue backups, you can either:

* Increase the quota, or
* Use the restore menu to delete older backup data to free up space


# Troubleshooting


# Cannot proceed – another task needs to finish using the Storage Vault first

#### Backup jobs may have the following error:

`Error "Cannot proceed - Locked by device 'XXXXXXXX'..."`

Occasionally devices will perform vault maintenance, during the maintenance processes devices can lock the vault for exclusive access. While the vault is locked, other devices cannot start writing to the vault. This lock ensures that data which is in the process of being added, but not yet fully-referenced in the index, is not deleted.

If the device is revoked or goes offline during the maintenance phase (power-cut, sudden sleep mode, network connection lost, etc.), the locks may not be removed. The 'lock' will stay in place, and the vault will remain in a not-writeable state.

#### **Step 1:**

**Cancel Running Backup from Control Panel**

1. Log-in to the Control Panel: <https://panel.eazybackup.ca/>
2. From the main menu, select 'Job History'.
3. You can use the Job History Search feature to filter the list to show only running jobs - type 'Running' in the Job History filter field.
4. Click the 'Report' button next to the Running job you want to Cancel
5. On the Report page, click the Cancel button to stop the abandoned job.

<img src="https://eazybackup.com/wp-content/uploads/2020/01/job_history_running_status.png" alt="" width="563">

<img src="https://eazybackup.com/wp-content/uploads/2020/01/job_history_running_cancel.png" alt="" width="563">

**If Step 1 did not resolve the issue, proceed to Step 2.**<br>

#### **Step 2:**

To clear the lock on the storage vault so new backup jobs can proceed you can run a retention pass on the storage vault.

1. From the Backup Application menu, Click on 'Settings'
2. On the Storage Vaults tab, Right click on the Storage Vault -> Advanced -> Apply retention rules now<br>

   <figure><img src="https://eazybackup.com/wp-content/uploads/2019/10/vault_apply_retnetion_rules.png" alt="" width="563"><figcaption></figcaption></figure>

   <figure><img src="https://eazybackup.com/wp-content/uploads/2019/10/backup_renteion_pass.png" alt="" width="563"><figcaption></figcaption></figure>

{% hint style="info" %}
**If you have multiple devices backing up to the same Storage Vault, consider using one Vault per Device.**
{% endhint %}

For more information, see below.

Adding new Storage Vaults:&#x20;

{% content-ref url="/pages/MNOZ6PK7sY0SUTLesdNj" %}
[Add and Rename Storage Vaults](/documentation/add-and-rename-storage-vaults)
{% endcontent-ref %}

Update Protected Items to use the Storage Vaults:

{% content-ref url="/pages/81aIS5xJzMMTYhE49zYR" %}
[Manage Vaults on Protected Items – Add/Remove/Update](/documentation/manage-vaults-on-protected-items-add-remove-update)
{% endcontent-ref %}

***

[eazyBackup](https://eazybackup.com)


# Change of hardware causes registration dialog to appear

**eazyBackup detects the current device based on a hardware ID.**

The hardware ID may be changed in some situations:

* if you replace the motherboard or CPU; or
* if you upgrade the BIOS / UEFI, without preserving hardware IDs; or
* if you virtualise a physical server; or
* if you migrate a VM guest to a different VM host, without preserving hardware IDs; or
* if you install "sandboxing" software, or install certain PC security software that includes a "sandboxing" feature (e.g. Comodo Containment); or
* if you make certain specific modifications to the operating system.

In these situations, the device's hardware ID will change, and eazyBackup will recognize the PC as a new device.

Handling a changed device ID

***

If your device is recognized as a new device, you should register it again.

The original backup data is still preserved in the Storage Vault, and will be deduplicated against any future backups from this device.

> **Contact eazyBackup Support**

***

eazyBackup support staff can move the Protected Item settings from one device to another. Please contact support to request this.

The old device must be revoked once the new device has been properly set up to prevent it from incurring additional charges, Please contact support to request this.

Alternatively, removing all Protected Item's from the old device will also prevent the device from being charged.

The backup job log history will be preserved, but, they will be associated with the old device.

* Once you de-register the original device, it would show as "Unknown device (XXXXX...)" in the job history.
* Customers can still see these old jobs in eazyBackup if they use the filter option > "All devices".

***

[eazyBackup](https://eazybackup.com)


# Diagnosing Slow Backup Jobs

There are many possible reasons why a backup job might be slow.

### Internet Bandwidth

* Check the speed of your internet connection, [fast.com](https://fast.com/) is a popular website that will test your transfer rates. Your upload bandwidth will be the limiting factor in how quickly your can transfer data to your cloud storage vault.

### Recent changes

Did the issue suddenly start happening, at a certain time?

* New software
  * Any recently-installed software might change the performance profile of the customer's PC.
  * On Windows, check in "Programs And Features" and sort by Date to see any recently-installed software

### PC performance

Do you have multiple computers experiencing the issue, or just a single PC? This helps determine whether the issue is related to a particular computer or whether the issue is related to the environment.

* Antivirus
  * Many antivirus programs will scan each file as eazyBackup reads them, including but not limited to ESET NOD32 and Windows Defender.
  * Does it help to exclude eazyBackup `backup-tool.exe` program in the antivirus software?
    * v19.3.13 and later automatically does this for Windows Defender.
  * Does the antivirus process show as having high usage in Task Manager when the backup is running?
* Use of slow settings
  * Ensure the "Limit backup to use only 1 disk thread" option is not enabled
  * Ensure the "speed limit" option is not enabled
  * Ensure the "Prefer temporary files instead of RAM (slower)" option is not enabled
  * Toggle the "Rescan unchanged files" option, to see if it increases- or decreases- performance
* RAM usage
  * With large data sets, there are many different data chunks that may be deduplicated against. eazyBackup can use a few GB of RAM to hold all the indexes for deduplication. If the local PC is low on RAM, it may use the swapfile / pagefile, which can significantly reduce performance.
* CPU usage
  * eazyBackup compresses and encrypts all data before upload. On weak CPUs this may cause high CPU usage. The CPU usage may become a bottleneck.

### Storage performance

* Avoid backing up files from a network share
  * If you are backing up files from a network location, eazyBackup must make many network roundtrips to access the data. It may be substantially faster to install eazyBackup on the network device instead.
* Backup source is a single-queue block device
  * eazyBackup issues many requests to the source disk in parallel. To avoid negatively affecting other programs on the PC, eazyBackup tries to access the source disk at a low OS priority, but this may be ineffectual if your disk only supports a single queue. You can toggle the "Limit backup to use only 1 disk thread" option to force eazyBackup to make only a disk request to the source disk at a time. This may have a positive effect on other programs on the PC, at the expense of backup job performance.
* Use of external harddrives
  * Is it USB 2 or USB 3?
  * Some disk drives may experience slow performance. You can use a benchmarking tool to determine the expected performance of the USB drive both in sequential reads, and in small random reads) independently of eazyBackup, as a baseline to compare against eazyBackup's performance.
    * At the time of writing, [CrystalDiskMark](https://crystalmark.info/en/software/crystaldiskmark/) is a popular freeware software for measuring disk performance on Windows.
  * Performance Mode
    * There is an option in Windows to control whether USB drives are configured for "Quick removal" (default) or "Better performance". Switching to the latter mode can significantly improve performance, but requires you to safely eject the drive. To change this setting:
      1. Open Device Manager > Disk drives > Properties > Policies tab
      2. If the "Quick removal" / "Better performance" radio option is available, ensure it is set to "Better performance"
      3. If the "Enable write caching" checkbox option is available, ensure that it is enabled
* Backing up direct to cloud storage
  * Check the speed of your internet connection
  * Check the Internet service provider's status page, to ensure they are not currently experiencing any error

***

[eazyBackup](https://eazybackup.com)


# Error “EFS-encrypted files may be unusable once restored”

**You may see a warning of this form in the backup job logs:**

`EFS-encrypted files may be unusable once restored, unless you also backup the EFS encryption keys from this PC.`<br>

To disable this warning, please ensure you have backed up the EFS encryption keys, and then enable the 'I confirm EFS keys are exported' option in the Protected Item settings.

<figure><img src="/files/WC5CRvI8OOlu0Ml2LmHo" alt="" width="375"><figcaption></figcaption></figure>

EFS is a Windows feature that allows you to encrypt individual files on disk. The backup job was successful, but if you restore the data to a new PC, the files might not be readable because the EFS encryption keys are tied to the Windows user account. In effect, the backup might not be restorable in a practical sense.

For more information, please see the full article on [EFS in the Documentation](/documentation/confirm-efs-keys-are-exported-windows-efs) section.

{% content-ref url="/pages/Blv9IEXr1pc8T75tOI1a" %}
[Confirm EFS keys are Exported (Windows EFS)](/documentation/confirm-efs-keys-are-exported-windows-efs)
{% endcontent-ref %}

***

[eazyBackup](https://eazybackup.com)


# Error “Media is write protected” backing up OneDrive with VSS

To save on disk space, OneDrive (and some other cloud storage providers) use a system where some files are only "virtually" stored on the local disk, and are materialized from the cloud storage on-demand.

When you use the "Take filesystem snapshot" option in eazyBackup, eazyBackup takes a VSS snapshot of the disk. This is a read-only snapshot.

When you back up the OneDrive directory with VSS enabled, OneDrive is not able to download files into the snapshot, because the snapshot is read-only. This causes the "Media is write protected" error message.

In this situation, your OneDrive data is not being protected by eazyBackup and is not available for restore.

You can workaround this issue by creating two Protected Items: one with VSS enabled, that excludes the OneDrive directory; and a second one with VSS disabled, that only includes the OneDrive directory.

Note that if OneDrive needs to materialize a lot of data from the cloud, then backing up the OneDrive directory may cause a lot of data to be downloaded.

A future version of eazyBackup may avoid this issue by automatically disabling VSS for the OneDrive directory.

***

[eazyBackup](https://eazybackup.com)


# Error “operation not permitted” macOS

Since macOS 10.14, Apple has introduced a new privacy flow. The user is now asked for permission when an app requires access to certain features or functions.&#x20;

#### The user will need to explicitly grant "Full Disk Access" to the eazyBackup application by doing the following:

1. Open the System Preferences (Apple menu)
2. Select "Security and Privacy" > "Privacy" tab
3. Select "Full Disk Access"
4. Add eazyBackup

***

[eazyBackup](https://eazybackup.com)


# Error “The target path ‘X:\WindowsImageBackup’ already exists – please safely remove this direct...

Error : `“The target path ‘X:\WindowsImageBackup’ already exists – please safely remove this directory and retry the backup.”`

The "Windows System Backup" Protected Item type uses the wbadmin program to write a disk image to the spool directory; backs up the spool directory with eazyBackup; and then cleans up the spool directory. eazyBackup automatically removes this directory after the backup, even if the backup failed.

If the directory exists at the start of a backup job, this could mean either:

1. eazyBackup did not have the chance to clean up the directory (e.g. the PC was not shut down safely); or
2. another eazyBackup backup job is running simultaneously; or
3. another non-eazyBackup software on the PC is also using the wbadmin functionality for System State or Windows System Backup.

You can avoid case 2 above by using the "Skip if already running" option.

It's not generally possible to distinguish between case 1 and case 3 above. If you look at the job history and you are able to make a positive distinction between these cases, it may be safe to delete the directory.

You can temporarily add the following command as a "Before" command to the backup job:

`rmdir /S /Q "X:\WindowsImageBackup\"`

You should then remove this command from the job settings after the command has run, because this command would cause problems if two eazyBackup backup jobs ever run simultaneously in the future.

***

[eazyBackup](https://eazybackup.com)


# Error backing up item exit status 3 Couldn’t create virtual device set: Unknown error 0x80770005

This error might be caused if the user account running the backup is not included in the Security Setting for the "Create global objects" in the "User Rights Assignment" of the Local Security Policy.

In Control Panel, under Administrative Tools, open the Local Security Policy editor and expand ‘Local Polices’ -> 'User Rights Assignment' locate 'Create global objects'. Ensure that the group and or user performing the backup is within the Security Setting for the 'Create global objects' field. Add the user/group to this policy if they are not a member.

You may also want to change the backup service to run as a privileged user. Open Run ->  `services.msc`, locate eazyBackup delegate and elevator services. Stop both services, change the login user to your local Administrator account or account with sufficient privileges and restart both services.

Ensure the account running the backup service (eazyBackup delegate and elevator service) also belongs to the 'Create global objects' listed above.

***

[eazyBackup](https://eazybackup.com)


# Found packs in index but not appearing on disk. Reindex needed

`Found # packs in index but not appearing on disk. Reindex needed! Please contact your support agent for more information. The retention encountered a problem (exit status 1)`

To correct this warning, please complete a re-index and a retention pass of your storage vault:

1. &#x20;Open the eazyBackup desktop application
2. Select the 'Settings' tab.
3. Right click on the eazyBackup storage vault
4. Select Advanced -> Rebuild Indexes

The index process can take anywhere from several minutes to hours depending on the size of the vault and the number of snapshots. When the index process is complete, run a retention pass on the storage vault.

1. Open the eazyBackup desktop application
2. Select the 'Settings' tab.
3. Right click on the eazyBackup storage vault
4. Select Advanced -> Apply retention rules now
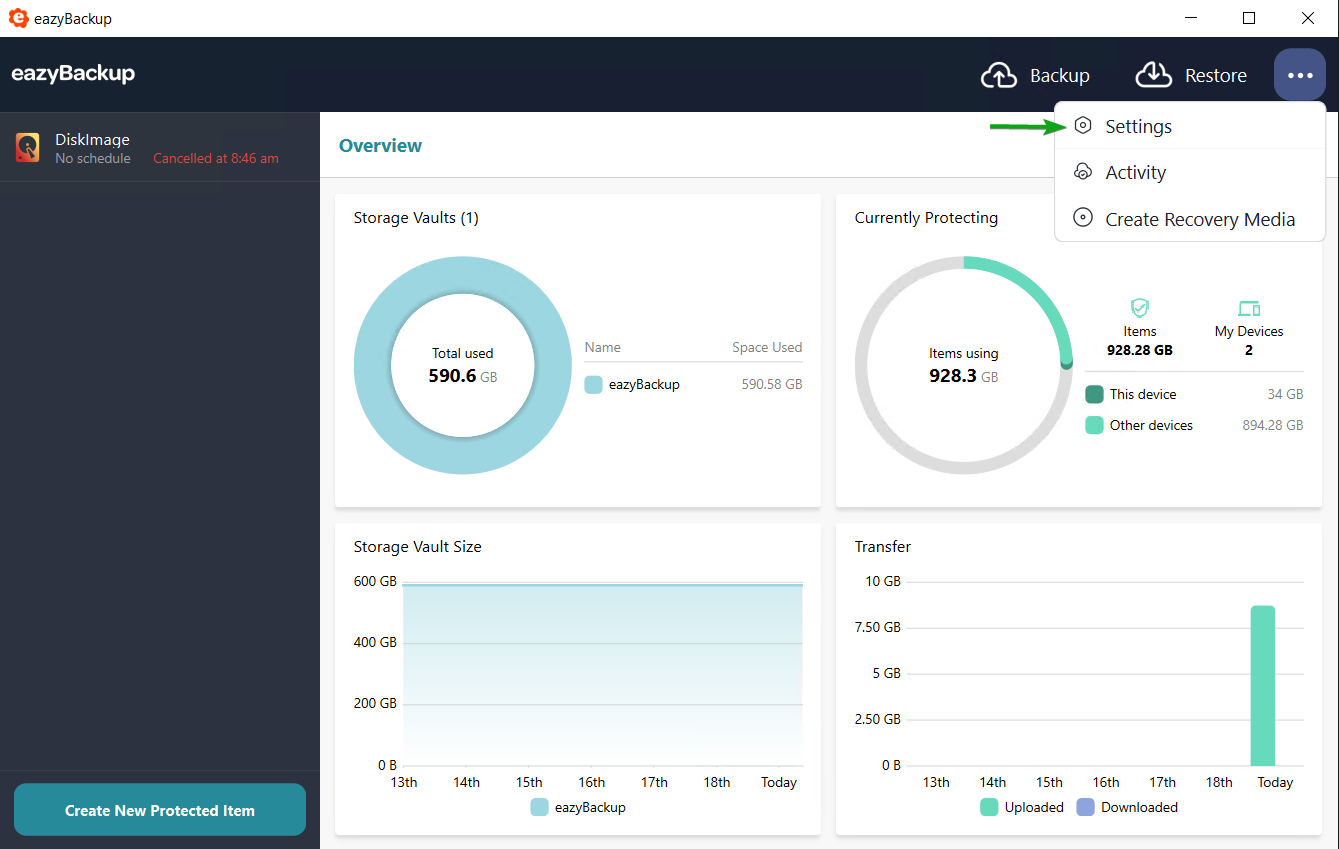
When the task finishes, re-run your backup and confirm the warning message has been resolved. Please contact our support team if you need additional assistance.

{% embed url="<https://eazybackup.com/wp-content/uploads/2019/10/re-index-vault-apply-retention-rules.mp4?_=1>" %}

***

[eazyBackup](https://eazybackup.com)


# Inactive / Abandoned “Running” Jobs

**Error:** `This job was thought to have stopped, but it seems to still be running.`

eazyBackup on the customer PC is responsible for closing-off a job log, there are certain situations where a job would be left in "Running" state indefinitely, for e.g., If the PC is shut down unexpectedly.

#### To clear old, inactive "Running" jobs, you can try the following solution or contact support for assistance:

* **Solution:**
  * The vault in use must be unlocked before new jobs can proceed. Run a retention pass on the storage vault to cancel abandoned / inactive jobs and unlock the vault - From the Settings Panel, right click on the Storage vault in use -> Advanced -> Apply retention rules now<br>

    <figure><img src="https://eazybackup.com/wp-content/uploads/backup-retention-pass.png" alt="" width="563"><figcaption></figcaption></figure>
  * Once the retention pass has been completed, try running a new backup job on the same device.
* If the backup still fails after running the retention pass, please contact support and request the abandoned job to cancelled.&#x20;

***

[eazyBackup](https://eazybackup.com)


# Lost connection to local service

**The following error is displayed when opening eazyBackup:**

`"Lost connection to local service.`\
`Post /auth: open \.\pipe{backup.delegate Background Service}: The system cannot find the file specified."`

This error indicates that the background service (eazyBackup delegate service) is either not running in the background or not present.

#### To resolve this issue, please restart the background services:

From the Windows search box type `services.msc` and open the Services App.

<img src="https://eazybackup.com/wp-content/uploads/2019/11/Services-App.png" alt="" width="563">

Locate the eazyBackup Delegate and Elevator services.

Select each of the services and click the Restart button in the left side menu.

Verify that the service status shows Running after restarting both the delegate and elevator services.
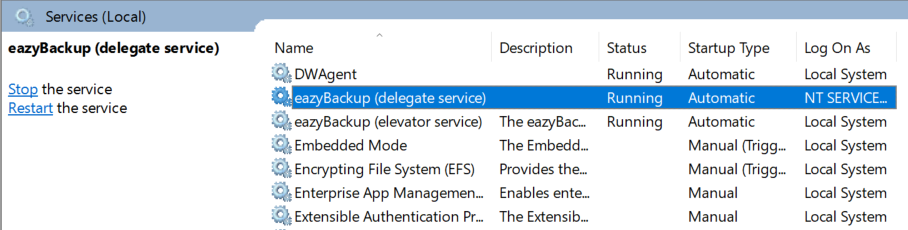
<img src="https://eazybackup.com/wp-content/uploads/2019/11/eazyBackup-Services.png" alt="" width="563">

At this point you should be able to open eazyBackup normally from the start menu shortcut.
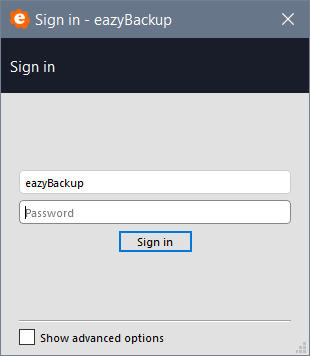
<img src="https://eazybackup.com/wp-content/uploads/2019/11/eazyBackup-login.png" alt="" width="375">

***

[eazyBackup](https://eazybackup.com)


# Lstat: CreateFile \\\\?\UNC\ backup: Access is denied.

`Lstat: CreateFile \\?\UNC\ backup: Access is denied.`

When performing a backup of a network location such as a mapped network drive or UNC path you may receive an error message similar to this in your backup logs.

The error message, "`Lstat: CreateFile \?\UNC\Server\Path: Access is denied`," indicates that there was an error while trying to retrieve information about a file or directory located on a UNC (Universal Naming Convention) network path.

This error message could be due to several reasons, such as:

1. Incorrect login credentials: The network login credentials you supplied in the Protected Item to access the network drive may be incorrect, or the account you used may not have sufficient permissions to access the drive.
2. You have not added network credentials in the Protected Item, and the backup service is unable to access the UNC path without your login credentials.

Please see[ our guide](/guides/how-to-backup-windows-network-shares-and-unc-paths) to backing up network shares. There are some important steps you don't want to miss.

{% content-ref url="/pages/CUu86ODkLS7am2p8wn7r" %}
[How to Backup Windows Network Shares and UNC Paths](/guides/how-to-backup-windows-network-shares-and-unc-paths)
{% endcontent-ref %}

Some additional information on the error -> We frequently get asked about the meaning of Lstat and CreateFile:

**Lstat** and **CreateFile** are functions used in the context of accessing files and directories in Windows and Linux operating systems.

In Windows, the CreateFile function is used to create or open a file or device for reading, writing, or other types of operations.

Lstat is a function used in the Linux operating system to retrieve information about a file or directory, such as its type, size, and permissions.

***

[eazyBackup](https://eazybackup.com)


# Mount path conflict: Can’t mount path inside real directory

Backup reports the following error:

```
Invalid path 'C:\example\path\files': 
Mount path conflict: Can't mount path 'C:\example\path\files' 
inside real directory 'C:\example\'!
```

This issue is caused because both "C:\example\ " and  "C:\example\path\files " are included for backup. Because the former (C:\example\\) is included, there's no need to specially include the latter (C:\example\path\files).

A new version of eazyBackup will have a filter to automatically skip this issue.

For now, you can work around this issue in eazyBackup by editing your protected item -> “items” tab, remove the included location "C:\example\\".

Substitute C:\example\ for your own path.

***

[eazyBackup](https://eazybackup.com)


# OneDrive error “The tag present in the reparse point buffer is invalid”

This warning may appear if you are using the OneDrive Files On-demand feature. If you have chosen to backup the contents of your OneDrive folder, the backup client may be trying to backup placeholder junction files/folder kept by the On-demand feature.

The message: "`The tag present in the reparse point buffer is invalid`" indicates that some of those junction files are likely in a damaged state, this could happen if OneDrive had crashed or terminated improperly at some point.

Usually this can be fixed by running chkdsk.exe from an elevated command prompt by running '`chkdsk c: /f`'.

Be aware that running this repair may require a system reboot.

You may also want to [see this article](/documentation/error-access-to-the-cloud-file-is-denied-backing-up-onedrive) to disable the OneDrive Files On-demand feature so that you can backup files stored on OneDrive:

{% content-ref url="/pages/rZuIDgot6cnH6UywoRKl" %}
[Error “Access to the cloud file is denied” backing up OneDrive](/documentation/error-access-to-the-cloud-file-is-denied-backing-up-onedrive)
{% endcontent-ref %}

***

[eazyBackup](https://eazybackup.com)


# Out of memory

eazyBackup needs RAM to run. The main cause for this is to hold deduplication indexes; therefore the amount of RAM used is proportional to the size of the Storage Vault.

You might see these error messages:

> * runtime: VirtualAlloc of 1048576 bytes failed with errno=1455 on Windows
> * 0x5AF ERROR\_COMMITMENT\_LIMIT: The paging file is too small for this operation to complete. on Windows
> * fatal error: out of memory on all platforms

On Linux, when the system is out of memory (OOM), the kernel "OOM Killer" subsystem will immediately terminate a process of its choosing, to free up memory. If you see an error message like signal: killed in eazyBackup on Linux, this means the process was terminated by a user or a subsystem, that might possibly be the OOM Killer. You can check for this in `dmesg` or `kern.log`.

You can reduce eazyBackup's RAM usage by trying to limit how much data is in each Storage Vault. For instance, instead of having multiple devices backing up into a single Storage Vault, create multiple Storage Vaults for each device. This will reduce the deduplication efficiency, but it will also reduce the necessary memory usage.

### **Other Options**&#x20;

Some trade-offs are possible, that can reduce eazyBackup's memory usage at the expense of other system resource types:

### **Rescan unchanged files**&#x20;

This option causes eazyBackup to read more data from the source disk, reading less data from the Storage Vault into in-memory indexes. This can have a varied impact on RAM usage, and may be positive or negative depending on the shape of your directories.

### **Prefer temporary files instead of RAM**&#x20;

The "Prefer temporary files instead of RAM" option on a backup job schedule will cause eazyBackup to keep indexes in an on-disk database file, instead of a pure in-memory index. The on-disk database file is mapped into pageable memory, that can more easily be reclaimed by the OS when the system is under memory pressure.

Depending on how you measure eazyBackup's memory usage, this option may not immediately appear to have lower memory usage if your measurement includes `mmap` disk sections. However, the resident working set is reduced.

There is a major performance penalty for using this option (approximately 5x or worse) and it is not generally recommended.

Follow these steps to enable the "Prefer temporary files instead of RAM" option&#x20;

* Open the eazyBackup agent
* Select the Protected Item, click 'Configure'
* Select the 'Schedule' tab
* Select and Edit your Schedule
* In the Schedule window, select the Advanced tab
* Enable the Prefer temporary files instead of RAM option&#x20;
* Save changes

<figure><img src="/files/8WBx4fVEHtzCTF6H7ESC" alt="" width="375"><figcaption></figcaption></figure>

***

[eazyBackup](https://eazybackup.com)


# Shared Memory Provider: Could not open a connection to SQL Server

When performing a backup of an MSSQL database, you may receive the following errors in your job logs.

```
Couldn't connect to database: Shared Memory Provider: Could not open a connection to SQL Server [2].
```

```
Couldn't connect to database: [DBNETLIB][ConnectionOpen (Connect()).]SQL Server does not exist or access denied.
```

This article aims to explain how eazyBackup connects connects to MSSQL databases and offer some basic troubleshooting steps.

### **SQL Server Connection Details:**

Connection details should be supplied before selecting databases. eazyBackup will only connect to an SQL Server running on the local machine. You must enter the instance name, or leave the field blank to use the default instance.

### **Server Address:**

The address is always `localhost`, eazyBackup does not use TCP addresses or TCP ports to connect to SQL Server instances. eazyBackup makes use of "Shared Memory" to connect to SQL Server instances.

If you encounter authentication issues connecting to your SQL Server, you must ensure that "Shared Memory protocol" is enabled in SQL Server Configuration Manager.

Open the SQL Server Configuration Manager:

```
Check that you have the Shared Memory protocol enabled
```

<img src="https://eazybackup.com/wp-content/uploads/2021/08/Sql_server_configuartion_manager_protocol_settings.png" alt="" width="563">

### **Drivers**

Ensure you have the correct drivers installed so that eazyBackup can connect to your database.

`OLE DB` and `ODBC` are data access methods that use pluggable "drivers" / "providers" for connecting to databases like SQL Server. The following drivers for `OLE DB` / `ODBC` support SQL Server:

<table><thead><tr><th width="180">Driver</th><th width="166">TLS 1.2 Support</th><th>Notes</th></tr></thead><tbody><tr><td><code>MSOLEDBSQL</code></td><td>Yes</td><td>Included with SQL Server 2016 and 2017; Optional download from <a href="https://www.microsoft.com/en-us/download/details.aspx?id=56730">https://www.microsoft.com/en-us/download/details.aspx?id=56730</a></td></tr><tr><td><code>SQLNCLI11</code></td><td>Yes</td><td>Included with SQL Server 2012 and 2014; Optional download from <a href="https://www.microsoft.com/en-us/download/details.aspx?id=50402">https://www.microsoft.com/en-us/download/details.aspx?id=50402</a></td></tr><tr><td><code>SQLNCLI10</code></td><td>No</td><td>Included with SQL Server 2008</td></tr><tr><td><code>SQLNCLI</code></td><td>No</td><td>Included with SQL Server 2005</td></tr><tr><td><code>SQLOLEDB</code></td><td>No</td><td>Included with SQL Server (all versions); Included with Windows since XP / Server 2003</td></tr></tbody></table>

Find out which drivers you have installed.

* for

  ```
  ODBC, Open the Run dialog and enter odbcad32.exe > check the "Drivers" tab; or
  ```

* for

  ```
  OLE DB, via .
  ```

eazyBackup defaults to using the `MSOLEDBSQL` driver if available. If this driver is not available, the `SQLNCLI11` and `SQLOLEDB` drivers will be used as a fallback. **Authentication** eazyBackup allows you to connect to SQL Server using either Windows authentication or native SQL Server authentication. If you are using SQL Server authentication, you must enter a valid username and password to connect to SQL Server. If you are using Windows authentication, you can either:

* > * enter valid Windows credentials to impersonate that user account; or
  > * leave the field blank, to connect as the logged-on account of the background `backup.elevator` service (normally running as the `LOCAL SYSTEM` Windows user account); or
  > * enter `NT SERVICE\backup.delegate` with no password, to connect as the logged-on account of the background `backup.delegate` service (normally running as the `NT SERVICE\backup.delegate` Windows user account)

In addition, you may assign any Windows user account to have `sysadmin` rights within SQL Server. Multiple instances eazyBackup supports backing up multiple instances from SQL Server. You can select an instance for backup, by entering the instance name in the "Instance Name" field. Leave this field blank to use the default instance. eazyBackup automatically lists available instances for selection in the drop-down menu. **Confirm the SQL Server is running.**

```
All Programs >> Microsoft SQL Server xxxx >> Configuration Tools >> 
SQL Server Configuration Manager >> SQL Server Services, 
check if SQL Server service status is “Running”.
```

<img src="https://eazybackup.com/wp-content/uploads/2021/08/mssql_server_browser_service.png" alt="" width="563">

***

[eazyBackup](https://eazybackup.com)


# VSS Error: Device is not ready

The error message indicating "`Device is not ready`" is a VSS snapshot error.

It indicates that the VSS snapshot may have been destroyed while the backup was in progress. VSS snapshots can be destroyed manually by malware, or by ‘cleanup’ type programs. They can also be destroyed if the device is low on disc space, and the device uses space in the ‘shadow’ area where the snapshot is being put together.

#### Suggested solutions are:

* Check if other software is requesting a VSS snapshot operation at the same time as eazyBackup's request for a VSS snapshot.
* Run the backup again to see if the problem still persists - the issue may have been temporary.
* Check the disk space on the device - low disk space is the most cause and is outside of eazyBackup control.

***

[eazyBackup](https://eazybackup.com)


# VSS Error: Couldn’t take snapshot. The shadow copy provider had an unexpected error while trying ...

The VSS Error: `Couldn’t take snapshot. The shadow copy provider had an unexpected error while trying to process the specified operation`&#x20;

**Common VSS Related Errors:**

`0x800423f4: The writer experienced a non-transient error.`

`0x8004230f: The shadow copy provider had an unexpected error while trying to process the specified operation.`

`0x80042336: The writer experienced a partial failure. Check the component level error state for more information.`

### Suggestions:

1. Start by checking the VSS shadow storage size available on your hard drives. &#x20;
   * Open an elevated command prompt or PowerShell
   * Run the following command to check the current usage:&#x20;

```
vssadmin list shadowstorage
```

<figure><img src="/files/eUx2O0Dg9ZkYKVc3vbEx" alt=""><figcaption></figcaption></figure>

**Used Shadow Copy Storage space:** This shows the amount of storage currently in use by existing shadow copies. If there is  insufficient space when VSS tries to create a new snapshot, the process could fail.

**Adjust the Maximum Storage Size**: Assuming you have free disk space available, you could increase  the maximum size available for shadow copies. You can increase the size with the command: `vssadmin resize shadowstorage`.&#x20;

For example to increase the max size on the C: volume from 3% to 5%:&#x20;

```
vssadmin Resize ShadowStorage /For=C: /On=C: /Maxsize=5%
```

### Check VSS Writers

1. Check the VSS writers' status in an elevated command prompt. If any writer is in a failed state, you may need to restart the associated service or, reboot the system.
   * From an elevated command prompt or PowerShell, run the following command to list all VSS writers and their status: vssadmin list writers

```
vssadmin list writers
```

![](https://eazybackup.com/wp-content/uploads/2021/08/powershell_vssadmin_list_writers.png)

This will provide an list of all VSS writers on your PC. Check the **Last Error** and **State** items.

* The value of **Last Error** should always be **No Error**, if the status is different you have a problem writer.
* The value of **State** should be show \[1] Stable.
* A simple reboot of the PC may resolve this problem. If the issue continues after a reboot, it could indicate a larger issue within the PC.

Some VSS writers may be associated with a Windows service. Restarting the service can often reset the writer and resolve the issue.&#x20;

```
net stop service_name
net start service_name
```

Restart the VSS Service:&#x20;

```
net stop vss
net start vss
```

### Verify that you have free disk space

Ensure that there's enough free disk space on the volumes being backed up and the volume where the shadow copies are stored.

### Check VSS Providers

When there are VSS issues, it’s often due to a problematic or failed VSS writer, which can prevent VSS from creating snapshots.

* Third-party software vendors may install additional VSS providers.
* Problems with third-party providers are a common source of VSS issues. If a non-Microsoft VSS provider is not functioning correctly, it may interfere with VSS operations, causing snapshots to fail.
* You can list all VSS writers and see if any are in an error state by running the following command from an elevated command prompt or PowerShell:

```
vssadmin list providers
```

<figure><img src="https://eazybackup.com/wp-content/uploads/2021/08/powershell_vssadmin_list_providers.png" alt=""><figcaption></figcaption></figure>

If any writer shows a status of `Failed` or `Timed Out`, that writer could be the cause of the VSS failure. Restarting the associated service or rebooting the system can often reset the writer.

4. Shadow storage on the source drives is not configured or not large enough. The shadow storage size can be checked and manually changed through an elevated command prompt or PowerShell:

To check the current shadow storage limits:

```
vssadmin list shadowstorage
```
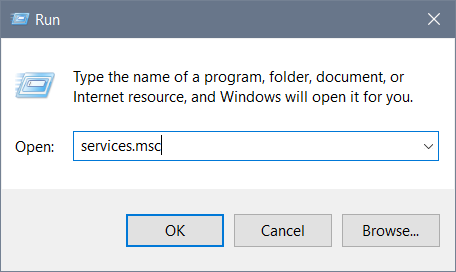
<figure><img src="/files/BTn70yDp7Tem3NUz7qu0" alt=""><figcaption></figcaption></figure>

### Windows Event Logs

Check the Windows Event Logs for error messages or warnings that might be helpful. You can use the Windows Event Viewer or we have provided a PowerShell command below.\
This command will filter events with the source "VSS" or "VolSnap" and displays those with a level of 'Error' or 'Warning':

```
Get-WinEvent -FilterHashtable @{LogName='System'; ProviderName=@('VSS', 'VolSnap'); Level=@(2,3)} | Format-Table TimeCreated, ProviderName, Id, LevelDisplayName, Message -AutoSize
```

### Restarting the VSS Service

Microsoft's VSS is only able to perform one snapshot at a time. If a snapshot is already in progress when your backup job starts, the backup job could fail. Stopping and restarting the Volume Shadow Copy service can resolve this problem. To do this, open an elevated command prompt or PowerShell window and run the following commands:

```
net stop vss
net start vss
```

<figure><img src="https://eazybackup.com/wp-content/uploads/2021/08/powershell_net_start_vss_net_stop_vss.png" alt=""><figcaption></figcaption></figure>

If restarting the VSS service with the '`net stop vss` & `net start vss`' shown above does not resolve the issue, a server reboot has also been known to clean up the snapshot manager correctly.

* Having multiple backup products installed has been known to cause this error. Many backup solutions have their own proprietary snapshot manager which can cause conflicts with other backup solutions installed on the system.
* VSS snapshots have been known to fail because an advanced format drive is connected to the machine.\
  <https://docs.microsoft.com/en-us/troubleshoot/windows-server/backup-and-storage/support-policy-4k-sector-hard-drives>

***

[eazyBackup](https://eazybackup.com)


# Windows Backup encountered an error when writing data to the backup target.

During a Windows System Backup this error may appear in your job log:

`Windows Backup encountered an error when writing data to the backup target.`

The backup error is indicating that the Spool volume was not accessible, or there was an error writing to that device. This could mean the drive was detached or went offline, the spool device may be a failing. If this is a an external device check your USB cable.

If you are certain your spool volume is attached and working normally, run your back up again and see if the issues re-occurs. please contact support for additional assistance.

***

[eazyBackup](https://eazybackup.com)


# Error “Access is denied” when backing up files and folders on Windows

An "Access Denied" error message means that the Windows user account running the backup job does not have access to read the file content.

Current versions of eazyBackup automatically create a service account with all necessary permissions to read local files. If you are experiencing "Access Denied" errors you may be trying to back up a network path that has been mounted as a directory. Please see the "Accessing Windows network shares and UNC paths" article for more information.

#### If you are experiencing "Access Denied" errors and you are certain that you are not backing up a mounted network path, you may need to change the eazyBackup Delegate service log-on user.

Press Windows Key + R to open the Run box.

Type `services.msc`, press OK.

<img src="https://eazybackup.com/wp-content/uploads/2019/09/explorer_Q4HxhTCSlg.png" alt="" width="563">

In the list of services, locate the eazyBackup Delegate service. Double click to open.
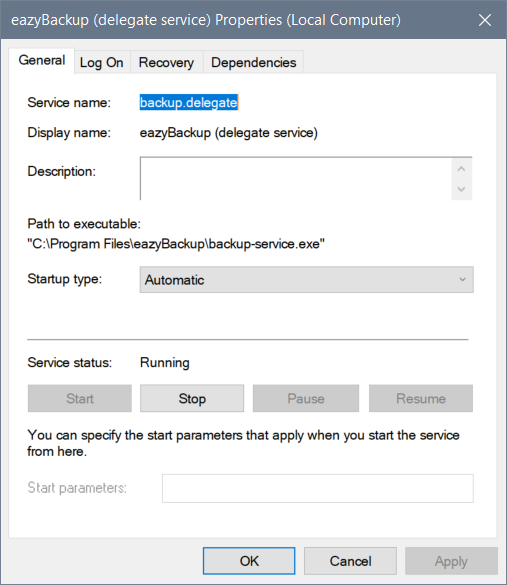
<img src="https://eazybackup.com/wp-content/uploads/2019/09/mmc_55RFaR35HB.png" alt="" width="563">

From the Log On tab, you will need to change the 'This account' user from eazybackup.delegate to an admin user that has read permission to your selected files.
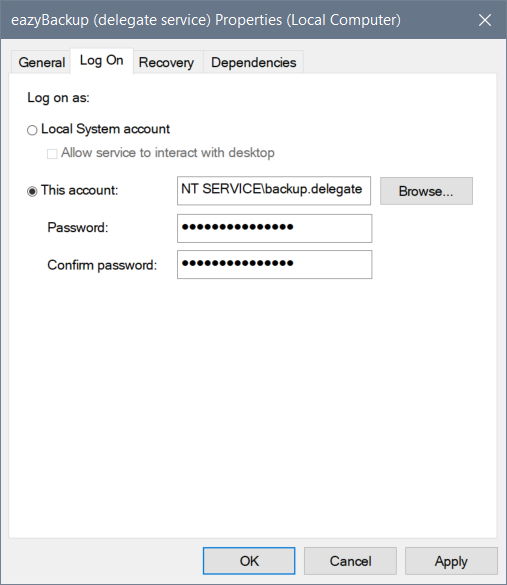
<img src="https://eazybackup.com/wp-content/uploads/2019/09/mmc_Er6xlhhJlf.png" alt="" width="563">

Enter the password for your admin account, press OK to confirm the changes.
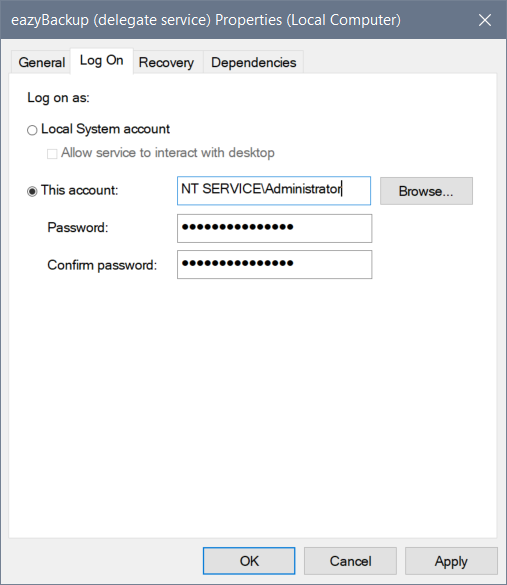
<img src="https://eazybackup.com/wp-content/uploads/2019/09/mmc_IWm7PKqkj8.png" alt="" width="563">

Restart the service for your changes to take effect.
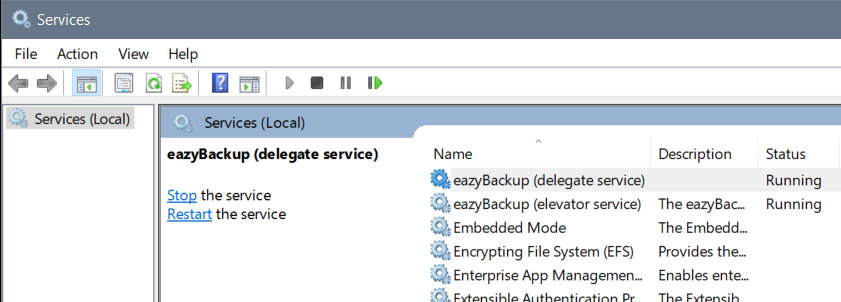
<img src="https://eazybackup.com/wp-content/uploads/2019/09/mmc_TfsK9Mfley.png" alt="" width="563">

***

[eazyBackup](https://eazybackup.com)


# Error “local error: tls: record overflow”

This message means the connection was corrupted over the network, and eazyBackup aborted the connection.

This can happen because of random network conditions. Retrying the operation should fix the issue.

If the issue keeps happening repeatedly, this message indicates that something is interfering with packets in your network.

* Failing NIC
* Bad NIC driver or driver configuration
* Failing RAM, on either the endpoint machine or any of the intermediate routers
* Outdated firewall or proxy, performing incorrect SSL interception

For more information, please see the record\_overflow section in [IETF RFC 5246](https://tools.ietf.org/html/rfc5246#page-31).

***

[eazyBackup](https://eazybackup.com)


# Microsoft SQL Server backup encountered a VDI error

You should ensure that the necessary VDI `.dll` files are registered and are the correct version for your SQL Server installation. You can use [Microsoft SQL Server Backup Simulator](https://github.com/Microsoft/tigertoolbox/releases/) to check the status of the VDI `.dll` files.

***

[eazyBackup](https://eazybackup.com)


# Troubleshooting Network Connectivity Errors

### Overview

eazyBackup transfers your data to your Storage Vault over an encrypted HTTPS connection. During a backup, the agent opens multiple parallel connections to eazyBackup's servers and keeps them open for the duration of the job. If anything on the path between your device and our servers interrupts those connections — a firewall, a security appliance, an unstable internet link, or a DNS problem — the backup job will fail with a network connectivity error.

This article explains what these errors mean, how to narrow down where the problem is occurring, and how to resolve the most common causes.

### Common Error Messages

You may see one or more of the following messages in your backup job log:

| Error message                                                                                    | What it usually indicates                                                                                                                                                                          |
| ------------------------------------------------------------------------------------------------ | -------------------------------------------------------------------------------------------------------------------------------------------------------------------------------------------------- |
| `wsarecv: An existing connection was forcibly closed by the remote host`                         | An open connection was terminated mid-transfer by a device between you and eazyBackup — commonly a firewall/UTM appliance, a multi-WAN router switching internet links, or an unstable connection. |
| `wsasend: ...`                                                                                   | Same as above, but the interruption occurred while sending data.                                                                                                                                   |
| `tls: failed to verify certificate: x509: certificate signed by unknown authority`               | A firewall or security appliance on your network is performing SSL/TLS inspection and replacing eazyBackup's certificate with its own. See SSL/TLS Inspection below.                               |
| `dial tcp: lookup [...]: no such host`                                                           | DNS failure — your device could not resolve the eazyBackup server hostname to an IP address.                                                                                                       |
| `connectex: A connection attempt failed because the connected party did not properly respond...` | The connection to the server could not be established at all — typically a firewall block, an outbound port restriction, or an internet outage.                                                    |
| `net/http: request canceled (Client.Timeout exceeded while awaiting headers)`                    | The server did not respond in time — often caused by severe packet loss, a saturated internet connection, or a proxy delaying traffic.                                                             |
| `Couldn't save data chunk: context canceled`                                                     | A follow-on message: after one upload thread fails, the agent cancels the remaining threads. Look earlier in the log for the original error.                                                       |
| `HTTP/1.x transport connection broken`                                                           | An established connection was dropped mid-request by a device on the network path.                                                                                                                 |

The agent automatically retries failed transfers several times before giving up, so a single error in a log does not always mean the job failed — check the final job status.

### eazyBackup Service Endpoints

Your device must be able to reach the following endpoints outbound on **TCP port 443 (HTTPS/TLS)**. No other ports or protocols are required.

| Hostname                         | IP address    | Port    |
| -------------------------------- | ------------- | ------- |
| `csw.eazybackup.ca`              | 45.45.161.146 | TCP 443 |
| `csw.obcbackup.com`              | 45.45.161.146 | TCP 443 |
| `s3.ca-central-1.eazybackup.com` | 45.45.161.149 | TCP 443 |

If your firewall supports it, whitelist by **hostname**; otherwise, allow outbound TCP 443 to **45.45.161.146**. and **45.45.161.149**

***

### Quick Checks First

Before deeper troubleshooting, try these steps — they resolve a large percentage of network errors:

1. **Retry the backup.** Many network errors are temporary. A repeated backup job will also usually run faster, because data chunks that were already uploaded do not need to be sent again. (Any unused chunks left behind by a failed job are cleaned up automatically by the next retention pass.)
2. **Reboot your router/modem.** Consumer and small-business routers can run out of resources when handling a large number of simultaneous connections. A reboot clears the connection table.
3. **Check whether the error occurs at a consistent time of day.** If backups only fail during business hours or during known heavy-usage periods, your internet connection may be congested. Try rescheduling the backup to a quieter time.
4. **Check for recent network changes.** New firewall, new ISP, new security software, or a firmware update on a UTM appliance immediately before the errors began is a strong lead.

If the problem persists, work through the steps below to narrow down where the connection is failing.

***

### Step 1: Check Your Device Status in the Client Area

Log in to the client area at [https://accounts.eazybackup.ca](https://accounts.eazybackup.ca/) and open the **Dashboard**:

**<https://accounts.eazybackup.ca/index.php?m=eazybackup\\&a=dashboard>**
Check whether your device shows as **Online**.

* **Device is Offline:** The agent cannot reach eazyBackup at all. Focus on Steps 2 and 3 below (DNS and basic connectivity), and verify your firewall allows outbound TCP 443 to the endpoints listed above.
* **Device is Online, but backups fail:** This is an important clue. It means your device *can* connect to eazyBackup — the live control connection is working — but the high-volume data connections to the Storage Vault are being interrupted. This pattern points strongly at an SSL/TLS inspection appliance, a multi-WAN router, or connection instability under load rather than a simple firewall block. Continue to Steps 4–6.

You can also review your full backup job history and logs in the client area, which helps identify whether failures are constant or intermittent, and whether they always occur at the same point in the job.

#### Reading the job log

The job log shows exactly how far the backup got before failing. For example:

```
12:00:01  I  Looking up account settings...
12:00:01  I  Running backup rule Company Every Hour
12:00:01  I  Checking connection to Storage Vault...
12:00:02  I  Finding backup job(s) in Storage Vault...
12:00:11  E  snapshots: Loading snapshot: read tcp 10.16.2.4:62380->45.45.161.146:443:
             wsarecv: An existing connection was forcibly closed by the remote host.
```

In this example, the device successfully looked up its account settings and began communicating with the Storage Vault — so DNS, routing, and the firewall rule are all working. The connection was then **forcibly closed mid-session**, which points at something on the network path interrupting established connections (see Steps 4 and 5).

***

### Step 2: Verify DNS Resolution

If your log shows `no such host` errors, your device cannot resolve eazyBackup hostnames.

**Windows** (Command Prompt):

```
nslookup csw.eazybackup.ca
```

**macOS / Linux** (Terminal):

```
dig +short csw.eazybackup.ca
```

or

```
nslookup csw.eazybackup.ca
```

The result should return **45.45.161.146**.

* **No result / timeout:** Your DNS server is failing. Try switching your device (or router) to a public DNS resolver such as `1.1.1.1` or `8.8.8.8` and re-test.
* **A different IP is returned:** A DNS filter, proxy, or security product may be intercepting DNS. Check any DNS-filtering services (Pi-hole, OpenDNS/Umbrella, firewall DNS filtering) for a block or override on eazyBackup domains.

***

### Step 3: Test Basic Connectivity on Port 443

Confirm your device can open a TCP connection to the backup servers.

**Windows** (PowerShell):

```powershell
Test-NetConnection csw.eazybackup.ca -Port 443
```

Look for `TcpTestSucceeded : True`.

**macOS / Linux** (Terminal):

```
nc -vz csw.eazybackup.ca 443
```

or

```
curl -v https://csw.eazybackup.ca --connect-timeout 10
```

* **Connection succeeds:** Basic reachability is fine — continue to Step 4.
* **Connection fails or times out:** An outbound firewall rule, proxy requirement, or ISP/network outage is blocking the connection. Verify that outbound TCP 443 to the endpoints in the table above is permitted, and test from another device on the same network to see whether the problem is device-specific or network-wide.

***

### Step 4: Check for SSL/TLS Inspection

**This is one of the most common causes of backup connection failures on business networks.**

Firewalls and Unified Threat Management (UTM) appliances — for example, FortiGate models such as the 40F or 70F, as well as SonicWall, Sophos, WatchGuard, and similar devices — often perform **SSL/TLS inspection (deep packet inspection)**. To scan encrypted traffic, the appliance intercepts the connection and presents its **own certificate** to the backup software instead of eazyBackup's certificate.

The eazyBackup agent does not trust the appliance's certificate and terminates the connection. This typically appears in the log as:

```
Can't access Storage Vault: Retried 3 times over 0:04:
Post "https://csw.eazybackup.ca/api/v1/bucket/checkauth":
tls: failed to verify certificate: x509: certificate signed by unknown authority
```

Even when full inspection isn't enabled, IPS/application-control features on these appliances can silently reset long-lived encrypted connections mid-transfer, producing `wsarecv: An existing connection was forcibly closed by the remote host` errors instead.

**How to verify:**

**Windows** (PowerShell):

```powershell
$tcp = New-Object Net.Sockets.TcpClient('csw.eazybackup.ca', 443)
$ssl = New-Object Net.Security.SslStream($tcp.GetStream())
$ssl.AuthenticateAsClient('csw.eazybackup.ca')
$ssl.RemoteCertificate | Format-List Subject, Issuer
```

**macOS / Linux** (Terminal):

```
openssl s_client -connect csw.eazybackup.ca:443 -servername csw.eazybackup.ca < /dev/null 2>/dev/null | openssl x509 -noout -issuer -subject
```

If the certificate **issuer** shows your firewall vendor or your own organization (e.g., `FortiGate`, `Fortinet`, your company's internal CA) instead of a public certificate authority, SSL inspection is intercepting the connection.

**How to resolve:**

Ask your network administrator to **exempt the eazyBackup endpoints from SSL/TLS inspection** (and from IPS/application-control profiles if resets continue). Create an exemption for:

* `csw.eazybackup.ca`
* `csw.obcbackup.com`
* `s3.ca-central-1.eazybackup.com`

or by destination IP: `45.45.161.146` on TCP 443.

Backup traffic is already encrypted end-to-end with AES-256 before it leaves your device, so exempting it from inspection does not reduce your security posture.

***

### Step 5: Check for Multi-WAN Routers and Load Balancing

If your site has **two or more internet connections** behind a dual-WAN router or SD-WAN appliance, load balancing or unstable failover can break backups.

A backup job holds connections open for minutes or hours. If the router shifts outbound traffic from one internet link to the other mid-job — because of load balancing policy or a link flapping up and down — your device's public IP address changes, the established connections to the Storage Vault break, and the job fails with `An existing connection was forcibly closed by the remote host`.

**How to spot it:**

* Your device's connection history shows it connecting from **multiple different public IP addresses** within a short time window. (Our support team can confirm this for your account — see Contacting Support below.)
* Backups fail intermittently at unpredictable points in the job, while short operations (device shows Online, small jobs) succeed.

**How to resolve:**

Ask your network administrator to create a **policy route / persistence rule** on the router that pins all traffic destined for **45.45.161.146 (TCP 443)** to a single WAN interface. Most dual-WAN routers (FortiGate SD-WAN rules, pfSense policy routing, Peplink outbound policy, etc.) support per-destination rules. If one of your links is unstable, also review the failover health-check settings so the router isn't flapping between links unnecessarily.

***

### Step 6: Test for Packet Loss and Connection Instability

If the previous steps check out but backups still fail intermittently, measure the quality of the connection.

#### Ping test

**Windows** (Command Prompt):

```
ping -n 100 csw.eazybackup.ca
```

**macOS / Linux** (Terminal):

```
ping -c 100 csw.eazybackup.ca
```

Review the summary at the end. **0% packet loss** is the goal; even 1–2% loss can cause failures on large, long-running transfers. Also note the latency — consistent round-trip times are good; wildly varying times suggest congestion or an unstable link.

To identify *where* loss occurs on the path:

**Windows:**

```
pathping csw.eazybackup.ca
```

**macOS:**

```
traceroute csw.eazybackup.ca
```

**Linux** (if installed):

```
mtr csw.eazybackup.ca
```

Loss at the first hop points at your local network or router; loss beyond that points at your ISP.

#### TCP retransmission test (Windows)

This measures how many packets had to be re-sent during an actual backup:

1. Open Command Prompt and run:

   ```
   netstat -s -p tcp
   ```

   Note the current values of **Segments Sent** and **Segments Retransmitted**.
2. Run a manual backup and wait for it to finish (or fail).
3. Run the same command again and compare. Divide the increase in retransmitted segments by the increase in sent segments to get the retransmission rate during the backup.

**macOS:**

```
netstat -s -p tcp | grep -i retrans
```

**Linux:**

```
nstat -az TcpRetransSegs TcpOutSegs
```

A retransmission rate **under 1%** is normal. Rates of several percent or higher indicate packet loss on the path — typically a saturated upload link, Wi-Fi interference, faulty cabling, or an ISP issue.

**Common fixes:**

* Use a **wired connection** instead of Wi-Fi for the backup device if possible.
* Enable **bandwidth throttling** in the eazyBackup agent so the backup doesn't saturate your upload link (a saturated link drops packets).
* Reduce the backup's **concurrent connections** if your router struggles with many simultaneous streams.
* If loss appears beyond your router in the path tests, contact your ISP with the results.

***

### Step 7: Check Local Security Software, Proxies, and VPNs

Software on the device itself can also interfere with backup connections:

* **Antivirus / endpoint protection with HTTPS scanning:** Products that scan encrypted web traffic behave just like the SSL-inspecting firewalls in Step 4. Add exclusions for the eazyBackup agent application and the three endpoints listed above.
* **Proxy servers:** If your network requires a proxy for internet access, confirm the backup agent's proxy settings are configured, or exempt the eazyBackup endpoints from the proxy.
* **VPN clients:** A VPN that routes all traffic through a remote gateway adds latency and another point of failure. Test with the VPN disconnected, or configure a split-tunnel exception for `45.45.161.146`.

***

### Contacting Support

If you've worked through these steps and backups are still failing, our team is happy to dig in. Please open a ticket from the client area at [https://accounts.eazybackup.ca](https://accounts.eazybackup.ca/) and include:

1. The **account name and device name** affected.
2. The **full job log** from a recent failed backup (Job Logs → Report in the Control Panel).
3. The **date and time** the failures began, and whether they're constant or intermittent.
4. The results of any tests from this article you've run (ping/packet loss results, certificate issuer check, `Test-NetConnection` output).
5. Details about your network: firewall/UTM make and model, whether SSL inspection is enabled, and whether the site has more than one internet connection.

With this information, we can compare against our server-side connection logs — including which public IP addresses your device has been connecting from — and usually pinpoint the failure point quickly.


# How to Locate All EFS Encrypted Files for Windows 10 and Server

On occasion, an EFS certificate may be issued to your domain user account. You may never have even knowingly used EFS, but if a certificate has been issued there are usually some EFS encrypted files on the system drive.

Encrypting File System is a technology that allows users to encrypt files, EFS was introduced in Windows long before BitLocker and is typically no longer in use. EFS is sometimes enabled by default, in this situation users can self-encrypt files without having implemented procedures that will allow them to recover the files when needed.

### Locating EFS Encrypted Files

Most users have never knowingly used EFS and do not know where these EFS encrypted files are located.

Fortunately, there is a utility included with Windows that can help us locate these files. From an elevated command prompted you need to run the following command.

To easily open the Command Prompt with admin privileges. Press Windows+R to open the “Run” box. Type “`cmd`” into the box and then press Ctrl+Shift+Enter to run the command as an administrator.

<img src="https://eazybackup.com/wp-content/uploads/2021/05/Open-Command-Prompted-with-Admin-Privlages.png" alt="" width="563">

**Ctrl+Shift+Enter** to run the command as an administrator

In your command window, move to the root of your system drive.&#x20;

Type the command:

```
cd\ 
```

Once you are at C:\ you can run the cipher utility with the following command.

```
cipher /u /n /h
```

This command will generate a list of all of the EFS encrypted files. The search process is recursive so it will look through sub-directories as well. We are including the /n switch to prevent cipher from triggering an update on the file which means that it will not try to use or renew the EFS certificate on the file. This is important where you may not have permissions to currently access the files but only traverse directory permissions.
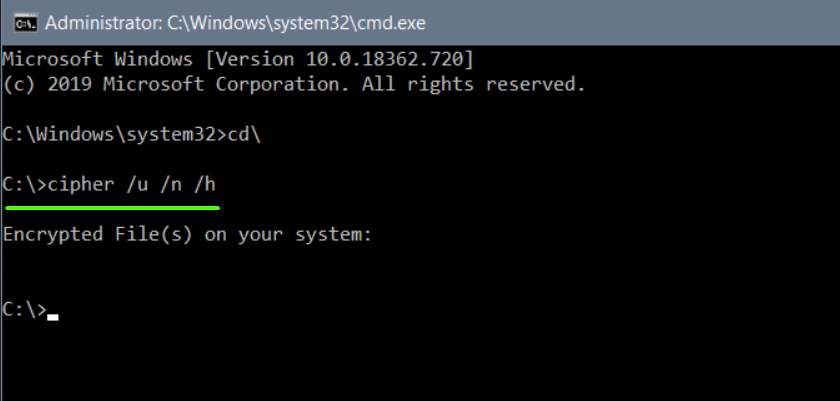
<img src="https://eazybackup.com/wp-content/uploads/2021/05/search_efs_files.png" alt="" width="563">

When the process is complete, Cipher will display a list of encrypted files with their locations.

If there are no files listed as shown in the example above, you do not have any EFS encrypted files on your system drive.

### Disable EFS via Group Policy

If you want to prevent any new EFS encrypted files from appearing, you can easily do this with Group Policy editor.

Press Windows+R to open the “Run” box. Type “`gpedit.msc`” and press enter.
<img src="https://eazybackup.com/wp-content/uploads/2021/05/Run-group-policy-editor.png" alt="" width="563">

In the Group Policy Editor navigate to

```
Computer Configuration > Windows Settings > Security Settings > Public Key Policies
```

Right-click on the **Encrypting File System** folder in the left side navigation area. Select **Properties** and In the EFS Properties window choose "**Don't allow**", Click OK. This will disable the ability for users to use EFS.
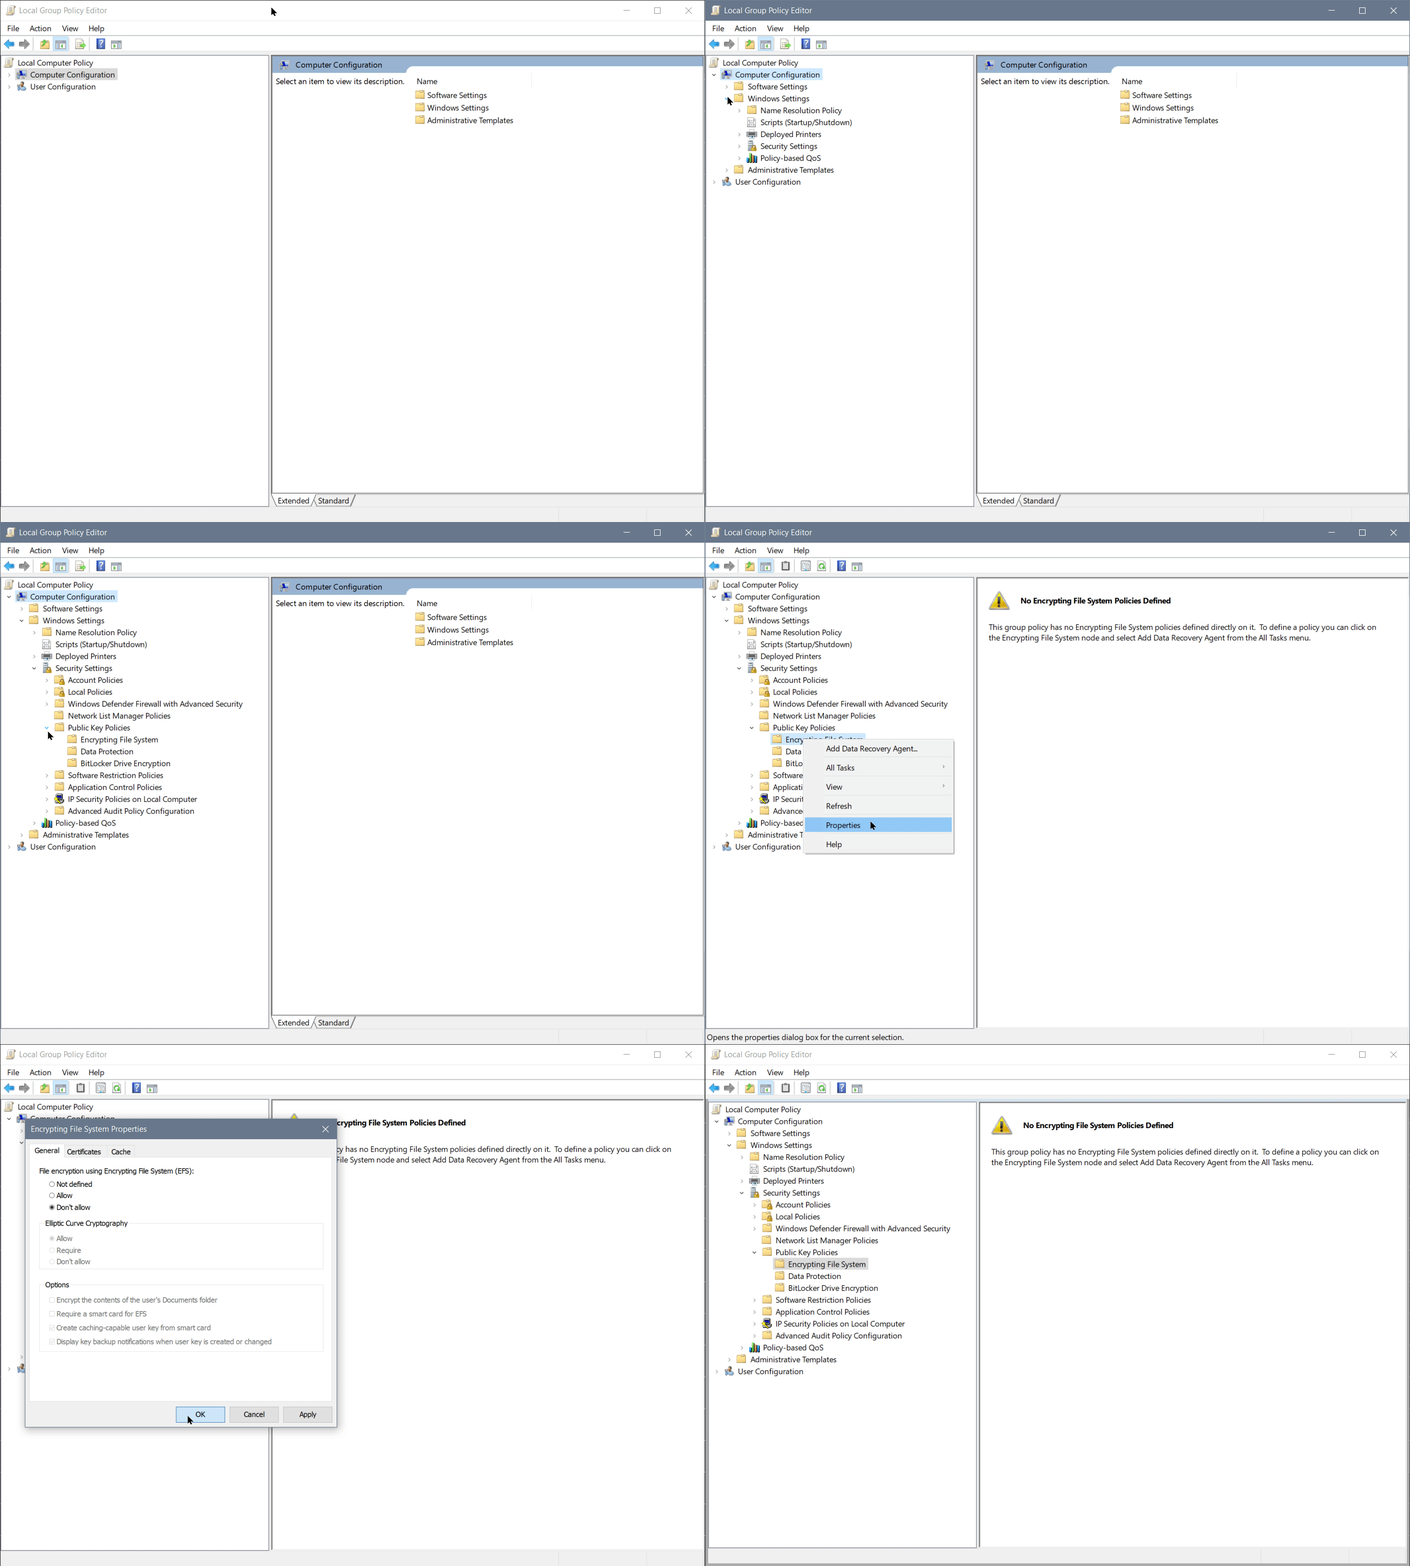
<img src="https://eazybackup.com/wp-content/uploads/2021/05/How-to-disable-EFS-Encryption.gif" alt="" width="563">

***

[eazyBackup](https://eazybackup.com)


# Couldn’t save folder details: fs.TempFile: Access is denied

This error is likely related to the eazyBackup delegate service user having insufficient permissions to to access one of the default temp folder locations.

You will need to switch the eazybackup.delegate service user on this device to use the local system account, or another Windows user of your choice, such as your own account.

* Open Windows Services: Press the Windows Key + R
* In the Run dialog box type `Services.msc`, press enter
<img src="https://eazybackup.com/wp-content/uploads/2023/03/Run-Command-Windows-Services.png" alt="" width="563">

* In the list of Windows Services, locate eazyBackup.Delegate
* Right click on the eazyBackup.Delegate service, select properties
* Click on the Log On tab
* Select Log on as: Local System account - or another Windows user of your choice
* Click OK
* Right click on the eazyBackup.Delegate, select Restart
* Run a backup to confirm the issue is resolved
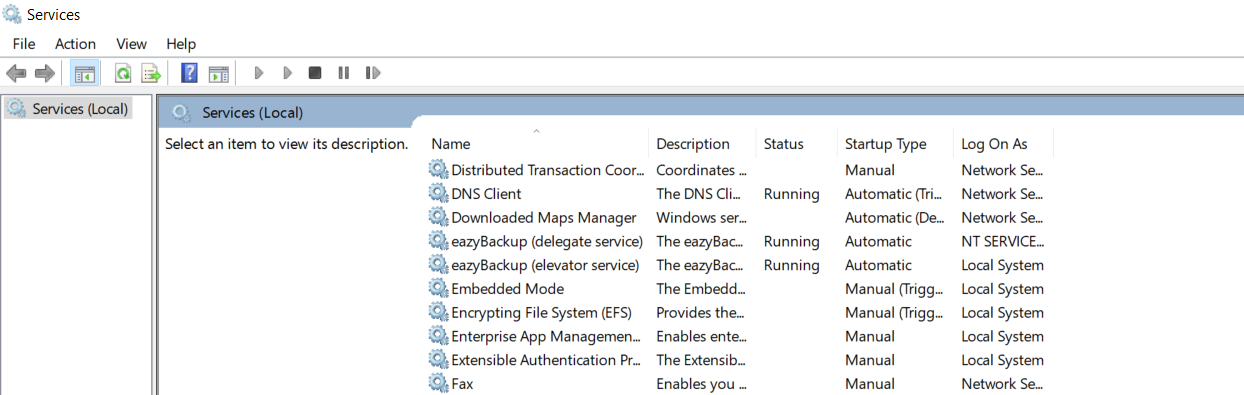
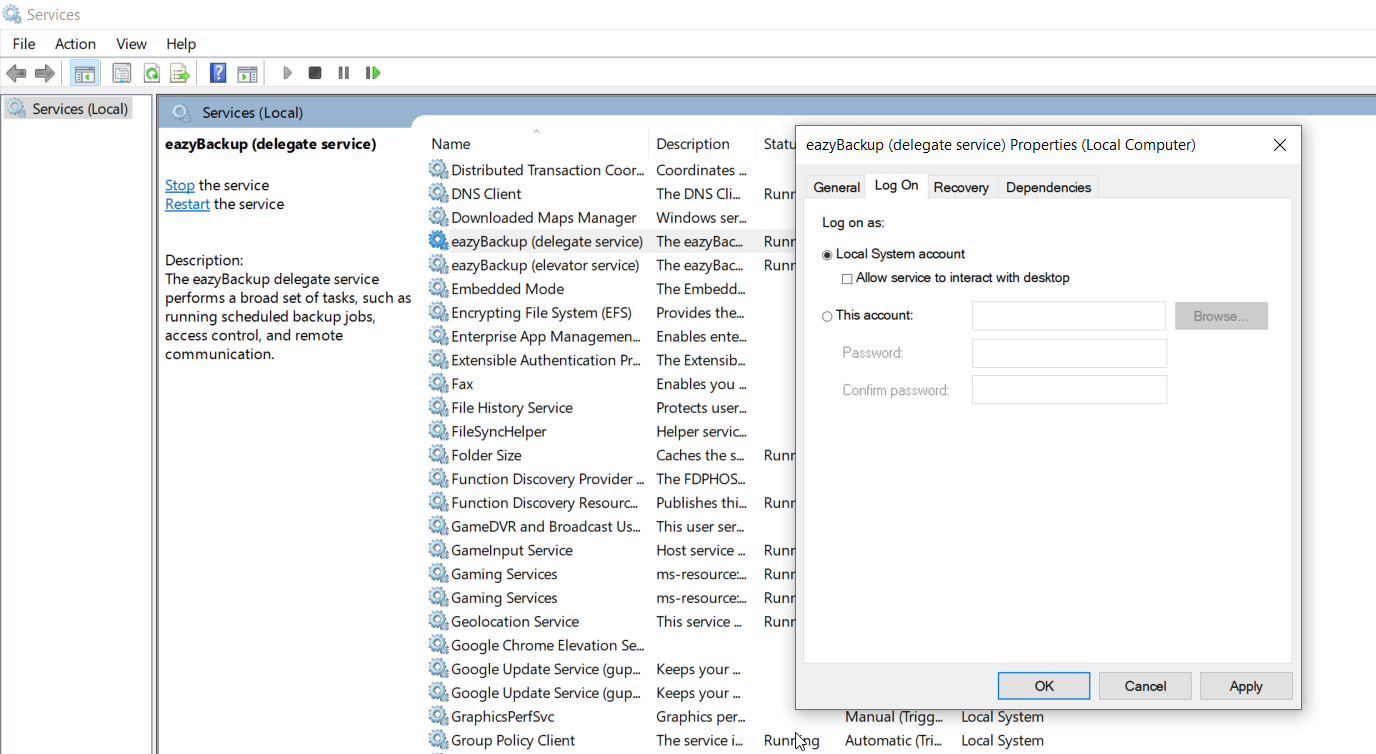
<img src="https://eazybackup.com/wp-content/uploads/2023/03/eazyBackup-Services.png" alt="" width="563">

<img src="https://eazybackup.com/wp-content/uploads/2023/03/eazyBackup.Delegate-Service-Log-On-User.png" alt="" width="563">

***

[eazyBackup](https://eazybackup.com)


---

[Next Page](/llms-full.txt/1)